This post is the third part of the series “Building a Robust Shipping Container Number Vision Recognition System”, we will focus on the training, building up the workflow, deployment and key takeaways. You can find all parts here:
Part 1: Task, Challenges, Design of the System
Part 2: Tools, Image Annotation, Data Preparation
Part 3: Training, Build up the Workflow, Deployment, Takeaways
Training
In the last post, we have prepared the training data for the four models, one YOLOv8 for container number detection, one YOLOv8 for character detection, and two PaddleOCR recognition for container number recognition. It’s time to train the models.
YOLOv8 Detection Training/Finetuning
YOLOv8 training is straightforward and easy to do, actually we should call it finetuning instead of training, because we are using the pre-trained model and only finetune the model on our own data. There are two different YOLO models to train. The training process is the same for both models. Before proceeding, we recap the directory structure of the training data:
yolov8_det_data
├── data.yaml
├── train
│   ├── images
│   │   ├── t000001.jpg
│   │   ├── t000002.jpg
│   │   ├── ...
│   │   └── t00000n.jpg
│   └── labels
│       ├── t000001.txt
│       ├── t000002.txt
│       ├── ...
│       └── t00000n.txt
└── valid
    ├── images
    │   ├── v000001.jpg
    │   ├── v000002.jpg
    │   ├── ...
    │   └── v00000n.jpg
    └── labels
        ├── v000001.txt
        ├── v000002.txt
        ├── ...
        └── v00000n.txt
Training Environment (Google Cloud):
- NVIDIA V100 GPU (16GB) x 1, 16 cores CPU, 64GB RAM
- Google Deep Learning VM with Debian 11, CUDA 11.8, PyTorch 2.0, Python 3.10 preinstalled
- Install YOLOv8 using command
pip install ultralytics
data.yaml is the configuration file for YOLOv8 training.
Here is the content of data.yaml for character detection:
train: ../train/images
val: ../valid/images

nc: 1
names: ['char']
Here is the content of data.yaml for container number detection:
train: ../train/images
val: ../valid/images

nc: 4
names: ['CN', 'CN_ABC', 'CN_NUM', 'TS']
Once you have the data.yaml and the training data prepared, you can start the training by running the following command, same for both models:
$ cd yolov8_det_data
$ yolo task=detect mode=train model=yolov8s.pt data=data.yaml epochs=1200 imgsz=640
In the above training command, yolov8s.pt is the pre-trained model provided by the YOLOv8 team (yolov8n.pt, yolov8m.pt, yolov8l.pt, yolov8x.pt are also available). The nano model yolov8n.pt is the smallest and fastest, but with less accuracy. We tested all the models and found that small model yolov8s.pt is the best choice for these two detection tasks, the two tasks is not very complex.
The epoch number is set to 1200, looks a bit large, but no worries, we can stop the training manually (press Ctrl+C) if we determine that the model has converged sufficiently. The best model will be saved automatically. We also can resume the training from the last checkpoint again. You can click here to check all the YOLOv8 train settings.
For the character detection small model, total training images are about 10K. With less than 100 epochs of training, the model almost converges, achieving mAP50-95 above 0.9. On our test set, the model’s accuracy is perfect, nearly 100%. Obviously, this task is very easy.
For the container number detection small model, total training images are about 100K. With a bit more than 100 epochs of training, the model almost converges, achieving mAP50-95 above 0.9. On our test set, the model’s accuracy is about 99.98%, which is good for us. We checked the failure cases, human eyes are also hard to recognize.
After the training, we can get best.pt in weights directory, which is the best model. We can use this model for inference.
PaddleOCR Recognition Training/Finetuning
Oct 2023 Update: orginal two recogniton algorithms we used were ABINet and SVTR, now the two algorithms are ABINet and CPPD. CPPD (Context Perception Parallel Decoder) provides much better accuracy and robustness in our test.
The training of PaddleOCR recognition is a little bit more complex than YOLOv8. The system has two recognition models using different algorithms (click here if you do not know why), one is ABINet, the other is CPPD. The training process is almost same for both models. Before proceeding, we recap the directory structure of the training data:
paddleocr_rec_data
├── PaddleOCR
├── config
│   ├── rec_r45_abinet.yml
│   ├── rec_svtrnet_cppd_base_en.yml
│   └── en_dict.txt
├── pretrain_model
│   ├── abinet
│   │   └── abinet_pretrained.pdparams
│   └── cppd
│       └── cppd_pretrained.pdparams
├── rec_eval_label.txt
├── rec_train_label.txt
├── RecTrainData
│   ├── t000001_text.jpg
│   ├── t000002_text.jpg
│   ├── ...
│   └── t00000n_text.jpg
└── RecEvalData
    ├── v000001_text.jpg
    ├── v000002_text.jpg
    ├── ...
    └── v00000n_text.jpg
Training Environment (Google Cloud):
- NVIDIA V100 GPU (16GB) x 3, 16 cores CPU, 64GB RAM
- Google Deep Learning VM with Python 3.7, CUDA 11.3 preinstalled
- Install packages:
pip install paddlepaddle-gpu==2.5.1 paddleocr
The dictionary file en_dict.txt (click here to view) defines the scope of characters the model should recognize. rec_r45_abinet.yml(click here to view) is the configuration file for ABINet recognition training. rec_svtrnet_cppd_base_en.yml(click here to view) is the configuration file for CPPD recognition training. The parameter should be easy to understand and configure. You may need to pay more attention to all the paths in the configuration file, make sure all the paths are correct.
SimpleDataSet configuration is used in training. Default architecture backbone is ResNet45 for ABINet, and SVTRNet for CPPD. If you have enough data and want to try other backbones, you can modify the configuration file and train from scratch. The PaddleOCR team provides very good pretrained models, we used the pretrained models (ABINet pretrained model, CPPD pretrained model) as the initial model and finetune on our own data, which saved us a lot resources.
There is one more important point to mention, PaddleOCR folder contains all the PaddleOCR source code, you need to clone or download it, it’s necessary to be there, because the training process will use the code to load some configuration. You can choose PaddleOCR version 2.8 or 2.7.1, older versions might not work.
Once we have the dictionary file, the configuration files, the pretrained models, and the training data (images + labels) prepared, we can start the training by running the following command:
$ cd paddleocr_rec_data
# for ABINet, single GPU
$ python PaddleOCR/tools/train.py -c config/rec_r45_abinet.yml
# for CPPD, single GPU
# python PaddleOCR/tools/train.py -c config/rec_svtrnet_cppd_base_en.yml
# for ABINet, multi-GPU (3 GPUs)
# python -m paddle.distributed.launch --gpus "0,1,2" PaddleOCR/tools/train.py -c config/rec_r45_abinet.yml
# for CPPD, multi-GPU (3 GPUs)
# python -m paddle.distributed.launch --gpus "0,1,2" PaddleOCR/tools/train.py -c config/rec_svtrnet_cppd_base_en.yml
In the above training command, paddle.distributed.launch is to enable multi-GPU training. The training process took a very long time, the recognition model is more complex than the detection model. We also can stop the training manually if we determine that the model has converged sufficiently. The best model will be saved automatically. We also can resume the training from the last checkpoint again.
After finishing the training, we can get the best model in the output directory, but the model is not the final model we can use for inference. We need to convert the model to the inference model using the following command:
# for ABINet
$ python PaddleOCR\tools\export_model.py -c config\rec_r45_abinet.yml -o Global.pretrained_model=".\output\r45_abinet\best_accuracy" Global.save_inference_dir=".\inf\r45_abinet\"
# for CPPD
$ python PaddleOCR\tools\export_model.py -c config\rec_svtrnet_cppd_base_en.yml -o Global.pretrained_model=".\output\svtr_cppd_base\best_accuracy" Global.save_inference_dir=".\inf\svtr_cppd_base\"
After the conversion, we can get the final model files in the inf directory, which is the model we can use for inference. You can find inference.pdiparams, inference.pdmodel and inference.pdiparams.info in the directory. We can use these files for inference.
Total training images are about 120K. ABINet took about 1 day and CPPD took less than 1 day to converge on our 3 GPUs. Training accuracy is about 97.0% for ABINet, and 99.8% for CPPD. It looks like the CPPD model is much better than ABINet, but ABINet performs a little better than CPPD on the test set. We tested the two models on our test set, the accuracy is about 99.6% for ABINet, and 99.1% for CPPD. Anyway, both models are good for us, we will use the two models for inference.
Build Up the Workflow
Now all the models are ready, we can build up the workflow. In case you forget, the simple flowchart is here. Here, I won’t post the actual deployment code, as it includes some content not directly related to the main topic, which might be difficult to understand, and there are also commercial considerations. However, I will explain using the code developed for testing and demonstration purposes. The demo comes with a basic UI interface, allowing for an intuitive view of the recognition results.
Development Environment
- CUDA 11.7 if NVIDIA GPU is used; No GPU is also OK
- Python 3.8/3.9/3.10 for compatibility
- paddlepaddle==2.5.1 or paddlepaddle-gpu==2.5.1, paddleocr==2.8.0 (for text recognition)
- pytorch==2.0.0 or pytorch with gpu support (for ultralytics:YOLOv8 detection)
- ultralytics==8.0
- opencv-python==4.8.0
- PyQt6==6.5.1 (for demo UI and testing)
Directory Structure
workflow_demo
├── PaddleOCR
├── config
│   └── en_dict.txt
├── models
│   ├── yolov8_cn_det
│   │   └── best_small.pt
│   ├── yolov8_char_det
│   │   └── best_small.pt
│   ├── pdlocr_abinet_rec
│   │   ├── inference.pdiparams
│   │   ├── inference.pdmodel
│   │   └── inference.pdiparams.info
│   └── pdlocr_cppd_rec
│       ├── inference.pdiparams
│       ├── inference.pdmodel
│       └── inference.pdiparams.info
├── char_detector.py
├── cn_detector.py
├── text_recognizer.py
├── text_corrector.py
└── main.py
The above directory structure shows the necessary files for the container number recognition workflow demo. The PaddleOCR folder is the PaddleOCR version 2.8 source code, it’s necessary to be there. Currently (Oct 2023, July 2024 updated) ABINet and CPPD algorithms are not available in wheel package (install by pip), so we need to download the source code and put it in the PaddleOCR folder. en_dict.txt is the dictionary file for recognition, it’s the same as the one used in above training.
Workflow
For the demo, the key functions are implemented in char_detector.py, cn_detector.py, text_recognizer.py, and text_corrector.py. The main.py is the main entry, logic controller and UI handler. We will introduce roughly the workflow as the following steps:
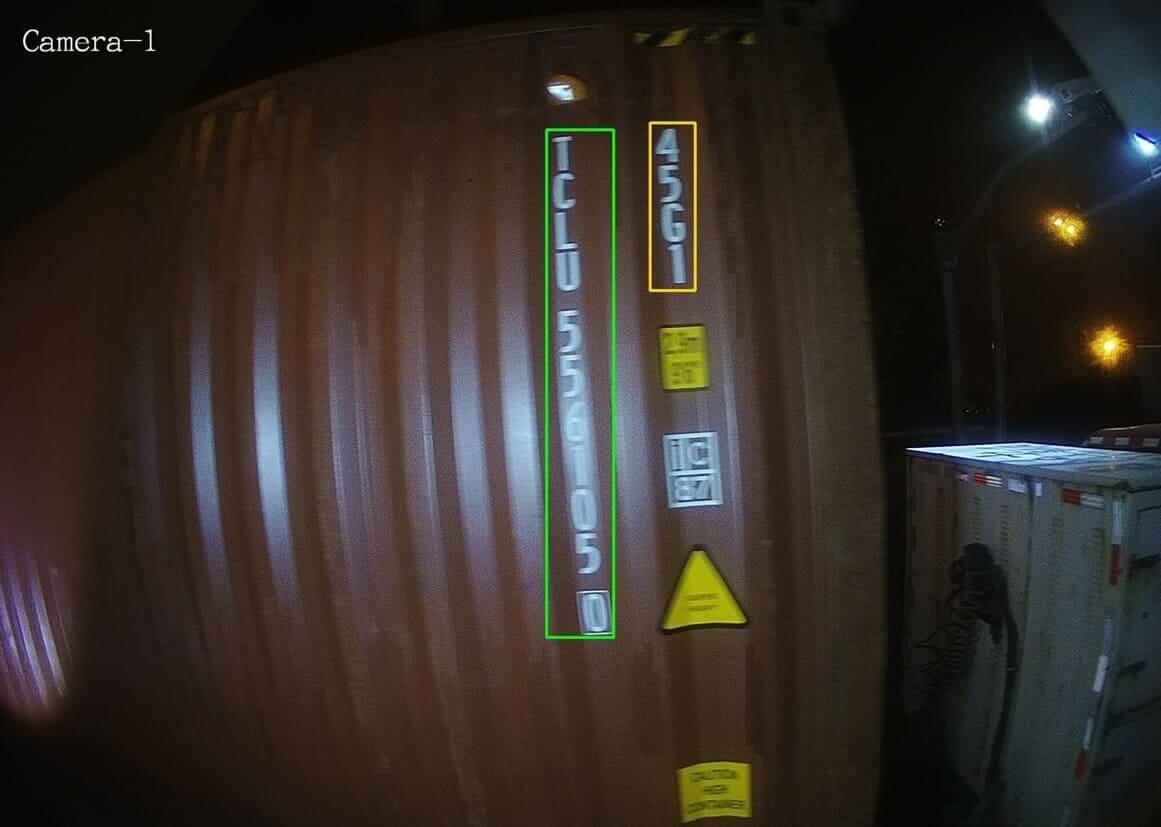
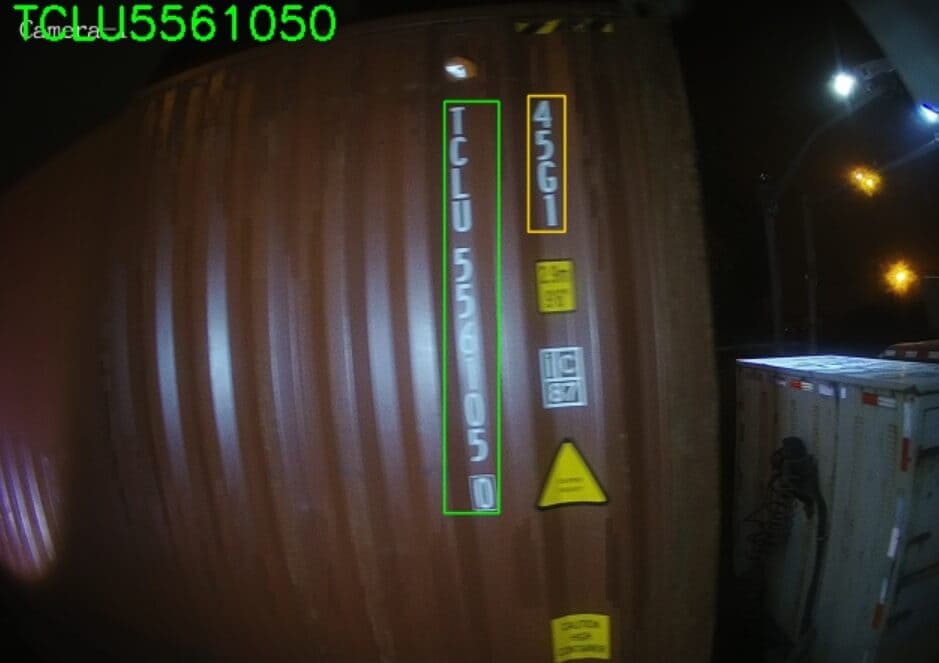
cn_detector.py(view code here) is the container number detector, it uses YOLOv8 to detect the container number (CN,CN_ABC,CN_NUM,TS) in the input image. The output is a box list of the detected objects, format is[[x1, y1, x2, y2, conf, class],[...box2....],[...box3...],..., [...boxN...]]], four classes could be detected,CN(0) is full container number,CN_ABC(1) is the first 4 characters (capital letters) of the container number,CN_NUM(2) is the last 7 characters (number) of the container number,TS(3) is the ISO type size of the container. The detection time is 200-300ms on my laptop without GPU, or 10-20ms on NVIDIA Jetson Orin Nano 8GB board with TensorRT.
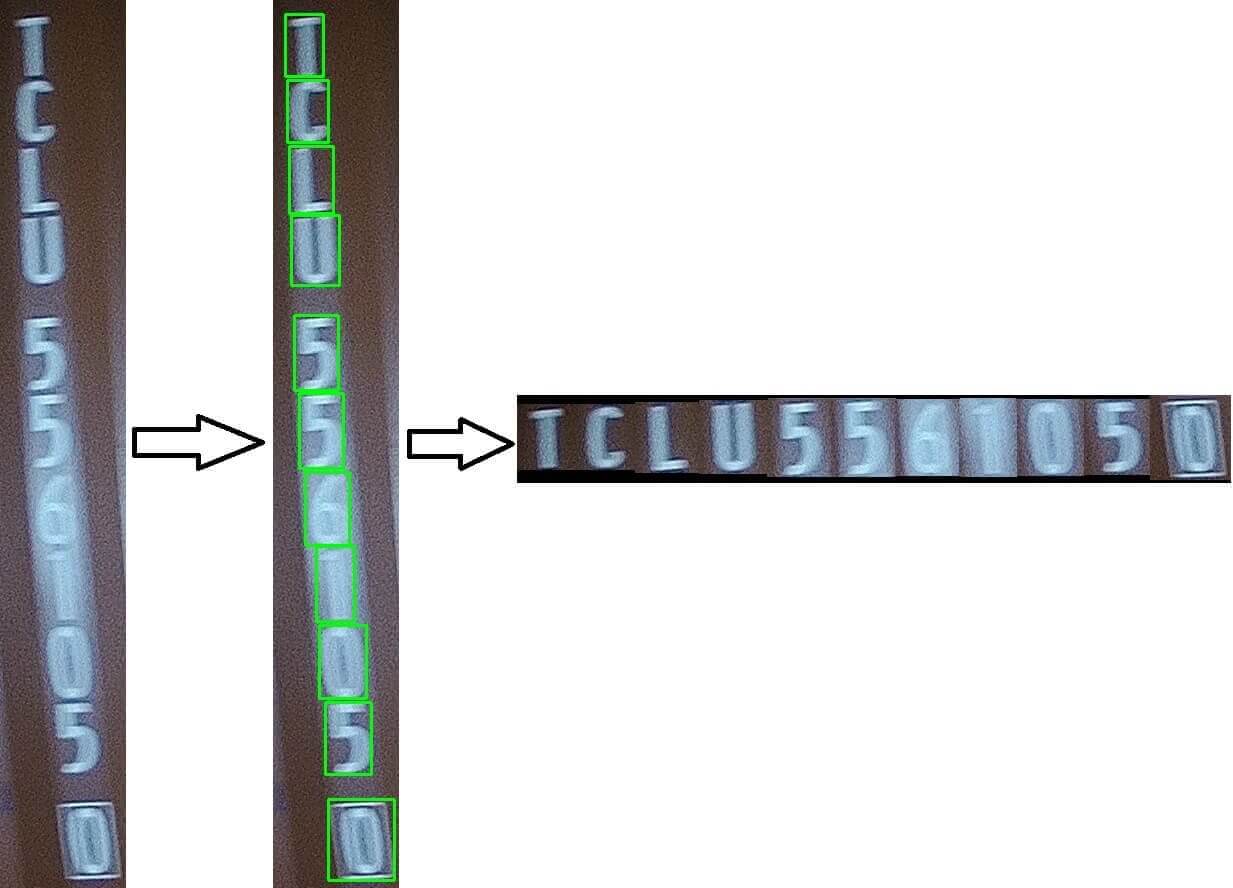
char_detector.py(view code here) is the character detector, it uses YOLOv8 to detect the characters in the cropped container number image, the cropped container number position is from the output boxes array ofcn_detector.py. If the original container number image is vertical aligned, the code will crop the 11 single characters from the container number image, and stitch them together to form a horizontal aligned container number image. The detection time is similar to above.
text_recognizer.py(view code here) is the text recognizer, it uses PaddleOCR to recognize the characters in the horizontal aligned container number image returned fromchar_detector.py. The output is the recognized text, which is the container number. As we have two recognition models, ABINet and CPPD, two recognition results will be returned. ABINet recognition time is about 350ms+ on my laptop without GPU, or 80ms+ on NVIDIA Jetson Orin Nano 8GB board with TensorRT. CPPD recognition time is about 120ms+ on my laptop without GPU, or 30ms+ on NVIDIA Jetson Orin Nano 8GB board with TensorRT.
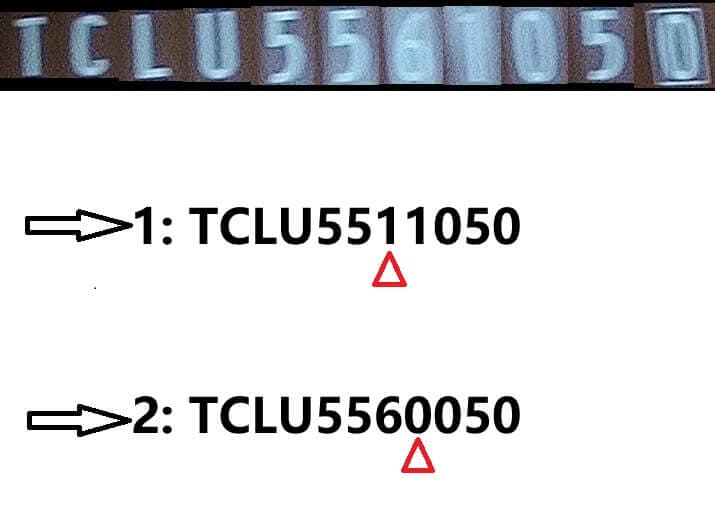
text_corrector.pyis the text corrector. As we get two recognition results fromtext_recognizer.py,text_corrector.pywill use some rules to correct the two results and try to return the final best result. The rules includes check-digit validation, character position validation, and some other rules we concluded from the practical experience (so we won’t post the code here). The code is not complex, input is two recognition results, output is the final best result or failure.
The main.py(view code here) will call the above four modules to process the input image, and show the results in the UI. The UI is implemented using PyQt6, it’s simple and intuitive. The whole process takes about 1 second on my laptop without GPU, or <200ms on NVIDIA Jetson Orin Nano 8GB board with TensorRT.
Deployment
The final service is deployed on an NVIDIA Jetson Orin Nano using Docker, with Flask as the web framework and Gunicorn as the WSGI server. The external main server accesses the recognition service on the Jetson via HTTP requests, inputs image data, and the service returns the identified container numbers. If you’re interested in knowing how to deploy Flask web services with Docker in one click, you can refer to my another blog post “Deploy Your Python Web Service to Production with Docker and Dockerfile”. If you want to know settings and development related to NVIDIA Jetson, you might find another blog post of mine useful “Setting Up PaddleOCR with CUDA on NVIDIA Jetson from Scratch”.
To speed up the detection and recognition process in Jetson Orin, we use the TensorRT to optimize the YOLOv8 detection model and the PaddleOCR recognition model. JetPack SDK has provided the necessary tools and libraries to do this. For YOLOv8 with TensorRT, you can refer the official docs. PaddleOCR with TensorRT is also easy to use, add parameter use_tensorrt=True when loading the model, and the model will be optimized by TensorRT.
The whole process takes about 150-200ms, which is good enough for the practical use. The basic service setup meets the application’s concurrency and response time requirements, thanks largely to the powerful performance of the Jetson Orin and the acceleration provided by TensorRT.
Takeaways
-
In machine learning, data (both quantity and quality) is the most critical factor (a well-known truth). In image-related machine learning tasks, a good image dataset can significantly improve the model’s accuracy and robustness, often allowing us to bypass most of the preprocessing steps required in traditional image processing, such as image enhancement, denoising, edge detection, binarization, etc.
-
Before starting image annotation, it’s important to have a clear understanding of the overall task, defining the objects and criteria for annotation. Consistency in annotation is very important, as reworking can be both costly and time-consuming.
-
PaddleOCR offers two functionalities: text detection and recognition. In this project, we only utilized its recognition feature. For this task, YOLO is more suited for detecting container numbers, treating the container number as an object for detection, which is both highly accurate and fast. PaddleOCR’s detection is text-based, significantly slower, and less accurate for this specific task compared to YOLO.
-
For container number recognition, we employed two different recognition algorithms and combined their results to increase accuracy. This approach is highly effective in practical applications, as different algorithms have their strengths and weaknesses. Integrating two results can compensate for the shortcomings of a single algorithm. This is a form of ensemble learning, which is very common in real-world applications.
-
Both ABINet and CPPD are highly suitable for this task, with very high accuracy rates, and ABINet performs slightly better. For fixed-format text recognition (such as identical characters counts and composition), ABINet and CPPD are excellent choices. They might not be as suitable for general text recognition.
-
Converting vertically arranged container number images to horizontal arrangements significantly increases the system’s accuracy. This operation ensures consistency in the type of recognition, greatly reducing the difficulty for the recognition algorithm. Fortunately, thanks to the excellent speed and accuracy of YOLOv8 character detection, we can perform this operation at a relatively low cost.
-
In practical applications, integrating and correcting the two recognition results proves to be very helpful. However, it’s important not to over-correct. Returning a recognition failure result is important because it allows the main service to handle the failure, such as by sending another new image for recognition, which can be more straightforward.
-
PaddleOCR is arguably the best open-source tool in the OCR field. It offers a full set of tools and algorithms, and the official team provides many pre-trained models. This is highly beneficial for projects with limited budgets, saving a significant amount of resources.