This post is the second part of the series “Building a Robust Shipping Container Number Vision Recognition System”, we will continue to discuss the tools used, image annotation, data preparation. You can find all parts here:
Part 1: Task, Challenges, Design of the System
Part 2: Tools, Image Annotation, Data Preparation
Part 3: Training, Build up the Workflow, Deployment, Takeaways
Tools and Frameworks
Computer Vision Annotation Tool (CVAT) is an open-source tool for annotating images and videos. We use it to annotate the container number bounding boxes and text. It also supports multiple users and roles, which is useful for collaborative annotation tasks. Self-hosting is recommended for faster annotation speed and better privacy.
YOLOv8 is a state-of-the-art object detection model. It is fast and accurate, and it is suitable for real-time applications. Two YOLOv8 models are used in this project: one for detecting the container number in the input image, and the other for detecting the characters in the cropped container number image (for rearranging the characters horizontally).
PaddleOCR is a high-performance OCR toolkits. It supports text detection and recognition. Only text recognition of PaddleOCR is used in this project, as the text detection is already handled by YOLOv8. Many popular text recognition algorithms are supported, including CRNN, NRTR, SVTR, ABINet, CPPD and so on. Two models will be used in this project for high accuracy and robustness.
Why don’t we use PaddleOCR for text detection? Because YOLOv8 is much faster and more accurate for the container number detection task. PaddleOCR detection is more suitable for general text detection tasks. In this case, the container number normally has a few fixed patterns, object detection is more efficient than general text detection. Also, other types of texts or objects in the container image could be added for detection in the YOLOv8 model, which is more flexible.
Image Annotation
CVAT Annotation
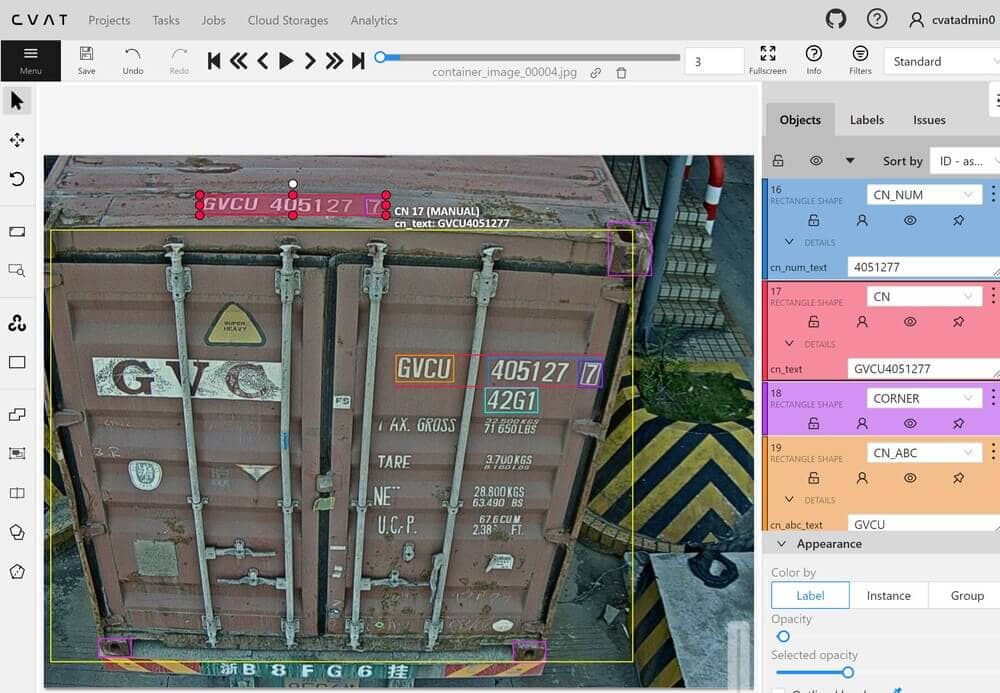
The figure above shows the image annotation interface of CVAT. Here, we can annotate the boundary boxes and text of the object. We use the rectangle tool to mark the boundary boxes, and then we can add text attributes to them. CVAT also supports multi-user and multi-role functionalities, making it suitable for collaborative annotation tasks. This feature is particularly useful for us, as our container image dataset was more than 100,000 images, and the annotation task was outsourced.
From the figure above, you can see that we annotated not just the boundary boxes and text of the container numbers. We also marked the container doors, corners, the first four characters of the container number, the last seven chracters, and the final check-digit, among other details. The annotations for the container doors and corners are for a different container loading and unloading task, unrelated to this task. The annotations for the first four and the last seven characters of the container number are primarily for the recognition of container numbers arranged across multiple lines, which will be explained in the training section later on.
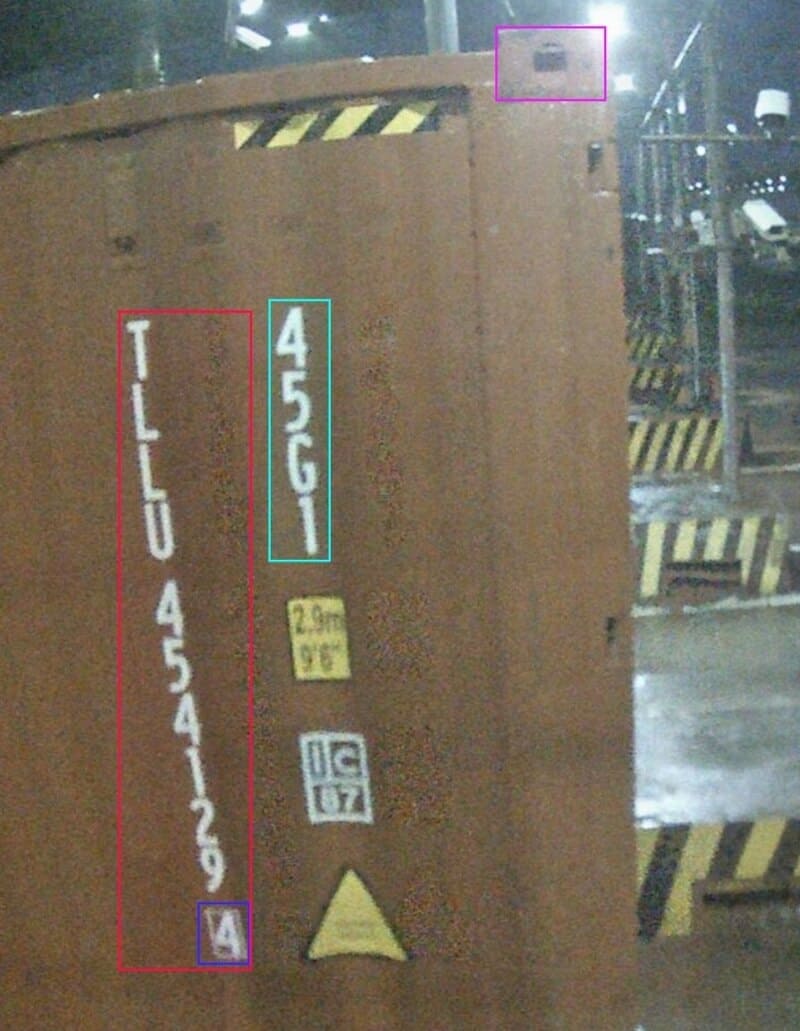
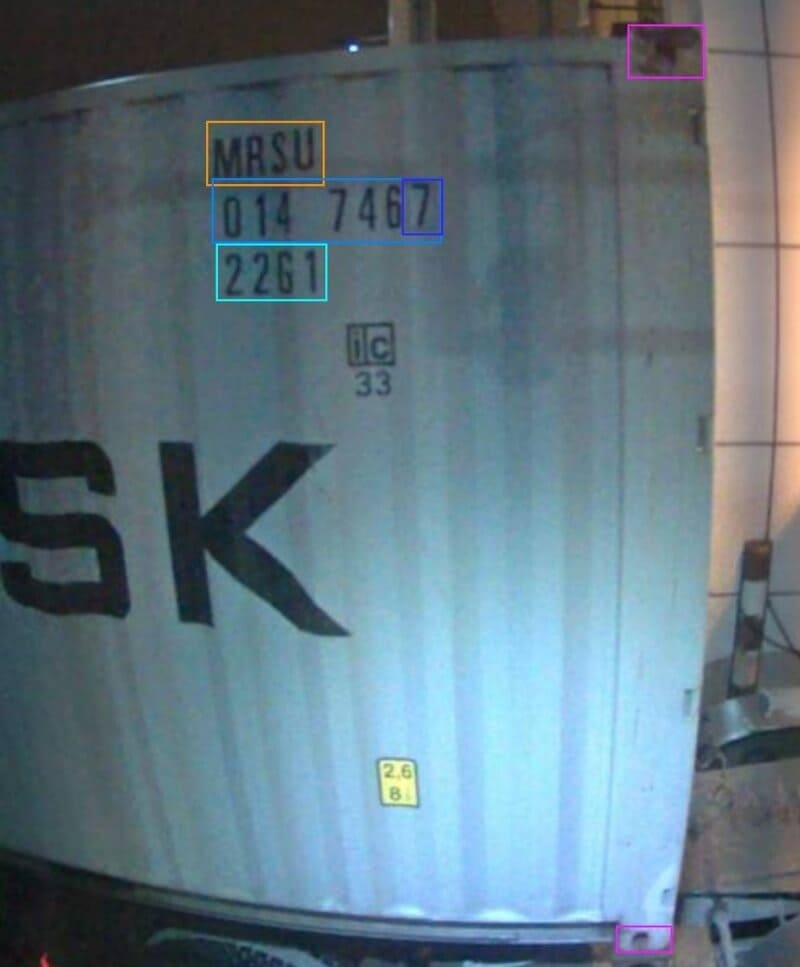
The following are some examples of annotated images (texts are not shown):

After annotating the images, we can export the annotations as CVAT for images 1.1 format, which is a xml file containing all the annotations. The annotations can be used for training the YOLOv8 model and the PaddleOCR recognition model after some preprocessing.
Here is an example annotation xml file, which contains all the labels description in the meta section and the annotations for each image:
<?xml version="1.0" encoding="utf-8"?>
<annotations>
  <version>1.1</version>
  <meta>
    <job>
      ......
      <labels>
        <label>
          <name>DOOR</name> <color>#fafa37</color> <type>rectangle</type>
        </label>
        <label>
          <name>IMDG</name> <color>#ff00cc</color> <type>rectangle</type>
        </label>
        <label>
          <name>CN</name> <color>#fa3253</color> <type>rectangle</type>
          <attributes>
            <attribute>
              <name>cn_text</name> <mutable>False</mutable> <input_type>text</input_type> <default_value>TEMPORARY</default_value> <values>TEMPORARY</values>
            </attribute>
          </attributes>
        </label>
        <label>
          <name>CN_ABC</name> <color>#f59331</color> <type>rectangle</type>
          <attributes>
            <attribute>
              <name>cn_abc_text</name> <mutable>False</mutable> <input_type>text</input_type> <default_value>TEMPORARY</default_value> <values>TEMPORARY</values>
            </attribute>
          </attributes>
        </label>
        <label>
          <name>CN_NUM</name> <color>#aaf0d1</color> <type>rectangle</type>
          <attributes>
            <attribute>
              <name>cn_num_text</name> <mutable>False</mutable> <input_type>text</input_type> <default_value>TEMPORARY</default_value> <values>TEMPORARY</values>
            </attribute>
          </attributes>
        </label>
        <label>
          <name>TS</name> <color>#33ddff</color> <type>rectangle</type>
          <attributes>
            <attribute>
              <name>ts_text</name> <mutable>False</mutable> <input_type>text</input_type> <default_value>TEMPORARY</default_value> <values>TEMPORARY</values>
            </attribute>
          </attributes>
        </label>
        <label>
          <name>S_NUM</name> <color>#24b353</color> <type>rectangle</type>
          <attributes>
            <attribute>
              <name>s_num_text</name> <mutable>False</mutable> <input_type>text</input_type> <default_value>TEMPORARY</default_value> <values>TEMPORARY</values>
            </attribute>
          </attributes>
        </label>
        <label>
          <name>C_DIGIT</name> <color>#3d3df5</color> <type>rectangle</type>
          <attributes>
            <attribute>
              <name>c_digit_num</name> <mutable>False</mutable> <input_type>text</input_type> <default_value>T</default_value> <values>T</values>
            </attribute>
          </attributes>
        </label>
        <label>
          <name>CORNER</name> <color>#b83df5</color> <type>rectangle</type>
        </label>
      </labels>
    </job>
  </meta>
  <image id="0" name="container_image_00001.jpg" width="1280" height="960">
    <box label="CN_NUM" source="manual" occluded="0" xtl="801.40" ytl="364.18" xbr="1006.07" ybr="416.49" z_order="0">
      <attribute name="cn_num_text">4051277</attribute>
    </box>
    <box label="CN" source="manual" occluded="0" xtl="281.25" ytl="71.51" xbr="617.26" ybr="108.02" z_order="0">
      <attribute name="cn_text">GVCU4051277</attribute>
    </box>
    <box label="CN_ABC" source="manual" occluded="0" xtl="635.28" ytl="360.40" xbr="739.10" ybr="408.13" z_order="0">
      <attribute name="cn_abc_text">GVCU</attribute>
    </box>
    <box label="TS" source="manual" occluded="0" xtl="796.00" ytl="419.19" xbr="890.11" ybr="463.42" z_order="0">
      <attribute name="ts_text">42G1</attribute>
    </box>
    <box label="C_DIGIT" source="manual" occluded="0" xtl="578.48" ytl="75.83" xbr="616.37" ybr="107.54" z_order="0">
      <attribute name="c_digit_num">7</attribute>
    </box>
    <box label="CORNER" source="manual" occluded="0" xtl="1017.10" ytl="121.10" xbr="1094.70" ybr="216.70" z_order="0">
    </box>
    <box label="DOOR" source="manual" occluded="0" xtl="12.63" ytl="134.65" xbr="1061.27" ybr="912.78" z_order="0">
    </box>
  </image>
  <image id="1" ...>
    ...
  </image>
  ...
</annotations>
CVAT Annotation Checking
Inevitably, some annotations may contain errors. Given the large volume of images, it’s impractical to individually verify the correctness of each annotation. However, we can use some simple rules (pattern of container number) to check the correctness of annotations. Below is the corresponding annotation checking Python script:
# check_cvat_annotation.py
# How to use: python3 check_cvat_annotation.py
# Checking Rules:
# 1. CN: 4 Cap letters + 7 numbers (ABCD1234567)
# 2. CN_ABC: 4 Cap letters (ABCD)
# 3. CN_NUM: 7 numbers (1234567)
# 4. TS: 1 any + 1 number + 1 any + 1 number (22G1, L5G1 etc.)
# 5. C_DIGIT: 1 number
# 6. CN_ABC = CN[:4] (first 4 digits)
# 7. CN_NUM = CN[-7:] (last 7 digits)
# 8. CN check digit calculation should be correct && CN[-1:] = C_DIGIT

import os
import xml.etree.ElementTree as ET
import re

def calculate_check_digit(container_code):
    # You can find this function from Part 1
    # https://linzichun.com/posts/robust-container-number-ocr-recognition-system-part1/#design-of-the-recognition-process

def validate_annotations(xml_file):
    # Load and parse the XML file
    tree = ET.parse(xml_file)
    root = tree.getroot()

    # Define the validation rules as regular expressions, rule 1-5
    rules = {
        "CN": {"attribute": "cn_text", "regex": r"^[A-Z]{4}\d{7}$"},
        "CN_ABC": {"attribute": "cn_abc_text", "regex": r"^[A-Z]{4}$"},
        "CN_NUM": {"attribute": "cn_num_text", "regex": r"^\d{7}$"},
        "TS": {"attribute": "ts_text", "regex": r"^.(\d).(\d)$"},
        "C_DIGIT": {"attribute": "c_digit_num", "regex": r"^\d$"}
    }

    # Iterate through images and their boxes
    for image in root.findall('image'):
        image_name = image.get('name')
        labels_attributes = {}

        # Collect all attributes for each label
        for box in image.findall('box'):
            label = box.get('label')
            for attribute in box.findall('attribute'):
                attribute_name = attribute.get('name')
                attribute_value = attribute.text
                if label not in labels_attributes:
                    labels_attributes[label] = {}
                labels_attributes[label][attribute_name] = attribute_value

        # Validate each label and attribute
        for label, attributes in labels_attributes.items():
            for attribute_name, attribute_value in attributes.items():
                if label in rules and rules[label]["attribute"] == attribute_name:
                    if not re.match(rules[label]["regex"], attribute_value):
                        print(f"Image: {image_name}, Label: {label}, Attribute: {attribute_name}, Invalid value: {attribute_value}")

                # rule 8
                if label == "CN" and attribute_name == "cn_text":
                    if len(attribute_value) != 11: # CN should be 11 digits
                        print(f"Image: {image_name}, Label: CN, Invalid length: {attribute_value}")
                    else:
                        expected_check_digit = calculate_check_digit(attribute_value[:10])
                        actual_check_digit = int(attribute_value[10])
                        if expected_check_digit != actual_check_digit:
                            print(f"Image: {image_name}, Label: CN, Invalid check digit in: {attribute_value}")
        # rule 6
        if "CN" in labels_attributes and "CN_ABC" in labels_attributes:
            if labels_attributes["CN"].get("cn_text")[:4] != labels_attributes["CN_ABC"].get("cn_abc_text"):
                print(f"Image: {image_name}, Label: CN and CN_ABC, Mismatch in first 4 characters")
        # rule 7
        if "CN" in labels_attributes and "CN_NUM" in labels_attributes:
            if labels_attributes["CN"].get("cn_text")[-7:] != labels_attributes["CN_NUM"].get("cn_num_text"):
                print(f"Image: {image_name}, Label: CN and CN_NUM, Mismatch in last 7 digits")

if __name__ == "__main__":
  raw_cvat_annotations_floder = "/home/user/project/data/cvat_annotations" # replace with your absolute folder path

  for filename in os.listdir(raw_cvat_annotations_folder): # check all the annotation files
      if filename.endswith(".xml"):
          print(filename + " check start.")
          validate_annotations(os.path.join(raw_cvat_annotations_folder, filename))
          print(filename + " check done.")
The above checking script will print out the invalid annotations, and we can manually verify and correct them.
After fixing the annotations, the raw annotation file still cannot be directly used for training. We need to preprocess the annotations to fit the input format of the YOLOv8 model and the PaddleOCR recognition model. The preprocessing will be explained in the next section.
Roboflow Annotation
Roboflow is another popular image annotation tool. It mainly focuses on object detection and image classification tasks. It supports various annotation formats, including YOLO, COCO, VOC, and others. It also supports image preprocessing, augmentation, and dataset splitting.
As I mentioned in the previous Post 1, a character detection YOLOv8 model is used to detect the characters in the cropped container number image. The character detection model is trained on a separate dataset, which is annotated using Roboflow. The character detection model is used to rearrange the characters horizontally.
Why do we use Roboflow for character detection annotation? Character detection task is relatively simple, and Roboflow supports to use existing YOLO detection model to annotate the characters automatically, it saves time and money for us. So we first annotated about 300 images manually, and then use them to train a basic YOLOv8 model to annotate the rest of the character images in Roboflow, of course, we still need to check the annotations manually, but it did save a lot of time. After finish annotating, we can do some preprocessing, argumentation and dataset splitting in Roboflow, and then export the annotations as YOLO format, which are txt files containing all the annotations. The annotations can be directly used for training the character detection YOLOv8 model. It’s very convenient. Regrettably, Roboflow does not support text annotation for OCR tasks.
Training Data Preparation
There are four models need to be trained in this project: the container number detection YOLOv8 model, the character detection YOLOv8 model, and two container number PaddleOCR recognition models. The training annotation data for the character detection YOLOv8 model is ready (see above Roboflow Annotation). The training annotation data for the container number detection YOLOv8 model and the container number PaddleOCR recognition model need to be preprocessed from the raw CVAT annotations.
Before preprocessing, we need to know the training dataset format of the YOLOv8 model and the PaddleOCR recognition model.
Dataset Format for YOLOv8 Detection
The directory structure of the YOLOv8 training dataset is as follows:
yolov8_det_data
├── data.yaml
├── train
│   ├── images
│   │   ├── t000001.jpg
│   │   ├── t000002.jpg
│   │   ├── ...
│   │   └── t00000n.jpg
│   └── labels
│       ├── t000001.txt
│       ├── t000002.txt
│       ├── ...
│       └── t00000n.txt
└── valid
    ├── images
    │   ├── v000001.jpg
    │   ├── v000002.jpg
    │   ├── ...
    │   └── v00000n.jpg
    └── labels
        ├── v000001.txt
        ├── v000002.txt
        ├── ...
        └── v00000n.txt
Each image has a corresponding txt file containing the annotations, so each txt file may contains zero or more lines, each line represents a bounding box of an object in the image. The format of the txt file is as follows:
<class-id> <x_center_normalized> <y_center_normalized> <width_normalized> <height_normalized>
Where the <class-id> is the index of the class label, the normalized coordinates are in the range of [0, 1].
The data.yaml file contains the class names and the path to the training and validation images and labels. Here is an example of the data.yaml file:
train: ../train/images
val: ../valid/images

nc: 2
names: ['class1', 'class2']
Dataset Format for PaddleOCR Recognition
The directory structure of the PaddleOCR Recognition training dataset is as follows:
paddleocr_rec_data
├── PaddleOCR
├── config
│   ├── rec_r45_abinet.yml
│   ├── rec_svtrnet_cppd_base_en.yml
│   └── en_dict.txt
├── pretrain_model
│   ├── abinet
│   │   └── abinet_pretrained.pdparams
│   └── cppd
│       └── cppd_pretrained.pdparams
├── rec_eval_label.txt
├── rec_train_label.txt
├── RecTrainData
│   ├── t000001_text.jpg
│   ├── t000002_text.jpg
│   ├── ...
│   └── t00000n_text.jpg
└── RecEvalData
    ├── v000001_text.jpg
    ├── v000002_text.jpg
    ├── ...
    └── v00000n_text.jpg
We have two rec models to train, so there are two config files and two pretrain models. en_dict.txt is the dictionary file for the recognition model, for our case, it contains all the capital letters (A~Z) and numbers(0~9). PaddleOCR is the PaddleOCR source code folder, you can download it from the PaddleOCR GitHub, I used the dygraph branch, which contains the latest features and algorithms.
The rec_train_label.txt and rec_eval_label.txt files contain the image files paths and the corresponding text labels. Each line of the txt file is <image_path> <text_label>, separated by \t, not space. An example of the rec_train_label.txt file (the rec_eval_label.txt file is similar) is as follows:
t000001_text.jpg	GLDU5734179
t000002_text.jpg	GATU8818029
t000003_text.jpg	TCNU4583473
...
The images in the RecTrainData and RecEvalData folders are the cropped container number images, and the text in the image is the container number. The cropped container number images are obtained from the raw container images using the annotations, I will explain the process in the next section.
Preprocessing of CVAT Annotations
Before preprocessing, set up the development environment and install the required packages. If CUDA is available, you can install the corresponding gpu version package. The following Python packages are required:
# python 3.8/3.9/3.10
paddlepaddle==2.5.1 or paddlepaddle-gpu==2.5.1
paddleocr==2.7.0.2
pytorch==2.0.0 or pytorch with gpu support (for ultralytics:YOLOv8 detection)
ultralytics==8.0
opencv-python==4.8.0
PyQt6==6.5.1
numpy==1.26.1
tqdm==4.65.0
For Container Number Detection YOLOv8
Firstly, we preprocess the raw CVAT annotations to fit the input format of the container number detection YOLOv8 model. We need to prepare the training/validation images and annotations in the corresponding folder, then we can run the following Python script:
import xml.etree.ElementTree as ET
import os
from tqdm import tqdm # for progress bar

# define the paths for training set
raw_cvat_annotation_file = '/home/user/project/data/cvat_annotations/container_annotation_for_train.xml'
output_labels_folder = '/home/user/project/data/yolov8_det_data/train/labels'
# do the same for the validation set
# raw_cvat_annotation_file = '/home/user/project/data/cvat_annotations/container_annotation_for_valid.xml'
# output_labels_folder = '/home/user/project/data/yolov8_det_data/valid/labels'

# Define the interested labels, what we want to detect
interested_labels = {'CN': 0, 'CN_ABC': 1, 'CN_NUM': 2, 'TS': 3}

if not os.path.exists(output_labels_folder):
    os.makedirs(output_labels_folder)

tree = ET.parse(raw_cvat_annotations_file)
root = tree.getroot()

images = root.findall('image')

for image in tqdm(images, desc="Converting to YOLO labels"):
    image_file = image.get('name')
    image_width = int(image.get('width'))
    image_height = int(image.get('height'))

    label_file = os.path.join(output_labels_folder, os.path.splitext(image_file)[0] + '.txt')
    with open(label_file, 'w') as file:
        for box in image.findall('box'):
            label = box.get('label')
            if label in interested_labels:
                # normalize the coordinates
                xtl = float(box.get('xtl')) / image_width
                ytl = float(box.get('ytl')) / image_height
                xbr = float(box.get('xbr')) / image_width
                ybr = float(box.get('ybr')) / image_height
                # convert to yolo format
                x_center = (xtl + xbr) / 2
                y_center = (ytl + ybr) / 2
                width = xbr - xtl
                height = ybr - ytl

                file.write(f"{interested_labels[label]} {x_center} {y_center} {width} {height}\n")
We need to run the above script twice, one for the training set and one for the validation set. After running the script, we will get the txt files in yolov8_det_data/train/labels and yolov8_det_data/valid/labels folders. Also remember to prepare the images in the yolov8_det_data/train/images and yolov8_det_data/valid/images folders. And then you can modify the data.yaml file to fit your dataset. By now, the training dataset for the container number detection YOLOv8 model is ready.
As you can see from the script, we are interested in four labels: CN, CN_ABC, CN_NUM, and TS. The CN label is for the full container number, the CN_ABC label is for the first four characters of the container number, the CN_NUM label is for the last seven characters of the container number, and the TS label is for the container ISO type and size. To get all types of container numbers correctly, we need to detect the first four characters and the last seven characters separately too. The TS label is for the recognition of container ISO type and size, we will not use it for container number detection. We can add more labels if we are interested in other objects in the container image.
If you want to increase data diversity, you can upload the training dataset to Roboflow, and do some preprocessing, augmentation. I use the following setup in Roboflow: 3 outputs per training example; apply grayscale to 5% of images; change brightness between -20% and +20%; change exposure between -15% and +15%;blur up to 1.6px; add noise up to 2.0% of pixels; add bounding box noise up to 4.0% of pixels.
For Container Number PaddleOCR Recognition
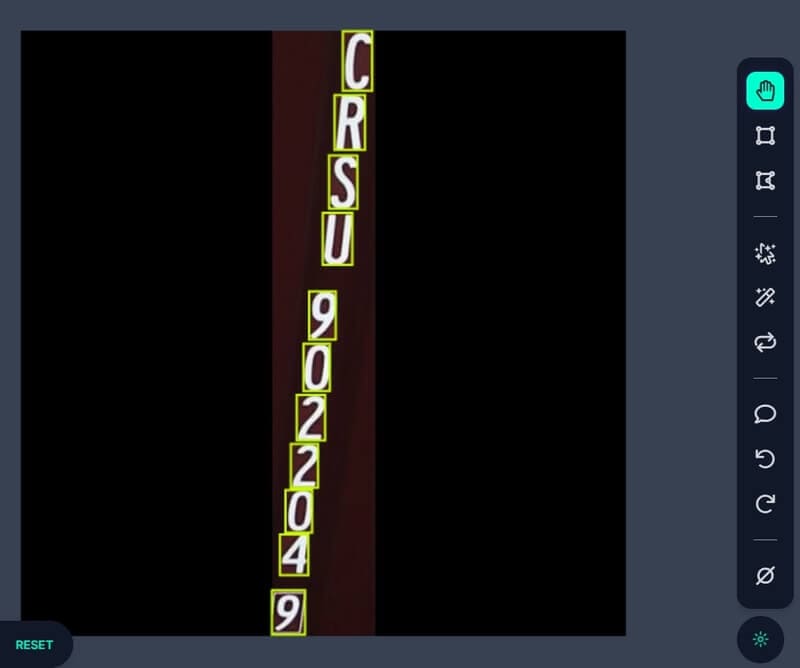
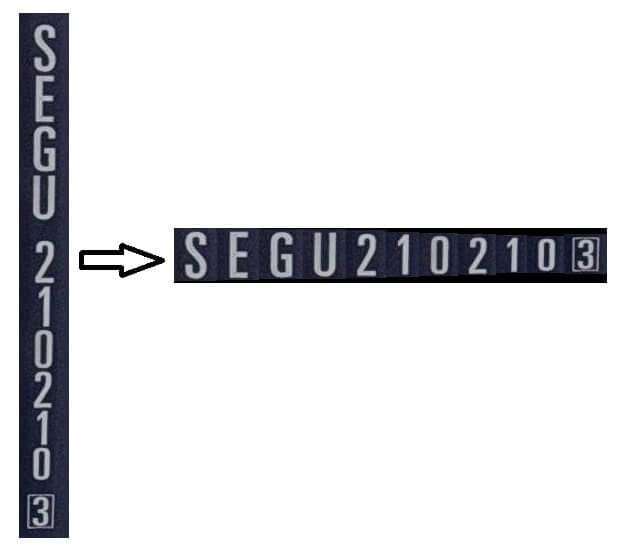
As mentioned earlier, we designed this system to recognize only horizontally arranged container numbers, as this approach yields higher accuracy. Therefore, first, we need to crop the container numbers from the original container images based on the CVAT annotations. Then, we convert the vertically arranged container number images into a horizontal arrangement (not by simply rotating the image, but by detecting the position of each character with a character detection model and then rearranging each character in order horizontally).
There are three scripts to achieve this, we need to run them in order. The first script converts the CVAT annotation data into the label files for PaddleOCR recognition and crop the container numbers from the original container images.
# step 1: cvat_to_pdlocrrec_label.py
# How to use: python3 cvat_to_pdlocrrec_label.py
import xml.etree.ElementTree as ET
import cv2 # for cropping images
import os
from tqdm import tqdm # for progress bar

raw_images_folder = '/home/user/project/data/container_images'
raw_cvat_annotation_file = '/home/user/project/data/cvat_annotations/container_annotation.xml'
cropped_images_folder = '/home/user/project/data/cropped_container_number_images'
cropped_labels_file = '/home/user/project/data/cropped_container_number_labels.txt'

tree = ET.parse(raw_cvat_annotation_file)
root = tree.getroot()

if not os.path.exists(cropped_images_folder):
    os.makedirs(cropped_images_folder)

# calculate total CN labels count
total_cn_count = sum(1 for image in root.findall('.//image') for box in image.findall('.//box') if box.get('label') == 'CN')

with open(cropped_labels_file, 'w') as file, tqdm(total=total_cn_count, desc="Processing CN labels for PaddleOCR Rec") as pbar:
    for image in root.findall('.//image'):
        image_name = image.get('name')
        base_name = os.path.splitext(image_name)[0]
        cn_count = 1

        for box in image.findall('.//box'):  # one image may have multiple CN
            if box.get('label') == 'CN':
                cn_text = box.find(".//attribute[@name='cn_text']").text
                new_image_name = f"{base_name}_{cn_count:02}.jpg"
                file.write(f"{new_image_name}\t{cn_text}\n")
                xtl, ytl, xbr, ybr = map(lambda x: round(float(box.get(x))), ['xtl', 'ytl', 'xbr', 'ybr'])
                img = cv2.imread(os.path.join(raw_images_folder, image_name))
                cropped_img = img[ytl:ybr, xtl:xbr]
                cv2.imwrite(os.path.join(cropped_images_folder, new_image_name), cropped_img)

                cn_count += 1
                pbar.update(1)

print(f"Total CN labels processed: {total_cn_count}")
The following second script continues to convert vertically arranged container number images into horizontal arrangements.
# step 2: text_image_v2h.py
# How to use: python3 text_image_v2h.py
import cv2
import os
from v2h_char_detector import V2HCharDetector # character detection, vertical to horizontal

# cropped the container number images from the original container images
cropped_images_folder = '/home/user/project/data/cropped_container_number_images'
# the folder to save the updated cropped images, include originally horizontal images and rearranged horizontal images
updated_cropped_images_folder = '/home/user/project/data/updated_cropped_images'
# the images that are not processed will be saved in the need_manual_check_images_folder
need_manual_check_images_folder = '/home/user/project/data/need_manual_check_images'

if not os.path.exists(updated_cropped_images_folder):
    os.makedirs(updated_cropped_images_folder)
if not os.path.exists(need_manual_check_images_folder):
    os.makedirs(need_manual_check_images_folder)

v2h_char_detector = V2HCharDetector() # it will return the rearranged horizontal image

processed_count = 0

for filename in os.listdir(cropped_images_folder):
    if filename.lower().endswith(('.png', '.jpg', '.jpeg')):
        image_path = os.path.join(cropped_images_folder, filename)
        img = cv2.imread(image_path)

        if img is not None:
            height, width = img.shape[:2]
            # check if image is vertical
            if height > width:
                # vertical image
                print(filename + " is vertical)
                # detect the characters and rearrange them horizontally, return the rearranged image
                is_res_ok, processed_img = v2h_char_detector.detect(img)
                processed_count += 1
                if is_res_ok:
                    cv2.imwrite(os.path.join(updated_cropped_images_folder , filename), processed_img)
                else:
                    # if the char detection is not ok, save the image to the need_manual_check_images_folder
                    cv2.imwrite(os.path.join(need_manual_check_images_folder, filename), processed_img)
                    print(filename, " is not processed, please check manually.")
            else:
                # horizontal image, no need to process
                cv2.imwrite(os.path.join(updated_cropped_images_folder, filename), img)

print(processed_count, " images processed.")
In the above script, we import V2HCharDetector class from v2h_char_detector.py, which is a character detection class. The V2HCharDetector is a YOLOv8 model trained on the character detection dataset. But in the previous post, I haven’t mentioned how to train and use this model, you can click here to check the code v2h_char_detector.py, I will explain it in next post. For now, you just need to know that this class can detect vertically arranged characters and rearrange them horizontally.
After running the above script, you will get the cropped images in the updated_cropped_images_folder and one label text file cropped_container_number_labels.txt. We also need to check the images in the need_manual_check_images_folder manually, decide whether to process them or not.
There is one more step left, we need to split the dataset (images and labels) into training and validation sets.
# step 3: split_dataset_for_paddleocr_rec.py
# How to use: python3 split_dataset_for_paddleocr_rec.py
import os
import random
from shutil import copyfile
from tqdm import tqdm

images_path = '/home/user/project/data/updated_cropped_images'
labels_path = '/home/user/project/data/cropped_container_number_labels.txt'
train_images_path = '/home/user/project/data/paddleocr_rec_data/RecTrainData'
val_images_path = '/home/user/project/data/paddleocr_rec_data/RecEvalData'
train_labels_path = '/home/user/project/data/paddleocr_rec_data/rec_train_label.txt'
val_labels_path = '/home/user/project/data/paddleocr_rec_data/rec_eval_label.txt'

def split_dataset(total_images, train_ratio, images_folder, labels_file, train_images_folder, val_images_folder, train_labels_file, val_labels_file):
    with open(labels_file, 'r') as file:
        lines = file.readlines()

    total_images = min(total_images, len(lines))

    train_indices = set(random.sample(range(total_images), int(total_images * train_ratio)))

    if not os.path.exists(train_images_folder):
        os.makedirs(train_images_folder)
    if not os.path.exists(val_images_folder):
        os.makedirs(val_images_folder)

    with open(train_labels_file, 'w') as train_labels, open(val_labels_file, 'w') as val_labels:
        for i in tqdm(range(total_images), desc="Splitting dataset"):
            line = lines[i]
            image_name, label = line.split('\t')
            source_image_path = os.path.join(images_folder, image_name)

            if i in train_indices:
                copyfile(source_image_path, os.path.join(train_images_folder, image_name))
                train_labels.write(line)
            else:
                copyfile(source_image_path, os.path.join(val_images_folder, image_name))
                val_labels.write(line)

    print("Dataset split done.")

# change the total_images and train_ratio to fit your dataset
# train_ratio = 0.9 means 90% of the images will be used for training, 10% for validation
split_dataset(total_images=99999, train_ratio=0.9, images_folder=images_path, labels_file=labels_path, train_images_folder=train_images_path, val_images_folder=val_images_path, train_labels_file=train_labels_path, val_labels_file=val_labels_path)
After running the above script, you will get the training and validation images in the RecTrainData and RecEvalData folders, and the label text files rec_train_label.txt and rec_eval_label.txt. By now, the training dataset for the container number PaddleOCR recognition model is ready.
We have finished the training data preparation for the models training. In the next post, I will explain how to train the YOLOv8 model and the PaddleOCR recognition model, and how to use the trained models to recognize the container number in the container images.