Introduction
Magic links allow users to log in with a single click, eliminating the need for passwords and increasing the security of your application. It involves sending users a unique link via email or other messaging platforms, which they can click to authenticate and access their account.
Note: The post was updated in Dec 2022. The sample code was updated to the release of SvelteKit 1.0.
In this post, I will provide step-by-step instructions and sample code using SvelteKit and a serverless backend, so you can streamline the login process. Let’s dive in and simplify the login process using magic link for your websites.
Flow of Magic Link Login
There are two primary approaches to implementing magic link login. One method involves using a signed JWT to verify the magic link, while the another method uses a unique token stored in a database to verify the magic link. Both methods have their pros and cons, and you can choose the one that best suits your needs.
Method 1: JWT verification
- User enters their email address in a login form and clicks the “Login” button.
- The web app retrieves the user information from the database and verifies identity.
- The web app generates a JWT token (
auth_token) contaning the user information, and signs it with a secret key. - The web app sends an email containing a link with the signed JWT (
auth_token) to the user’s email address. - When the user clicks the link in the email, the web app verifies the signature of the JWT to ensure that it was not tampered with.
- If the signature is valid and the JWT (
auth_token) is not expired, the web app will generate another JWT token (login_token) and stores it to cookies, then user can log in the website.
Method 2: Unique token stored in database verification
- User enters their email address in a login form and clicks the “Login” button.
- The web app retrieves the user information from the database and verifies identity.
- The web app generates a unique token (
auth_token, no need to be JWT) for the user’s email address, and stores it to the database or other storage. - The web app sends an email containing a link with the
auth_tokento the user’s email address. - When the user clicks the link in the email, the web app retrieves the
auth_tokenfrom the database and verifies it. - If the auth_token is valid, the web app will generate another JWT token (
login_token) and stores it to cookies, then user can log in the website.
Comparison
- Method 1 with JWT verification is simpler and easier to implement. If the JWT secret key is cracked, the attacker can use it to log in the website. Make sure to set a long and complex secret key. Even better, you can rotate the secret key periodically to mitigate the risk. This method also can save some computation resources or cost, since it does not need to store and retrieve the
auth_tokenfrom the database. - Method 2 with unique token stored in database verification provides a way to track and revoke tokens if necessary, and can easily add additional security measures like rate limiting and IP blocking, which is useful for security purposes. However, it requires more work to implement and maintain. This method also has the potential risk if the database is not properly secured.
- Ultimately, the choice of which method to use depends on the specific needs and risks of your application, and it’s important to carefully consider the potential risks and implement appropriate security measures to mitigate those risks.
- If you want fast/easy implementation and save some cost, you can use Method 1 with JWT verification. If you want to add additional security measures, you can use Method 2 with unique token stored in database verification.
Implementation
In this post, I will use Method 1 with JWT verification to implement the magic link login system, but I will also provide some hints on how to implement Method 2 with unique token stored in database verification. Many of the steps are similar, so you can easily adapt the code samples to Method 2.
Prerequisites
- SvelteKit (version >= 1.0) as the full stack web framework
- The app is deployed to Cloudflare Pages (or other serverless platforms like Vercel, Netlify, etc.). I like Cloudflare ^_^
- Serverless database access, such as Planetscale, Neon Postgres, Supabase, Prisma, etc. If you don’t know how to use serverless database, you can check out my previous post.
- An automated email sending worker, to send the magic link to the user’s email address. If you want to setup a free email sending worker, you can check out my previous post.
- One key package to generate and verify JWT tokens: @tsndr/cloudflare-worker-jwt (lightweight with ZERO dependencies), installed by
npm i @tsndr/cloudflare-worker-jwt. The popular package jsonwebtoken are NOT supported by many serverless platforms and a little heavy, so don’t use it.
Step 1: Create a SvelteKit app and install dependencies
Create a SvelteKit app following the official guide. Then install the dependencies.
$ npm create svelte@latest login-demo
$ cd login-demo
$ npm install
$ npm install @tsndr/cloudflare-worker-jwt # install the JWT package
$ npm install tailwindcss # install tailwindcss for styling
$ npm run dev # run the app locally
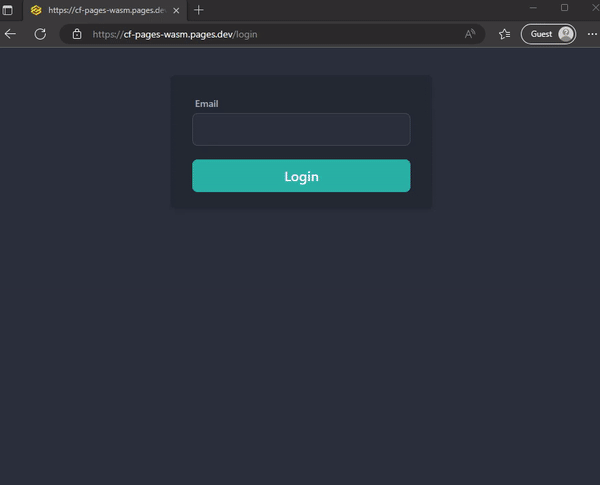
Step 2: Create a login page
Create a simple login form in your Sveltekit web app that asks the user to enter their email address. For SvelteKit >= 1.0, you just create a new folder src/routes/login and create a new file +page.svelte in it. Then add the following code to the file.
<!-- src/routes/login/+page.svelte -->
<script>
export let form; // to get the form returned message
</script>

<div class="flex flex-col items-center h-full w-full pt-4">
	<div class="bg-base-200 py-6 shadow-md rounded-lg w-full max-w-sm mt-6">
		<form method="POST" action="?/login" class="flex flex-col items-center space-y-2 w-full">
			<div class="form-control w-full max-w-xs">
				<label for="email" class="label font-medium pb-1">
					<span class="label-text">Email</span>
				</label>
				<input
					type="email"
					name="email"
					class="input input-bordered focus:outline-none focus:ring focus:border-accent w-full max-w-xs"
				/>
			</div>
			<div class="w-full max-w-xs pt-3">
				<button
					class="btn btn-accent text-xl text-white normal-case w-full max-w-xs disabled:bg-accent-focus disabled:text-inherit disabled:cursor-not-allowed"
				>
					Login
				</button>
			</div>
			{#if form?.message}
				<span class="label-text text-lg">{form?.message}</span>
			{/if}
		</form>
	</div>
</div>
Then we can access the login page at http://localhost:port/login.
Step 3: Create the login backend
Create a new file +page.server.js in src/routes/login, this file will be used to handle the login request to generate JWT login_token and send the magic link to the user’s email address. Then add the following code to the file. I have added some comments to explain the code.
// src/routes/login/+page.server.js
import jwt from '@tsndr/cloudflare-worker-jwt'
async function send_email(data, mail_auth_bearer) {
// send a post request to mail-sender worker
// mail-sender worker will send the email to the recipient_email
// if you want to setup a free email sending service,
// you can check related post here:
// https://linzichun.com/posts/free-email-sending-cloudflare-worker/
const options = {
method: 'POST',
headers: {
'Content-Type': 'application/json',
'Authorization': 'Bearer ' + mail_auth_bearer
},
body: JSON.stringify(data)
};
try {
await fetch("https://your.mail-sender.url/", options); // mail-sender worker url
console.log("mail-sender request success.");
} catch (err) {
console.log("mail-sender error:", err);
}
}
/** @type {import('./$types').Actions} */
export const actions = {
login: async ({ request, platform}) => {
const formData = await request.formData();
const data = Object.fromEntries([...formData]);
console.log("Login data:", data);
const user_email = data.email.toLowerCase();
// get the user_id from the database according to the user_email
// your code here......
// user_id will be null if the email is not existed in db
// check this post for how to use serverless db:
// https://linzichun.com/posts/database-cloudflare-functions-workers/
const user_id = '10000000001'; // assume that the user_id is '10000000001'
if (user_id) { // if user_id is found in db
// generate a JWT login_token with the user_id, and expired after 5 minutes
// it means that the user can only login within 5 minutes after the magic link is sent.
const login_token = await jwt.sign({
id: user_id,
exp: Math.floor(Date.now() / 1000) + (5 * 60),
}, 'Your-Login-JWT-Secret');
// Your-Login-JWT-Secret is the secret key for JWT login_token, you should put it in the .env file!!!
console.log("JWT login_token generated:", login_token);
// send email request with the login_token
const mail_data = {
"email": user_email,
"name": user_id, // temporary use the user_id as the name
"subject": "Login to your account",
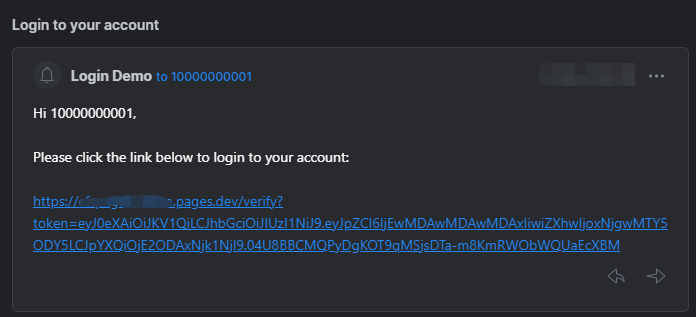
"content": "Hi " + user_id + ",<br><br>Please click the link below to login to your account: <br><br> https://your.domain/verify?token=" + login_token,
}
// Mail-Auth-Bearer-Token is the auth bearer token for the mail-sender worker
// you should put it in the .env file!!!
await send_email(mail_data, 'Mail-Auth-Bearer-Token');
// then user will receive an email with the magiclogin link in seconds
return {
success: true,
message: 'Please check your email to login.',
}
} else { // if user_id is null (the email is not existed)
return {
success: false,
message: 'Please register your email first.',
}
}
}
}
Then user will receive an email with the magic link in seconds like this:
Step 4: Create the verify backend
The magic link is something like https://your.domain/verify?token=xxxxx.xxxx.xxxxx. When user click the link, the app need to verify the token and login the user.
Create a new folder src/routes/verify and add a new file +server.js in the folder, this file will be used to handle the magic link request and verify the token. Then add the following code to the file. I have added some comments to explain the code.
// src/routes/verify/+server.js
import { redirect } from '@sveltejs/kit';
import jwt from '@tsndr/cloudflare-worker-jwt'

/** @type {import('./$types').RequestHandler} */
export async function GET( {cookies, locals, url} ) {
    // get the params from the url
    const params = new URLSearchParams(url.search);
    // get the login_token from the params
    const login_token = params.get('token');

    if (!login_token) {
        // if the login_token is null, redirect to the login page
        console.log("login_token is null");
        throw redirect(303, '/login');
    }

    console.log("login_token found in url:", login_token);

    // verify the JWT login_token with the secret key
    const is_valid = await jwt.verify(login_token, 'Your-Login-JWT-Secret')

    if (!is_valid) {
        // if the token is invalid or expired, redirect to the login page
        console.log("login_token verfify failed");
        throw redirect(303, '/login'); // or redirect to a page that says the token is invalid
    } else {
        console.log("login_token verfify success");
        const { payload } = jwt.decode(login_token); // decode the login_token to get the user_id
        // generate a JWT auth_token with the user_id, and expired after 24 hours
        const auth_token = await jwt.sign({
            id: payload.id, // the user_id
            exp: Math.floor(Date.now() / 1000) + (24 * 60 * 60), // expired after 24 hours
        }, 'Your-Auth-JWT-Secret');
        // Your-Auth-JWT-Secret is another secret key for JWT auth_token, you should put it in the .env file!!!
        console.log("auth_token generated:", auth_token);

        // save the auth_token in the cookie
        cookies.set('Auth_Token', auth_token);
    }

    throw redirect(303, '/dashboard') // if verify success, redirect to the dashboard page
}
Then create a simple dashboard page, user will be redirected to the dashboard page after the magic link is verified.
Create a new folder src/routes/dashboard and add a new file +page.svelte in the folder, you can randomly add some content to the page.
<!-- src/routes/dashboard/+page.svelte -->
<h1 class="text-2xl font-bold text-center">
  Great, you are logged in!
</h1>
Step 5: Create the hooks to verify the auth_token
The last step is to create hooks to verify the auth_token in the cookie. If the auth_token is valid, the user is logged in, otherwise the user is not logged in. For more details about the hooks, please check the official document.
Create a new file hooks.server.js in src folder and add the following code to the file. I have added some comments to explain the code.
// src/hooks.server.js
import { redirect } from '@sveltejs/kit';
import jwt from '@tsndr/cloudflare-worker-jwt'

// if the user is not logged in, he/she will be not allowed to access these routes
const protected_routes = [
    '/dashboard',
];

/** @type {import('@sveltejs/kit').Handle} */
export async function handle({ event, resolve }) {
    const auth_token = event.cookies.get('Auth_Token');

    if (!auth_token && protected_routes.includes(event.url.pathname)) {
        // if the auth_token is null, redirect to the login page
        console.log("auth_token not found and in protected route hook ", event.url.pathname);
        throw redirect(303, '/login');
    }

    if (auth_token) {
        console.log("auth_token found in hook:", auth_token);

        const is_valid = await jwt.verify(auth_token, 'Your-Auth-JWT-Secret');

        if (!is_valid) {
            // if the auth_token is invalid or expired, redirect to the login page
            console.log("auth_token verify failed in hook.");
            await cookies.delete('Auth_Token'); // clear the Auth_Token cookie
            event.locals.user = null; // clear the user info in locals
            if (protected_routes.includes(event.url.pathname)) {
                throw redirect(303, '/login');
            }
        } else {
            console.log("auth_token verify success in hook.");
            const { payload } = jwt.decode(auth_token);
            event.locals.user = payload.id; // save the user info in locals
            if (event.url.pathname === '/verify') {
                throw redirect(303, '/dashboard'); // login success, redirect to dashboard
            }
        }
    }

    const response = await resolve(event);
    return response;
}
That’s all for the code part, the overall structure of src folder is like this:
├── src/
│   ├── app.d.ts
│   ├── app.html
│   ├── hooks.server.js
│   └── routes/
│       ├── dashboard/
│       │   └── +page.svelte
│       ├── login/
│       │   ├── +page.server.js
│       │   └── +page.svelte
│       ├── verify/
│       │   └── +server.js
│       ├── +layout.svelte
│       └── +page.svelte
Step 6: Preview and deployment
Preview the app locally with npm run dev with the default adapter.
If you want to deploy the app to Cloudflare Pages, you need to follow the Cloudflare guide. We need to install Cloudflare adapter to instead of the default adapter.
If you want to preview the app locally with Cloudflare adapter, you can run the following command:
$ npm install wrangler --save-dev # install command line tool for Cloudflare Workers and Pages
$ npm run build # build the app, you will get a .svelte-kit folder
$ wrangler pages dev --live-reload  .\.svelte-kit\cloudflare\  --binding YOUR_ENV_VAR="your-environment-variable" # preview the app locally with Cloudflare adapter
For the implementation of the Method 2 (unique token stored in database verification), most of the code is the same as the Method 1. The only difference is that we need to store and verify the
login_token(with timestamp, because the link can only work within 5 minutes) in the database, or we can use Durable Objects to store thelogin_tokenif Cloudflare is used. You can use uuid or similar package to generate thelogin_token.