Introduction
Email delivery services like SendGrid, Mailgun, and Amazon SES are popular choices for sending emails. However, these services can be expensive for small businesses or personal websites with fewer users. In this post, I will show you how to send emails for free using Cloudflare Workers and MailChannels API. This approach allows you to send automated emails without incurring costs, making it an excellent alternative to paid services. Currently, I don’t see any limitations on the number of emails you can send using this method, and the delivery rate is quite good as well.
Note: The MailChannels API for Cloudflare Workers will come to an end on 30 June 2024. There won’t be free email sending service for MailChannels API & Cloudflare Workers after that date, very sad news. I have turned to use Resend for email sending, which is also a good choice. Resend provides 3000 free emails per month (enough for testing), Pro plan is $20 per month for 50,000 emails. I am satisfied with the service so far.
Note: The post was updated (add Domain Lockdown setup) in Sep 2023.
Note: The post was updated (add DKIM setup) in Jan 2023. Part of this blog is adapted from the Cloudflare Blog.
MailChannels created an email sending service for Cloudflare Workers, it’s pretty easy to use. With this service, you don’t need to create a separate account to use it with Cloudflare Workers. However, it’s important to note that this MailChannels service will only work if the request comes from a Cloudflare IP address. If your apps or websites are not currently deployed on Cloudflare, you can deploy an email-sender worker on Cloudflare. This allows you to send HTTP requests to the email-sender worker from your apps to send emails.
DNS Setup
To use the MailChannels API in Cloudflare Workers, you need to add a few DNS records to your domain. The records are used to verify the domain and ensure that the emails are not marked as spam. The records include Domain Lockdown, DKIM, SPF, and DMARC records.
I assumed that you have already had a domain name. If your domain name is your-domain.com, you can use [email protected] as the sender’s email address.
1. Domain Lockdown
To prevent other MailChannels users and accounts from sending emails from your domain without your permission, Domain Lockdown lets you indicate via a DNS TXT record a list of senders and accounts permitted to send emails from your domain. Any other accounts that send from your domain will have their emails rejected with an error.
If we want to send email from Cloudflare Workers via the MailChannels send() API, it’s mandatory to add Domain Lockdown records in DNS.
Its’s very easy to add Domain Lockdown records in DNS. Here are the steps:
-
Create a DNS TXT record following the pattern
_mailchannels.your-domain.com, replacingyour-domain.comwith your domain name. -
In the DNS TXT record, add the following content:
v=mc1 cfid=your-cf-subdomain.workers.dev
Replace your-cf-subdomain.workers.dev with your Workers subdomain name. Note that you can find the cfid at Cloudflare Dashboard (dash.cloudflare.com/) beneath “Your subdomain” at the right side of the Workers and Pages / Overview page.
2. SPF
SPF records are used to identify and filter email messages that are sent from your domain. SPF records are used to prevent email messages from being marked as spam.
It’s pretty easy to set up SPF records in DNS. Just add the following content to the DNS TXT record, the record name is your-domain.com:
v=spf1 a mx include:relay.mailchannels.net ~all
If you already have an SPF record, simply add include:relay.mailchannels.net to this entry. Make sure to add it BEFORE the “~all” mechanism as “~all” always matches and typically goes at the end of the SPF record.
3. DKIM
DKIM (DomainKeys Identified Mail) is a digital authentication method that allows email recipients to verify that the messages they receive are from the domain they claim to be from. When a sender adds a DKIM signature to their outgoing emails, they are essentially adding a digital signature that verifies the authenticity of the email’s domain. This signature is generated using a private key that is associated with the domain and can be verified by the recipient using a public key that is stored in the domain’s DNS records.
1. Create DKIM private and public key
We can use OpenSSL Toolkit or the online DKIM Key Generator to generate the keys. I will demonstrate with OpenSSL Toolkit on Ubuntu, but the process is similar on other platforms. The easiest way is to use the online DKIM Key Generator.
# generate private key as PEM file and base64 encoded txt file
$ openssl genrsa 2048 | tee private_key.pem | openssl rsa -outform der | openssl base64 -A > private_key.txt
# check the private key in private_key.txt

# generate public key
$ echo -n "v=DKIM1;p=" > pub_key_record.txt && \
$ openssl rsa -in private_key.pem -pubout -outform der | openssl base64 -A >> pub_key_record.txt
# check the public key in pub_key_record.txt
2. Add DKIM public key to DNS records
Add a TXT record to your domain’s DNS records, the name of the record should be <dkim_selector>._domainkey (you can use any name you like, such as my_dkim_selector._domainkey, but it must match with the DKIM selector name mentioned in below email-sender worker code), and the content should be the public key (in pub_key_record.txt) generated in the previous step. The content format:
v=DKIM1;p=<content in pub_key_record.txt>
# for example: v=DKIM1;p=VXyYljCrWmAzb2fhnKU+..................
4. DMARC
DMARC (Domain-based Message Authentication, Reporting, and Conformance) is an email authentication protocol that uses SPF and DKIM to determine the authenticity of an email message. DMARC records are used to enforce the usage of DKIM and SPF records.
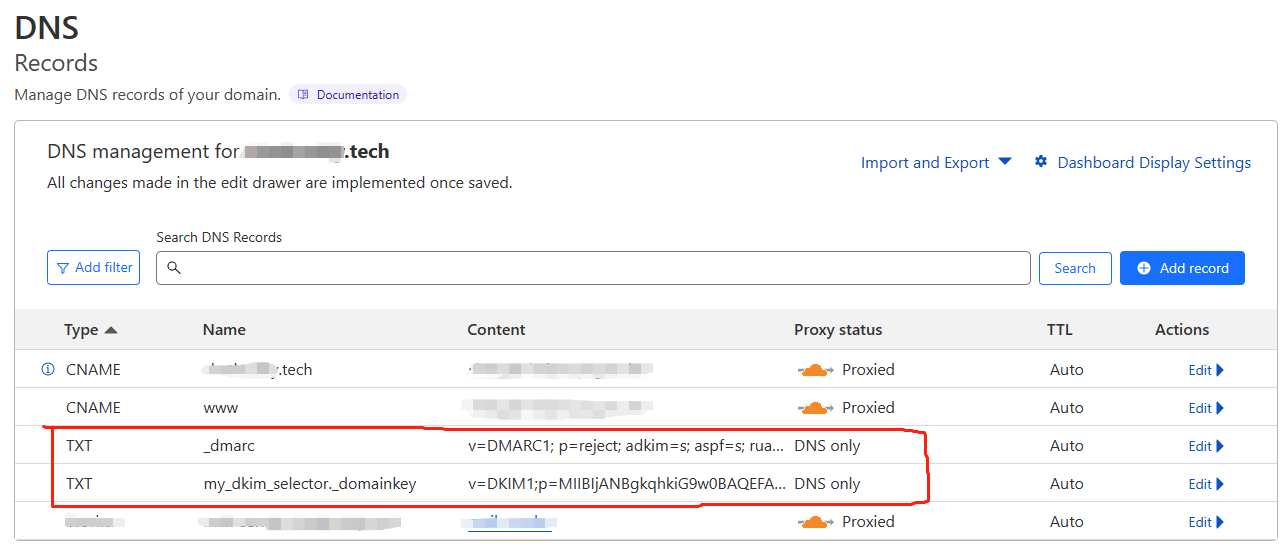
Add a TXT DMARC record in DNS, the name of the record should be _dmarc, the content is:
v=DMARC1; p=reject; adkim=s; aspf=s; rua=mailto:[email protected]; ruf=mailto:[email protected]; pct=100; fo=1;
Replace [email protected] with your desired email address. You can validate of your DMARC record at DMARC Analyzer.
Your DNS panel with DKIM and DMARC records should look like this:
Email-sender Worker
Now we can create an email-sender worker to send emails. The email-sender worker will receive HTTP requests with email content and send the email to the recipient. The email-sender worker will use the MailChannels API to send the email. For how to create a Cloudflare Worker, you can refer to the Cloudflare Workers documentation.
The dkim_private_key in below code is obtained from private_key.txt generated in the previous DKIM step, you had better to put it in the Worker’s environment variables. The email-sender worker code should look like this:
// email-sender worker

// put the below dkim_private_key to the worker's environment variables
// dkim_private_key: FG2gh3Lf26gdgfd3FGDS..............
export default {
  async fetch(request, env, context) {
      const my_headers = request.headers;
      // Better to add Bearer token for authentication to filter out malicious requests

      // payload = {recipient_email: "[email protected], name: "user1", subject: "Login Alert", content: "<p>You just logined from Singapore at 13:50 05 June 2022.</p>",...}
      const payload = await request.json();

      const email_send_request = new Request('https://api.mailchannels.net/tx/v1/send', {
				method: 'POST',
				headers: {
					'content-type': 'application/json',
				},
				body: JSON.stringify({
					personalizations:
					[
					{
						to: [{ email: payload.recipient_email, name: payload.name }], // here is the recipient's email address and name
						// add DKIM signature here
						"dkim_domain": "your-domain.com", // your domain name, align with the domain in the 'From' header address.
						"dkim_selector": "my_dkim_selector", // the DKIM selector name, MUST align with the name of the TXT record you added in step DKIM.
						"dkim_private_key": env.dkim_private_key, // the private key generated in step DKIM
					},
					],
					from: {
						email: "[email protected]", // You can use any email account(no_reply, admin, support...) you want.
						name: "Your-Domain Admin", // You can use any name you want.
					},
					subject: payload.subject, // here is the subject of the email
					content:
					[
					{
						type: 'text/html', // also can be text/plain
						value: payload.content, // here is the content of the email
					},
					],
				}),
			});

      try {
		  const res = await fetch(email_send_request);
	  } catch (err) {
		  console.log(err);
	  }

      return new Response('ok', { status: 200 })
	},
Please read the comments in the code carefully. All the necessary information is included in the code.
Now we can test the email-sender worker, let it to send email for us. You can send a http request to the email-sender worker route(example: https://mail-sender.your-cf-subdomain.workers.dev) from anywhere, even local machine, you can use any tool like Postman. The request body should be a json object with the following fields like this:
{
  "recipient_email": "[email protected]",
  "name": "user1",
  "subject": "Login Alert",
  "content": "<p>You just logined from Singapore at 13:50 05 June 2022.</p>",
}
Further Improvements
1. Add Queue to the email-sender worker
Sometime we need to send a large number of emails, such as sending a newsletter to thousands of users. In this case, we can add a queue to the email-sender worker, so that we can send emails in batches.
Cloudflare Queues is a great choice, it allows developers to send and receive messages with guaranteed delivery. We can use it to store the email requests and send them in batches. But it’s not free, only paid account can use it.
Here is a simple example of using Cloudflare Queues to send emails in batches:
// email-sender worker code with Cloudflare Queues
export default {
  async fetch(request, env, context) {
      const my_headers = request.headers;
      // Better to add Bearer token for authentication to filter out malicious requests

      // payload = {recipient_email: "[email protected], name: "user1", subject: "Login Alert", content: "<p>You just logined from Singapore at 13:50 05 June 2022.</p>",...}
      const payload = await request.json();
	  // you need to create a queue in Cloudflare and add it to the worker's Triggers in the dashboard or in wrangler.toml
	  await env.MAIL_SENDER_QUEUE.send(payload); // send the email request to the queue
	  return new Response('ok', { status: 200 });
  },

  async queue(batch, env) {
	  for (const message of batch.messages) {
		const payload = message.body;

		const recipient_email = payload.recipient_email;
		const name = payload.name;
		const subject = payload.subject;
		const content = payload.content;

		// same code as above email-sender worker code
		// ...
	  }
  },
}
2. Receive email with your own domain
By using the above approach, you can achieve to send emails automatically. If you want to receive email with your own domain, you can register an email service, such as ZOHO Mail (many alternatives). They provide a free plan (1 custom domain, five users, enough for most independent developers) to use. After setting up your own dmain with the mail service, you can use it (such as [email protected], looks formal and professional) to receive users’ email and send particular email to them.
References
- Cloudflare Blog: https://blog.cloudflare.com/sending-email-from-workers-with-mailchannels/
- MailChannels API: https://api.mailchannels.net/tx/v1/documentation
- Cloudflare Queues: https://developers.cloudflare.com/queues/
- Custom domain with Zoho Mail: https://www.zoho.com/mail/how-to/setup-my-domain-with-zoho-mail.html