Introduction
With the help of Cloudflare Workers, we can easily add serverless functions within Cloudflare Pages to create a dynamic website. To get started, check out this post that walks you through the step-by-step process of building a full stack website using Cloudflare Pages. And one of the critical pieces of full stack capability is database usage.
Cloudflare Workers is built V8 Javascript engine. However, we often face limitations when it comes to installing standard database drivers through npm install, which is a deviation from the traditional node.js project setup. This often results in restricted database usage within Workers or Pages. In this post, I will share with you multiple ways to query a database, such as PostgreSQL, MongoDB, and PlanetScale, from your Cloudflare Workers or Pages.
If you are not interested in the detail of each method, you can jump to the Severless DB Recommenation section to get the recommendation directly.
Overview
I understand the importance of verifying the efficiency of database query methods. That’s why I encourage you to check out the demo website. There are primarily two methods of querying database from Cloudflare Pages or Workers.
The first way is to use the serverless databases that already support HTTP connections, such as PlanetScale MySQL, NEON Postgres, Cloudflare D1 SQLite, Supabase, MongoDB Atlas, even TiDB Serverless from PingCAP, which makes connecting much easier. These serverless databases are incredibly simple to use, we can send the HTTP request to query the database anywhere. This is also the recommended way to query the database from serverless Workers or Pages.
Alternately, you can ceate a HTTP REST API agent on your server to communicate with the database, which you can call the API from Workers. There are various libraries to help us build the REST API to database, it’s definitely more complicated to configure serverless database. We can also deploy Prisma to Cloudflare Workers, Prisma will access the database and return results to Workers. Prisma is an ORM, or object-relational mapper, which transforms entries in a database into objects in code. Prisma currently supports Postgres, MySQL, SQL Server, SQLite and MongoDB.
The second way is to use the deno driver and connect through Cloudflare Tunnel. There are only PostgreSQL and MySQL runtime Deno driver options at the moment. The drivers have a minimal file size and modified from the deno version. With the template code, we can query non-serverless PostgreSQL and MySQL database from the Workers easily.
In addition to the above two ways, Workers KV is also a good choice in some conditions. Cloudflare Workers KV is a distributed, eventually consistent, key-value storage. It allows us to store billions of key-value pairs and read them with ultra-low latency. It has one biggest restrictions, KV supports high read volumes with low latency, but it is not ideal for situations where we need to write relatively frequently. Because a new written record may take 30-60 seconds to propagate to the global network edge. So we cannot use KV like a normal database, make a choice based on your situation.
Jan 2023 Update: Cloudfalre D1 SQLite serverless database is under Beta stage now, we can query it from Workers or Pages directly, nearly no setup required. I have tested it, it’s very easy to use. You can check this official DOC and the API DOC for detail. In my testing (my pc and db are in the same region), the latency is ~10-20ms for each select query, ~100ms for each insert query. I am satisfied with the latency. Now (Dec 2023) it’s highly recommended to use D1 SQLite if you are using Cloudflare Workers or Pages.
March 2024 Update: Planetscale announced the free hobby plan will be retired on April 2024, sigh… I will keep the below related content for reference, you can still use the paid version of Planetscale MySQL if you need.
In the following part, I will introduce usage detail on MongoDB Atlas (HTTP method), PlanetScale MySQL (HTTP method) and PostgreSQL (Deno driver method).
MongoDB Atlas (HTTP method)
MongoDB Atlas is a Cloud-Native Document Database as a Service, it offers free 512MB database storage. I used free version for demonstration and testing. You will have larger storage and better latency if you choose paid version. MongoDB Atlas provides Data API, it lets us read and write data from MongoDB Atlas with standard HTTPS requests. It’s very easy to implement in the Functions or Workers. For the detail setup steps, you can check this post. The overall spent time of each query for free version MongoDB Atlas is about 2 seconds in my testing, I will show more test results in the end of this post.
There is another way to use MongoDB Atlas with the help of Realm SDK in Worker. Realm is a SDK to provide access to Atlas App Services. MongoDB posted a tutotial with code on how to use it. It requires more complex setup.
PlanetScale MySQL (HTTP method)
PlanetScale is a MySQL-compatible serverless database platform, it offers free 5GB database storage, 1 billion row reads and 10 billion row writes per month. PlanetScale provides serverless driver for Javascript, so we can directly query the PlanetScale MySQL from Cloudflare Workers or Pages using the Fetch API. It’s also very easy to implement in Worker and Pages, next I will show you how to do.
1. Create a PlanetScale MySQL Database
Follow this guide to create a free PlanetScale MySQL database. Crate a new table using PlanetScale web console, here is the sample table schema:
CREATE TABLE `submitinfo` (
	`nickname` varchar(50) NOT NULL,
	`fruit` varchar(30) NOT NULL,
	`time` varchar(40) NOT NULL,
	`country` varchar(20) NOT NULL,
	PRIMARY KEY (`nickname`)
);
2. Install PlanetScale Serverless Driver
Open console or terminal in your development pc, enter your Workers or Pages project directory and type the following command to install PlanetScale Serverless Driver, the package size is less than 30kb. Refer this post if you do not know how to create a Pages project; refer this official guide if you do not know how to create a Workers project.
$ npm install @planetscale/database --save
After installation, edit the .gitignore file, make sure you can upload package @planetscale/database to the GitHub Repo or Workers Repo. Here is a sample .gitignore file:
# .gitignore
.DS_Store
*-lock.*
*.lock
*.log
.dev.vars
node_modules/*      # ignore node_modules folder
!node_modules/@planetscale  # but NOT ignore this folder in node_modules, we only want this!
3. Add the Code in Pages or Workers Script
The bleow code can work in Pages functions, it can also work in Workers with little changes.
import { connect } from '@planetscale/database'

export async function onRequestPost(context) {
  ......
  const pscaleConfig = {
      host: '<YOUR_PS_HOSTNAME>',
      username: '<YOUR_PS_USERNAME>',
      password: '<YOUR_PS_PASSWORD>',
      // add the following 3 lines for @planetscale/database >= 1.7.0
      fetch: (url, init) => {
        delete (init)["cache"];
        return fetch(url, init);
      }
  };
  const pscaleConn = connect(pscaleConfig);
  // insert query
  await pscaleConn.execute('INSERT INTO submitinfo (nickname, fruit, time, country) VALUES (?, ?, ?, ?)', ["Alex", "apple", "2022102615451011","SG"]);
  // select/count query
  const countRes = await pscaleConn.execute('SELECT COUNT(*) FROM submitinfo WHERE fruit = ?', ["apple"]);
  console.log(countRes.rows[0])
  ......
}
You can check the detail code here. I tested the PlanetScale MySQL in Singapore AWS, it showed very good performance on latency (~30ms each query) for my case.
PostgreSQL (Deno driver method)
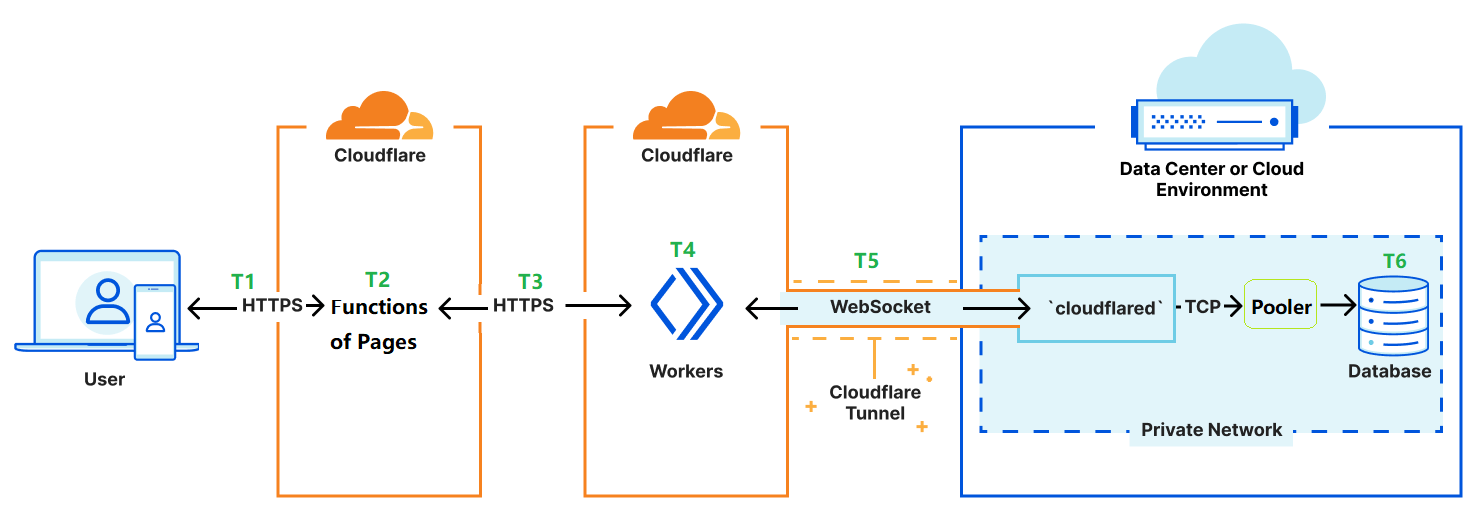
As you can see the above Figure-2, an user visits a website running on Cloudfalre Pages to query something, a HTTPS requests embedded with database query from Functions of Pages is sent to the Workers (we call it database connector in this case), then the worker communicates with cloudflared via Cloudflare Tunnel. The cloudflared is installed on the server that we also host our PostgreSQL database, cloudflared can query the PostgresSQL in its local and return the result to Workers/Functions/User. To utilize server RAM efficiently, PgBouncer is placed in front of Postgres to provide connection pooling.
Cloudflare provides the worker template for PostgreSQL and MySQL. We will use PostgreSQL for demonstration here. The official tutorial is a little confusing for beginners, I will outline my steps instead.
1. Configure Cloudflare Tunnel
Firstly, we need to configure the Cloudflare Tunnel. Cloudflare Tunnel provides us with a secure way to connect our resources to Cloudflare without a publicly routable IP address. With Tunnel, we do not send traffic to an external IP — instead, a lightweight daemon in your infrastructure (cloudflared) creates outbound-only connections to Cloudflare’s edge (such as Workers or Functions).
If you never use Cloudflare Tunnel, I recommend you follow this guide to set it up from Cloudflare webpage Dashboard. In step 2.2, service is tcp://localhost:5432 for our case, 5432 is default Postgres port. You need to prepare a domain or subdomain in Cloudflare.
From this step, you shoud have a public Tunnel Route hostname. We will use it in worker to access database.
2. Start the PostgreSQL Server and PgBouncer
We will use docker-compose to install PostgreSQL and PgBouncer. Postgres version 12 is used, DO NOT change the image version, older or newer version may be not compitable with edoburu/pgbouncer.
Here is docker-compoe.yml file, paste your database username and password in the corresponding field.
# docker-compose.yml
version: '3'
services:

  db:
    image: postgres:12
    restart: always
    volumes:
      - pg_data:/var/lib/postgresql/data
    environment:
      - POSTGRES_PASSWORD=PASTE_YOUR_DB_PASSWORD_HERE
      - POSTGRES_USER=PASTE_YOUR_DB_USERNAME_HERE
      - POSTGRES_DB=testdb

  pgbouncer:
    image: edoburu/pgbouncer
    restart: always
    environment:
       - DB_USER=PASTE_YOUR_DB_USERNAME_HERE
       - DB_PASSWORD=PASTE_YOUR_DB_PASSWORD_HERE
       - DB_HOST=db
       - DB_NAME=testdb
       - POOL_MODE=transaction
       - ADMIN_USERS=postgres,PASTE_YOUR_DB_USERNAME_HERE
    ports:
      - "5432:5432"
    depends_on:
      - db

volumes:
  pg_data:
Go to the folder with docker-compoe.yml file, execute the following command to start the docker compose:
$ docker compose up -d
Your Postgres server and PgBouncer should be running now, also created a database with name testdb.
Let’s connect to Postgres to create the below table and field via IP (127.0.0.1 or public IP, not via Tunnel) connection, you can use any SQL clients or CLI.
database:
      testdb
table:
      public.submitinfo
field:
      nickname (VARCHAR)
      fruit (VARCHAR)
      time (VARCHAR)
      country (VARCHAR)
After this step, you shoud know the database name, username and password.
3. Edit Worker and Query Database
Make sure you have installed Node.js, npm and Wrangler on you development PC, and you should know how to create a Workers project.
Download the template code to your PC.
Replace the /worker-postgres/src/index.ts with the following index.js file. (I prefer Javascript here, Typescript is also ok.)
// index.js
import { Client } from './driver/postgres';

export default {
async fetch(request, env, context) {
  try {
        const client = new Client({
            user: PASTE_YOUR_DB_USERNAME_HERE,
            database: 'testdb',
            hostname: PASTE_YOUR_TUNNEL_HOSTNAME_HERE,
            password: PASTE_YOUR_DB_PASSWORD_HERE,
            port: '5432',
        });

        await client.connect();

        var data = await request.json();

        const fruit = data.fruit;
        const nickname = data.nickname;

        var date = new Date(Date.now());
        date.setHours(date.getHours() + 8);// I am in UTC+8
        const time = date.toISOString();

        const country = request.cf.country;
        // select query
        //const res = await client.queryObject`SELECT * FROM public.submitinfo WHERE fruit = ${fruit};`;
        // insert query
        const res = await client.queryObject`INSERT INTO public.submitinfo
					(nickname, fruit, time, country) VALUES
					(${nickname}, ${fruit}, ${time}, ${country});`;

        return { body: res, option: { status: 200 } };
  } catch (error) {
        return new Response(error, { status: 400 });
}
}
Replace the Tunnel hostname, database username and password in the above code. Add worker name that you prefer in /worker-postgres/wrangler.toml.
Now you can deploy your worker online.
$ wrangler publish
You should get a Worker URL, for example: https://your-worker.worker-subdomain-name.workers.dev. You also can set a custom domain in dashboard.
4. Test and Use the Worker
Use Curl to test the Worker:
curl -X POST https://your-worker.worker-subdomain-name.workers.dev
   -H 'Content-Type: application/json'
   -d '{"fruit":"apple","nickname":"James"}'
You should get a return message from database if everything is ok.
Now anyone who knows the Worker URL can query your database. In order to secure your database, you should add Authorization header to validate, let only authorized users can query the database.
With the worker URL, we can call it from functions of Pages, you can check the functions code on how to use it.
Comparison of Latency
The demo website will be used to do the latency testing. I am located in Singapore, MongoDB Atlas was created in Singapore AWS, PostgreSQL was created in Hong Kong Azure and Singapore Alibaba Cloud, PlanetScale MySQL was created in Singapore AWS, Clouflare D1 SQLite was created in APAC region (I believe it’s in Singapore). The website is hosted on Cloudflare Pages.
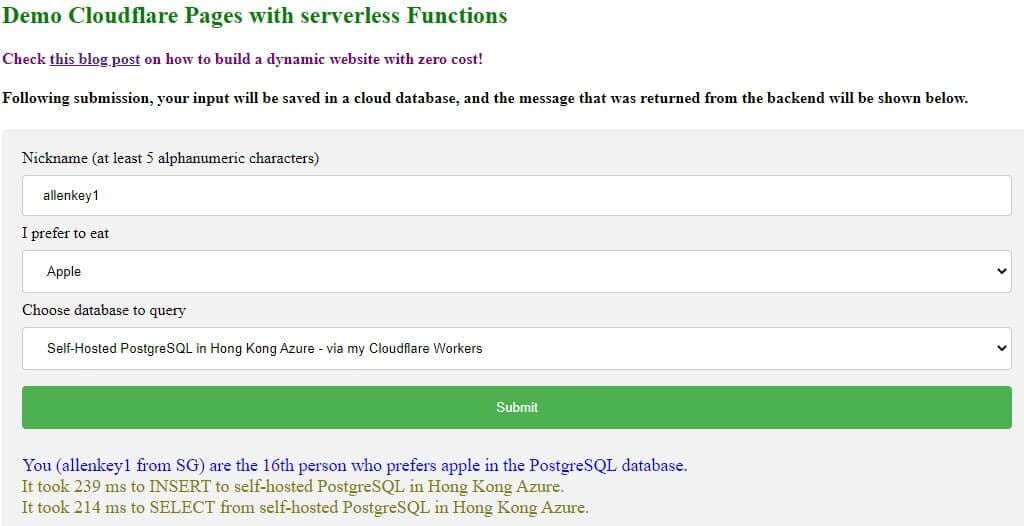
When you press the submit button in the demo website, one INSERT and one SELECT query will be executed in the database. You will see the total time $T$ (from “send query” to “get result” ) spent on each query in the returned message.
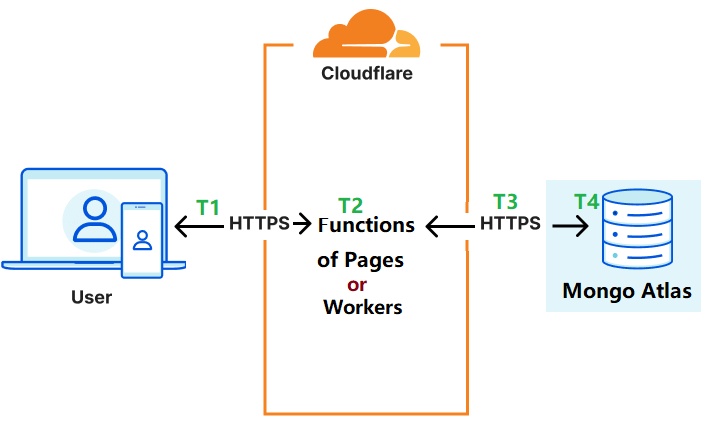
For the MongoDB Atlas (HTTP method), total time $T$ $≈$ $T1$ (HTTP transmission time) $+$ $T2$ (Worker/Function running time) $+$ $T3$ (HTTP transmission time) $+$ $T4$ (request process time and query execution time in database). T1 is small with the help of global network edge. T2 Function/Worker running time is very small (less than 10ms). T3 depends on distance. T4 should be the larget in this case.
For the PostgreSQL (deno driver method), total time $T$ $≈$ $T1$ (HTTP transmission time) $+$ $T2$ (Function running time) $+$ $T3$ (HTTP transmission time) $+$ $T4$ (Worker running time) $+$ $T5$ (Tunnel transmission time) $+$ $T6$ (query execution time in database). T1 and T3 is small with the help of global network edge. T2 and T4 Function/Worker running time is very small (less than 10ms). T5 depends on distance. T6 should also be very small too.
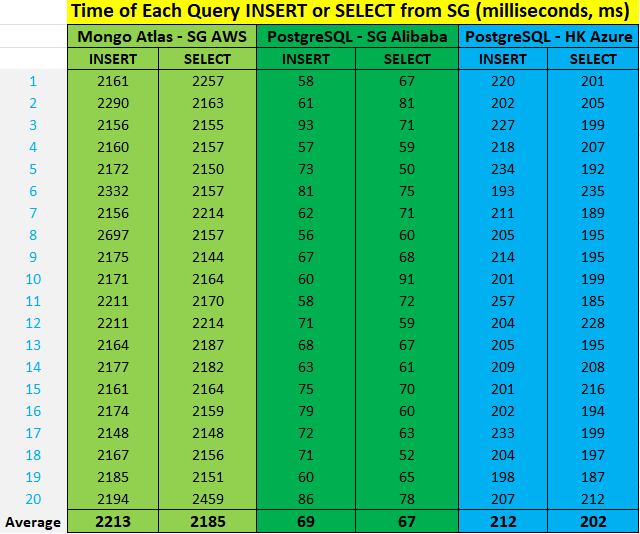
As you can see from the above results, each query (SG user $→$ SG MongoDB Atlas $→$ SG user) takes about 2 seconds; each query (SG user $→$ SG PostgreSQL $→$ SG user) takes about 70ms; each query (SG user $→$ HK PostgreSQL $→$ SG user) takes about 200ms. Your network condtion can affect the query time too, the query time will be longer if your network is not good.
Sep 2022 Update: For the PlanetScale MySQL serverless, each query takes about 30ms.
Jan 2023 Update: For the Cloudflare D1 SQLite serverless, each select query takes about 10-20ms, each insert query takes about 100ms.
Conclusion
Now you should be more clear on how to query database from Cloudflare Pages and Workers. You also understand how to select database. If you prefer a serverless database, PlanetScale MySQL, Cloudflare D1 SQLite and NEON Postgres are very good use with low latency, Supabase is also a good choice. If you want to use NoSQL database, then you should try MongoDB Atlas. If you want to set up your own database, you can start with PostgreSQL (Deno driver method).
Severless DB Recommenation (Dec 2023)
If you are using Cloudflare Workers or Pages: Cloudflare D1 SQLite > NEON Postgres > Supabase > MongoDB Atlas > TiDB Serverless.
If not: NEON Postgres > Supabase > MongoDB Atlas > TiDB Serverless.
Reference
- Introducing Relational Database Connectors: https://blog.cloudflare.com/relational-database-connectors/
- Announcing D1: our first SQL database: https://blog.cloudflare.com/introducing-d1/
- Announcing Cloudflare’s Database Partners: https://blog.cloudflare.com/partnership-announcement-db/
- Workers KV — Cloudflare’s distributed database: https://blog.cloudflare.com/workers-kv-is-ga/