Introduction
WebAssembly (Wasm) is a binary instruction format designed for secure and fast execution on the web. As a low-level “virtual machine”, it runs code at near-native speeds, enabling developers to use languages like Rust, C, and C++, it’s suitable for games, image processing, AR/VR and other computationally intensive applications.
Rust is a modern, systems programming language that emphasizes safety, performance, and concurrency. Known for its strong memory safety guarantees and minimal runtime, it is becoming a popular choice for high-performance applications. Of course, Rust’s learning curve can be quite steep ~(>_<~)
In this blog post, we’ll take a practical look at using Rust and WebAssembly (Wasm) for image processing in webpages. By integrating the performance of Rust with the flexibility of Wasm, we’ll create a simple yet effective web-based image processing application.
Prerequisites
- Install Rust and Cargo (Rust’s package manager) by following the instructions on the official doc.
- Install wasm-pack by executing the following command:
cargo install wasm-pack
wasm-pack is a workflow toolchain designed to simplify WebAssembly development. It provides a standard command-line interface for building, testing, and publishing Rust-generated WebAssembly packages for seamless integration with JavaScript, it offers developers an efficient workflow.
- Necessary Rust packages (install them by adding them in
Cargo.toml)- wasm-bindgen: it is a tool that simplifies the interaction between JavaScript and WebAssembly by generating glue code, allowing developers to call WebAssembly functions from JavaScript and vice versa.
- web-sys: it is a collection of raw bindings to the Web APIs using wasm-bindgen.
- image: it is a pure Rust library for basic image processing functions and methods for the most common image formats. You may add imageproc for more advanced image processing functions.
Workflows of the Image Processing Application
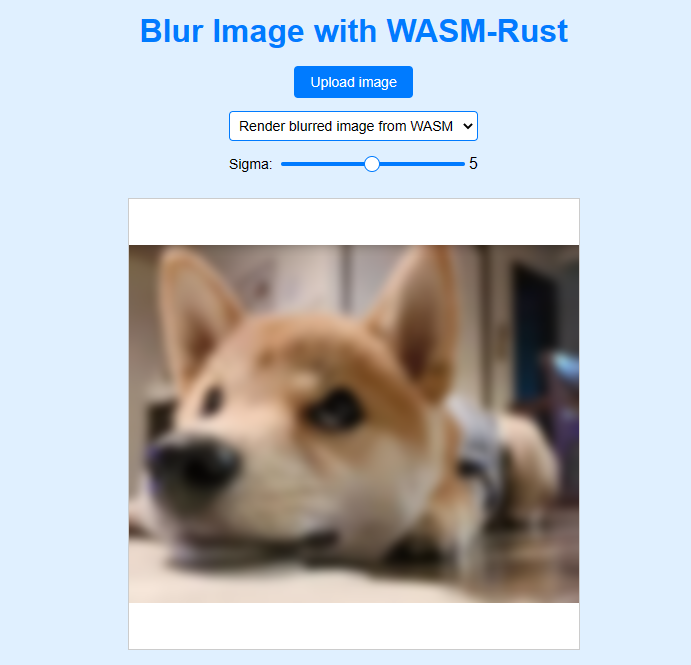
We’ll create a simple image blurring application that allows users to upload an image, control the value of sigma (a parameter of Gaussian function) and apply the Gaussian blur filter, then draw the blurred image on the webpage. You can click here to try the demo.
There are two ways to draw images on a webpage: directly from JavaScript to draw the blurred image, or from Wasm. Choosing the right approach depends on the specific needs of the project.
The workflow of the two ways are shown below:
Workflow - draw from JS
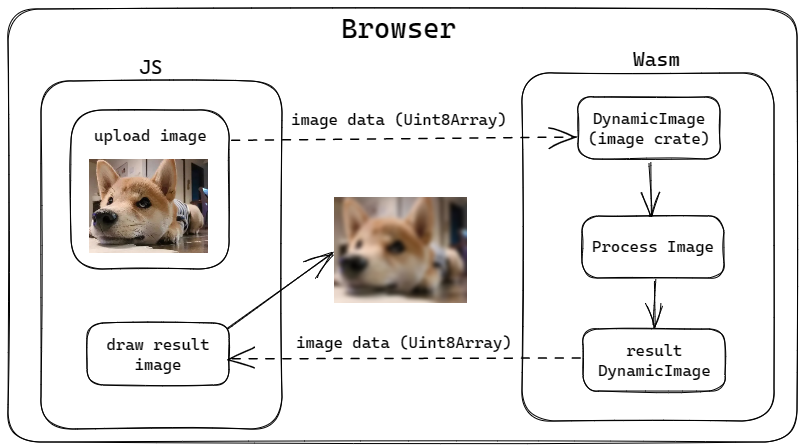
For this workflow, image data is first converted to a Uint8Array (8 bit unsigned int array ) in js and then passed to Wasm. In Wasm, the image data (vec<u8>) is converted to DynamicImage for image processing. After the image processing is done, the image data is converted to Uint8Array and then passed back to js. In js, the image data is converted to a ImageData object and then drawn on the canvas as usual.
Workflow - draw from Wasm
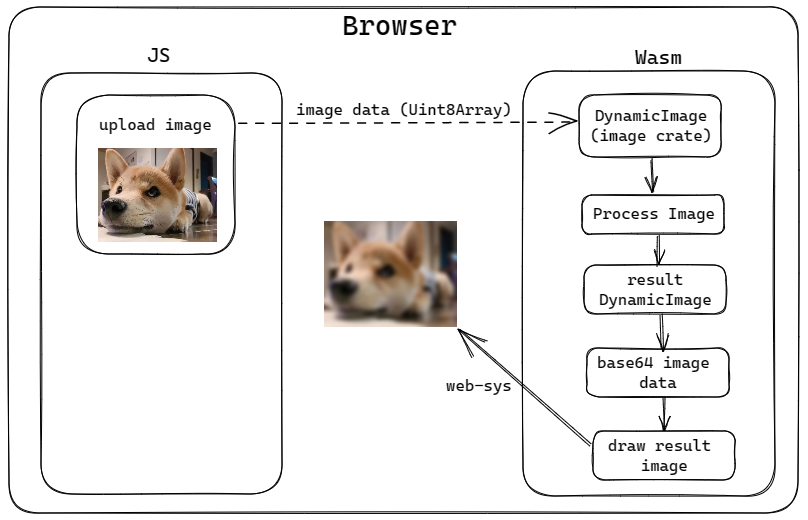
For this workflow, image data is first converted to a Uint8Array (8 bit unsigned int array ) in js and then passed to Wasm. In Wasm, the image data (vec<u8>) is converted to DynamicImage for image processing. After the image processing is done, the result DynamicImage is converted to base64 string, then drawn on the html canvas from Wasm with the help of web-sys. web-sys provides many useful APIs for interacting with the DOM, including the CanvasRenderingContext2D API for drawing images on the canvas.
Comparison of the two workflows
The workflow of drawing from JS is more simpler in terms of code, we can use familiar JS APIs to draw images on the canvas. The workflow of drawing from Wasm is flexible, but more complex in terms of code. Both workflow can use the power of Rust and Wasm to achieve high performance image processing.
Implementation of Drawing from JS
Create and configure a new Rust library
First, we’ll create a new Rust library project:
$ cargo new --lib wasm_image_blur
$ cd wasm_image_blur
Then configure the project by adding the following lines to Cargo.toml, Cargo will automatically download the necessary dependencies.
[lib]
crate-type = ["cdylib"]

[dependencies]
wasm-bindgen = "0.2"
wasm-bindgen-futures = "0.4"
futures = "0.3"
base64 = "0.13"
image = { version = "0.23", default-features = false, features = ["jpeg", "png"] }

[dependencies.web-sys]
version = "0.3"
features = [
  'Document',
  'Element',
  'HtmlElement',
  'HtmlImageElement',
  'HtmlCanvasElement',
  'Window',
  'CanvasRenderingContext2d'
]
Write the Rust code
In src/lib.rs, replace the existing code with the following, I have added comments to explain the code.
extern crate image;
use image::{DynamicImage, ImageFormat, ImageBuffer, Rgba};
use wasm_bindgen::prelude::*;

#[wasm_bindgen]  // this macro is required for wasm-bindgen to work, must be added to the top of the file
extern "C" {
    // to call `console.log()` of js in rust, for debugging
    #[wasm_bindgen(js_namespace = console)]
    fn log(s: &str);
}

#[wasm_bindgen]
pub fn blur_image_and_draw_from_js(_array: &[u8], width: u32, height: u32, sigma: f32) -> Vec<u8> {
    log("blur_image_and_render_from_html called"); // you will see this log in browser console
    // convert array to image
    let input_image = ImageBuffer::<Rgba<u8>, Vec<u8>>::from_raw(width, height, _array.to_vec())
    .map(DynamicImage::ImageRgba8)
    .expect("Failed to create image from raw data");

    let blurred_image = input_image.blur(sigma); // blur function is from image crate
    if let DynamicImage::ImageRgba8(blurred_rgba_image) = blurred_image {
        blurred_rgba_image.into_raw() // convert blurred image to array and return
    } else {
        panic!("Unexpected image format.");
    }
}
Then compile the Rust code to Wasm:
$ wasm-pack build --target web
This will generate a pkg folder, which contains the compiled Wasm file and the JS glue code.
Write the HTML and JS code
Create a file called index.html in the wasm_image_blur directory with the following content:
<!DOCTYPE html>
<html lang="en">
<head>
    <meta charset="UTF-8">
    <meta name="viewport" content="width=device-width, initial-scale=1.0">
    <title>WASM-Rust Blur Image</title>
    <!-- <style>  your-style-code  </style> -->
</head>
<body>
    <div>
        <input type="file" id="image-upload" accept="image/png, image/jpeg">
        <div class="range-container">
            <label class="range-label">Sigma:</label>
            <input type="range" id="blur-range" min="0.1" max="10" step="0.1" value="0.1">
            <span id="blur-value">0.1</span>
        </div>
    </div>
    <canvas id="image-canvas" width="450" height="450"></canvas>

    <script type="module">
    import init, { blur_image_and_draw_from_js } from './pkg/wasm_image_blur.js';

    async function run() {
        await init(); // initialize wasm module

        const imageUpload = document.getElementById('image-upload');
        const blurRange = document.getElementById('blur-range');
        const blurValue = document.getElementById('blur-value');
        const canvas = document.getElementById('image-canvas');
        const ctx = canvas.getContext('2d');

        let originalImageData = null; // store original image data

        // to fit/center image on canvas
        let offsetX = 0;
        let offsetY = 0;
        let scaledWidth = canvas.width;
        let scaledHeight = canvas.height;

        imageUpload.addEventListener('change', async (event) => {
            const file = event.target.files[0];
            if (!file) return; // if no file selected, return

            const image = new Image();
            image.src = URL.createObjectURL(file);

            image.onload = () => {
                // if new image is uploaded, reset blur range
                blurRange.value = 0.1;
                blurValue.textContent = 0.1;
                // fit image to canvas
                const scaleFactor = Math.min(canvas.width / image.width, canvas.height / image.height);
                scaledWidth = image.width * scaleFactor;
                scaledHeight = image.height * scaleFactor;
                offsetX = (canvas.width - scaledWidth) / 2;
                offsetY = (canvas.height - scaledHeight) / 2;

                ctx.clearRect(0, 0, canvas.width, canvas.height); // clear canvas
                ctx.drawImage(image, offsetX, offsetY, scaledWidth, scaledHeight); // draw original image to canvas
                originalImageData = ctx.getImageData(offsetX, offsetY, canvas.width - offsetX, canvas.height - offsetY); // store original image data
            }
        });

        blurRange.addEventListener('input', () => { // blur image when range value changes
            if (!originalImageData) return;

            const inputImageData = new Uint8Array(originalImageData.data.buffer);
            const sigma = parseFloat(blurRange.value); // blur strength

            // get blurred image data from wasm
            const outputImageData = new Uint8Array(blur_image_and_draw_from_js(inputImageData, scaledWidth, scaledHeight, sigma)); // call wasm function
            // create new ImageData from outputImageData
            const outputImage = new ImageData(new Uint8ClampedArray(outputImageData), scaledWidth, scaledHeight);
            // update blurred image to canvas
            ctx.putImageData(outputImage, offsetX, offsetY);

            blurValue.textContent = sigma.toFixed(1); // update blur value
        });
    }

    run();
    </script>
</body>
</html>
Serve the web application
Now we can serve the web application with a simple HTTP server. If you have Python3 installed, you can run command python3 -m http.server in the wasm_image_blur directory to start a server (many alternatives to start a HTTP server, free to use your favorites). Then open http://localhost:8000 in your browser, you should see the webpage and be able to upload an image and blur it.
Directoty structure
├── wasm_image_blur/
│   ├── cargo.toml
│   ├── cargo.lock
│   ├── index.html
│   ├── src/
│   │    └── lib.rs
│   └── pkg/
│       ├── package.json *(can be deleted)
│       ├── wasm_image_blur_bg.wasm
│       ├── wasm_image_blur_bg.wasm.d.ts  *(can be deleted)
│       ├── wasm_image_blur.d.ts  *(can be deleted)
│       └── wasm_image_blur.js
wasm_image_blur_bg.wasm and wasm_image_blur.js in the pkg folder are the compiled Wasm file and the JS glue code, they are needed to run the web application. We can delete the other files in the pkg folder when we deploy the web application. Also, we can delete cargo project files (cargo.toml, cargo.lock) and src folder when we deploy the web application. index.html,/pkg/wasm_image_blur.js and /pkg/wasm_image_blur_bg.wasm are files we need to keep.
Implementation of Drawing from Wasm
Steps to create and configure a new Rust library are the same as the previous section.
Write the Rust code
Here is the new src/lib.rs file, I have added comments to explain the code.
extern crate image;
extern crate base64;
use image::{DynamicImage, ImageFormat, ImageBuffer, Rgba};
use base64::encode;
use std::{panic, rc::Rc, cell::RefCell, io::{Cursor, Read, Seek, SeekFrom}};
use futures::channel::oneshot;
use wasm_bindgen::prelude::*;
use wasm_bindgen_futures::{future_to_promise, JsFuture};
use web_sys::{HtmlCanvasElement, HtmlImageElement, CanvasRenderingContext2d};

#[wasm_bindgen]
extern "C" {
    // to call `console.log()` of js in rust, for debugging
    #[wasm_bindgen(js_namespace = console)]
    fn log(s: &str);
}

#[wasm_bindgen]
pub async fn blur_image_and_draw_from_wasm(_array: &[u8], width: u32, height: u32, sigma: f32) -> Result<(), JsValue> {
    log("blur_image_and_render_from_wasm called");
    let input_image = DynamicImage::ImageRgba8(
        ImageBuffer::<Rgba<u8>, Vec<u8>>::from_raw(width, height, _array.to_vec()).unwrap(),
    );
    let blurred_image = input_image.blur(sigma);

    // convert blurred image to base64 string
    let img_base64_str = get_image_as_base64(blurred_image);

    let offset_x = ((450 - width) / 2) as f64; // 450 is the width of the canvas
    let offset_y = ((450 - height) / 2) as f64; // 450 is the height of the canvas

    return draw_image(img_base64_str, offset_x, offset_y).await;
}

fn get_image_as_base64(_img: DynamicImage) -> String {
    // image => cursor buffer => vec => base64
    // Create a new buffer to store the image
    let mut cur = Cursor::new(Vec::new());
    match _img.write_to(&mut cur, ImageFormat::Png) {
        Ok(cur) => cur,
        Err(error) => {
            panic!(
                "There was a problem writing the resulting buffer: {:?}",
                error
            )
        }
    };
    cur.seek(SeekFrom::Start(0)).unwrap();

    // Read the buffer contents into a `Vec`
    let mut out = Vec::new();
    cur.read_to_end(&mut out).unwrap();
    // vec => base64
    let raw_base64_str = encode(&mut out);
    // add prefix to raw base64 string, so that it can be used as image src in html
    let ready_base64_str = format!("{}{}", "data:image/png;base64,", raw_base64_str);

    return ready_base64_str;
}

async fn draw_image(img_src: String, offset_x: f64, offset_y: f64) -> Result<(), JsValue> {
    let canvas = get_canvas_element()?;
    // get the context of the canvas
    let ctx = canvas
        .get_context("2d")?
        .ok_or_else(|| JsValue::from_str("context is not 2d"))?
        .dyn_into::<CanvasRenderingContext2d>()
        .map_err(|_| JsValue::from_str("failed to cast context"))?;

    let img = create_image_element()?;

    // create a oneshot channel to wait for image load
    // a little bit complicated, for image load purpose
    // you just need to know that we need to wait for image load before drawing it on canvas
    let (sender, receiver) = oneshot::channel::<()>();
    let sender = Rc::new(RefCell::new(Some(sender)));
    let onload_handler = {
        let sender_clone = sender.clone(); // clone sender to move into closure
        Closure::wrap(Box::new(move || {
            if let Some(sender) = sender_clone.borrow_mut().take() {
                let _ = sender.send(());
            }
        }) as Box<dyn FnMut()>)
    };
    img.set_onload(Some(onload_handler.as_ref().unchecked_ref())); // set onload handler
    onload_handler.forget();

    img.set_src(&img_src); // set image src

    JsFuture::from(future_to_promise(async move {
        receiver.await.map_err(|_| JsValue::from_str("Image load canceled"))?; // wait for image load
        ctx.draw_image_with_html_image_element(&img, offset_x, offset_y)?; // draw image on canvas
        Ok(JsValue::NULL)
    }))
    .await?;

    Ok(())
}

fn get_canvas_element() -> Result<HtmlCanvasElement, JsValue> {
    // get the 'image-canvas' element from html
    let window = web_sys::window().ok_or_else(|| JsValue::from_str("no global `window` exists"))?;
    let document = window.document().ok_or_else(|| JsValue::from_str("should have a document on window"))?;
    let canvas = document.get_element_by_id("image-canvas").ok_or_else(|| JsValue::from_str("image-canvas not found"))?;
    canvas.dyn_into::<HtmlCanvasElement>().map_err(|_| JsValue::from_str("image-canvas is not a canvas"))
}

fn create_image_element() -> Result<HtmlImageElement, JsValue> {
    HtmlImageElement::new().map_err(JsValue::from)
}
Write the HTML and JS code
Most of the code is the same as the previous section. Here are some differences:
// first difference
import init, { blur_image_and_draw_from_js } from './pkg/wasm_image_blur.js';

//  change to =>

import init, { blur_image_and_draw_from_wasm } from './pkg/wasm_image_blur.js';

// second difference

// get blurred image data from wasm
const outputImageData = new Uint8Array(blur_image_and_draw_from_js(inputImageData, scaledWidth, scaledHeight, sigma)); // call wasm function
// create new ImageData from outputImageData
const outputImage = new ImageData(new Uint8ClampedArray(outputImageData), scaledWidth, scaledHeight);
// update blurred image to canvas
ctx.putImageData(outputImage, offsetX, offsetY);

// change to =>

// blur image and then draw the blurred image from wasm
blur_image_and_draw_from_wasm(inputImageData, scaledWidth, scaledHeight, sigma);
Now we can run the webpage again and do the testing.
One more thing
Another important thing is that the communication between JS and Wasm also affects the performance of the application. The process of communication is time-consuming. This actually indicates the application scenarios of WebAssembly (Wasm) on the web: heavy computation with light interaction, such as audio/video/image processing, AR/VR, gaming, and encryption.