Introduction
A web hit counter is a running tally of the number of visits that a webpage has received. A web tracker is used to collect the web visitors’ data, which can help web owners better understand their audience. Although there are numerous free web counter and tracker services available, building your own might provide you more control and less restrictions. Many commercial visitor trackers (such as Google Analytics) are blocked by privacy browsers or plugins. Building your own tracker service can help you avoid this issue, but we should still comply with the privacy policy.
A server is typically required for incremental counter and data storage, but maintaining a server for personal counter/tracker service is not cost-effective. Now we can use Cloudflare Workers and KV storage to build a free serverless counter/tracker, the real-time processing or calculation will be done in the Workers and all the data will be saved in KV storage. Cloudflare Workers provides free 100,000 requests per day, KV provides free 1GB storage, 100,000 reads per day and 1,000 writes per day, that’s should be enough for most personal blog or website. You can also upgrade to paid plan ($5/month) to have unlimited Workers requests and unlimited KV reads/writes.
In this post, I will show you how to create a free serverless web counter/tracker for your blog or website using Cloudflare Workers and KV storage.
How does it Work?
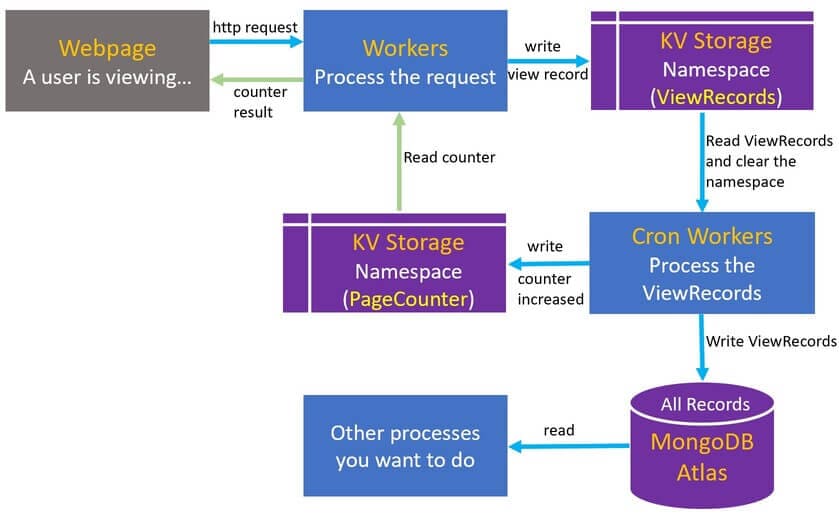
The Cloudflare Worker can be executed by routing requests triggered on a specific URL, we can send the http request from our webpage to the Cloudflare Workers to acquire the page counter value and record this viewing. Worker here is the processing center for the entire service.
KV is a global, low-latency(~ms), key-value data store. KV supports exceptionally high read volumes with low latency, but it is not ideal for situations where we need to write relatively frequently. A new written record may take 30-60 seconds to propagate to the global network edge. The counter number will be inaccurate if numerous users are almost viewing the same webpage at the same time, hence we are unable to let the worker directly increase the counter stored in KV. Even though there are numerous clients reading the same counter value from KV (same webpage means same key in KV), only the most recent write succeeds, hence the counter value will only increase by one.
To solve the above problem, we need to create two namespaces in KV, one is ViewRecords to store the raw viewing records (timestamp, webpage path, ip, country, user-agent…), another one is PageCounter to store the page counter value. We can save multiple records (must use differnet key) to the ViewRecords KV namespace at the same time. The Cloudflare Workers also provides cron trigger to shedule the worker event, the smallest interval is one minute. A cron Worker can be created to read the view records stored in ViewRecords KV, increase the counter value stored in PageCounter KV and clear the ViewRecords KV every minute. That means the page counter value appears in webpage have 1 minute delay, I think it shoud be ok for personal blog and website. You can use Cloudflare Durable Objects (NOT free) to implement the counter if you want real-time data consistency.
MongoDB Atlas is also used in this project, it offers free 512MB database storage. It’s used to store all the viewing records. You can remove the code related to MongoDB operation if you just want a pure counter service.
Steps
In the following section, we will create everything using Cloudflare webpage dashboard.
1. Create the KV Namaspace
Two KV namespaces need to be created, names for them are: page_view_records and page_counter.
Now we need to initialize the KV namespace page_counter. Just add entries in KV dashboard, key is the path of webpage for your blog or website, value is the initial value of page counter.
For example:
Key                           Value
-------------------------------------
/posts/example_post1/           1
/posts/example_post2/           1
/posts/example_post3/           1
/posts/                         1
/about/                         1
/archives/                      1
2. Create the Worker
Go to Workers dashboard, create a service with name page-tracker with default setting, so the service will be deployed to https://page-tracker.your.worker.domain.
Go to the tab Settings of this Worker, click Variables, add KV Namespace Bindings:
Variable name            KV Namespace
------------------------------------------
PAGE_VIEW_RECORDS        page_view_records
PAGE_COUNTER             page_counter
Go to the tab Resources of this Worker, click Quick edit to add the following code.
// src/index.js
var src_default = {
  async fetch(request, env, context) {
    const url = new URL(request.url);
    const path = url.pathname;
    // Ray ID is a unique identifier given to every request, we use it as key
    // check https://developers.cloudflare.com/fundamentals/get-started/reference/cloudflare-ray-id/
    const rayID = request.headers.get("CF-RAY");
    const ip = request.headers.get("CF-CONNECTING-IP");
    const ua = request.headers.get("user-agent");
    var date = new Date(Date.now());
    date.setHours(date.getHours() + 8); // I am in UTC+8
    // i.e 20210401220340731
    var time = date.toISOString().replace(/T/, "").replace(/Z/, "").replace(/-/g, "").replace(/:/g, "").replace(".", "");

    var response;
    // ignore bot visit, you can add more logic to filter the requests
    if (!ua.includes("bot")) {
      // save records to KV PAGE_VIEW_RECORDS
      // key is rayID
      await env.PAGE_VIEW_RECORDS.put(rayID, JSON.stringify({
        "path": path,
        "country": request.cf.country,
        "time": time,
        "cf-ray": rayID,
        "ip": ip,
        "user-agent": ua
      }));

      // get the counter value from KV PAGE_COUNTER
      const counter = await env.PAGE_COUNTER.get(path);
      response = new Response(JSON.stringify({ "pv": counter }));
    } else {
      // Google or other search engine won't index this tracker page by setting "name="robots" content="noindex""
      var html = `<!DOCTYPE html><html><head><meta name="robots" content="noindex"></head><body></body></html>`;
      response = new Response(html, {headers: { 'Content-Type': 'text/html;charset=utf-8' }});
    }

    // CORS configuration
    response.headers.set("Access-Control-Allow-Origin", "https://your.blog.domain");
    response.headers.set("Access-Control-Allow-Methods", "GET");
    response.headers.set("Access-Control-Max-Age", "86400");

    return response;
  }
};
export {
  src_default as default
};
3. Create the Cron Worker
Go to Workers dashboard, create another service with name page-counter with default setting.
Go to the tab Settings of this Worker, click Variables, add KV Namespace Bindings:
Variable name            KV Namespace
------------------------------------------
PAGE_VIEW_RECORDS        page_view_records
PAGE_COUNTER             page_counter
Go to the tab Resources of this Worker, click Quick edit to add the following code.
// src/index.js
var src_default = {
  async scheduled(controller, env, ctx) {
    ctx.waitUntil(countWorker(env));
  }
};
async function countWorker(env) {
  try {
    // get cf-ray-id(key) of view records
    const value = await env.PAGE_VIEW_RECORDS.list();
    var keys = value.keys; // [name1: "cf_ray1", name2: "cf_ray2", ....]
    var resDict = {}; // {'path1': count1, 'path2': count2, ......}
    // record => {"path": "/posts/example_post1/", "time": "2021xxxxxxxxxx", "country": "xx", "cf-ray": "fgdgd2xx", "ip":"xx.xxx.xx.xxx", "user-agent": "Mozillaxxx..."}
    var records = []; // [{record1}, {record2}, ......] records array, to send to mongoDB Atlas

    if (keys.length > 0){
      // count the views number from all the records
      for (var i = 0; i < keys.length; i++) {
        var record = await env.PAGE_VIEW_RECORDS.get(keys[i].name, { type: "json" }); // single record
        records.push(record);
        var path = record.path; // get path of the record
        if (path in resDict) { // check if path in resDict's keys
          resDict[path] = resDict[path] + 1;
        } else {
          resDict[path] = 1;
        }
      }

      // update the counter value in KV
      for (var key in resDict) {
        // get old counter value from KV PAGE_COUNTER
        var oldValueStr = await env.PAGE_COUNTER.get(key, { type: "text" });
        var val = resDict[key];
        var newValueInt = parseInt(oldValueStr) + val;
        // write new counter value to KV PAGE_COUNTER
        await env.PAGE_COUNTER.put(key, newValueInt.toString());
      }

      // send view records to mongodb atlas
      await insertToMongo(env, records);

      // delete all view records of KV PAGE_VIEW_RECORDS
      for (var i = 0; i < keys.length; i++) {
        await env.RAW_PAGE_VIEWS.delete(keys[i].name);
      }
    }
  } catch (err) {
    // console.log("error");
  }
}
// save records to MongoDB for other processing
async function insertToMongo(env, records) {
    var data = JSON.stringify({
        "dataSource": "Cluster0",
        "database": "blog",
        "collection": "pageviews",
        "documents": records,
    });

    var endpointURL = 'https://data.mongodb-api.com/app/' + 'Your-Mongo-App-ID' + '/endpoint/data/v1';

    var config = {
        method: 'POST',
        headers: {
            'Content-Type': 'application/json',
            'Access-Control-Request-Headers': '*',
            'api-key': 'Your-Mongo-API-KEY',
        },
        body: data
    };
    // batch insert
    await fetch(endpointURL+'/action/insertMany', config)
    .then(response => response.json())
    .then(data => {
        //console.log(data);
    })
    .catch(error => console.log(err));
}
export {
  src_default as default
};
Go to the tab Triggers of this Worker, click Add Cron Trigger and add every-1-minute cron tigger (*/1 * * * *). This Worker will start to be executed every minute from now.
4. Add Script to Your Blog/Website
After step 3, we have finished all backend work. Now we need to add script to website, so that the webpage can send the http request to Worker and get the counter value.
Embedded the below code to the head of every html page. If you are using Hugo, Hexo or other frameworks to build your blog, you can easily paste the below code the extend head file, the framework will add it to every page. For example, Hugo’s extend haed file is in /themes/THEME-YOU-USE/layouts/partials/extend_head.html.
<script>
    const workerUri = "https://page-tracker.your.worker.domain/";
    const { pathname } = new URL(window.location);
    let workerUrl = workerUri + pathname;
    fetch(workerUrl, {method: 'GET'})
    .then(response => response.json())
    .then(data => {
            // get the counter value
            document.getElementById("my_value_page_pv").innerHTML = data.pv;
    })
    .catch(err => {});
</script>
And add the following code to html to show the views number, pick where you want to display it. For Hugo, you should add it under <div class="post-meta"> in /themes/THEME-YOU-USE/layouts/_default/single.html. You can see the views number in my post meta data part.
<span id="my_container_page_pv">
    Views: <span id="my_value_page_pv"></span>
</span>
Now we have finished all steps, you can see the views number in your blog.
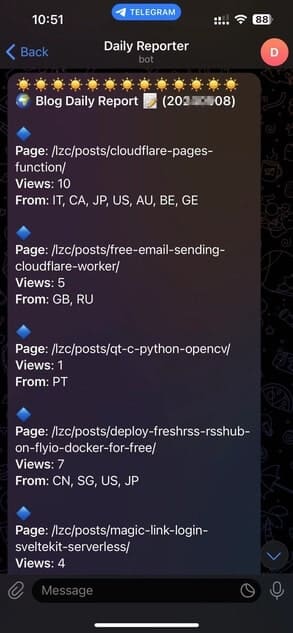
5. Create a Telegram Blog Reporter
This part is optional. If you want a message report that shows how many page views you received and where they came from for a given day, week, or month, you can try it.
The below image is the snapshot of Telegram daily blog reporter that I currently used. I will show you how to implement it in the following section.
Firstly, you need to use @Botfather provided by Telegram to create a chat bot for your Telegram account. You can search online for step-by-step guide. By following the instruction, you should know the bot token and chat id.
Now go to Workers dashboard, create another service with name page-reporter with default setting.
Go to the tab Resources of this Worker, click Quick edit to add the following code.
// src/index.js
var src_default = {
  async scheduled(controller, env, ctx) {
    ctx.waitUntil(reporter(env));
  }
};
async function reporter(env) {
  var date = new Date(Date.now());
  date.setHours(date.getHours() + 8); // I am in UTC+8
  var timeID = date.toISOString().replace(/T/, '').replace(/Z/, '').replace(/-/g,'').replace(/:/g, '').replace('.', '');


  try {
    var daydate = timeID.substring(0, 8); // 20210405
    // query view records from mongodb atlas
    var doc = await findFromMongo(env, daydate);
    var res = {}; // {"path1": {"count": 2, "country": set['CN', 'US']}, "path2": {"count": 3, "country": set['JP', 'KR']}, ......}

    // count all the records to get res
    for (var i = 0; i < doc.length; i++) {
      var record = doc[i];
      var path = record.path;
      if (!(path in res)) {
        let countrySet = new Set();
        res[path] = {"count": 1, "country": countrySet.add(record["country"])};
      } else {
        res[path] = {"count": res[path]["count"]+1, "country": res[path]["country"].add(record["country"])};
      }
    }

    // \u{xxxx} is emojy code
    var msg = "\u{2600}\u{2600}\u{2600}\u{2600}\u{2600}\u{2600}\u{2600}\u{2600}\u{2600}\u{2600}\u{2600}\u{2600}\u{2600}\n"
    msg += "<b>\u{1F30D} Blog Daily Report \u{1F4DD} (" + daydate + ")</b>\n\n";

    for (var key in res) {
      msg += "\u{1F537}" + "\n";
      msg += "<b>Page</b>: " + key + "\n";
      msg += "<b>Views</b>: " + res[key]["count"] + "\n";
      msg += "<b>From</b>: " + Array.from(res[key]["country"]).join(', ');
      msg += "\n\n"
    }

    if (doc.length == 0) {
      msg += "\u{1F605} 0 views.\n\n";
    }

    msg += "\u{1F606}\u{1F606}\u{1F606}\u{1F606}\u{1F606}\u{1F606}\u{1F606}\u{1F606}\u{1F606}\u{1F606}\u{1F606}\u{1F606}\u{1F606}\n\n"

    // send http request to telegram
    // check bot api: https://core.telegram.org/bots/api
    const bot_url = "https://api.telegram.org/bot" + "YOUR-TELEGRAM-BOT-TOKEN" + "/sendMessage";
    const msgSend = JSON.stringify({"chat_id": "YOUR-TELEGRAM-CHAT-ID", "text": msg, "parse_mode": "HTML"});
    await fetch(bot_url, {method: 'POST', headers: {"Content-Type":"application/json"}, body: msgSend});

  } catch (err) {
    // console.log(err);
  }
}

async function findFromMongo(env, date) {
    const dateFilter = date + '.*';
    var data = JSON.stringify({
        "dataSource": "Cluster0",
        "database": "blog",
        "collection": "pageviews",
        "filter": {"time": {'$regex':dateFilter}}, // query view records for today
    });

    var endpointURL = 'https://data.mongodb-api.com/app/' + 'YOUR-MONGO-APP-ID' + '/endpoint/data/v1';

    var config = {
        method: 'POST',
        headers: {
            'Content-Type': 'application/json',
            'Access-Control-Request-Headers': '*',
            'api-key': 'YOUR-MONGO-API-KEY',
        },
        body: data
    };

    var result;

    await fetch(endpointURL+'/action/find', config)
    .then(response => response.json())
    .then(data => {
        result = data.documents;
    })
    .catch(error => console.log(err));

    return result;
}

export {
  src_default as default
};
Go to the tab Triggers of this Worker, click Add Cron Trigger and add a cron tigger (such as 59 23 * * *). You will receive a telegram daily report for your blog at 23:59 UTC everyday. Try to DIY it for your own purpose.
Summary
We can build a serverless website counter and tracker using Cloudflare Workers and KV, which gives us more control on the data collection/display and eliminates the need to maintain a server. The free plan should be enough for most personal blog and small website. The drawback is that webpage views are displayed with a 1-minute delay. You can use Cloudflare Durable Objects (not free) to implement the counter if you want real-time data consistency. Thank you for your reading!
Reference
- MongoDB Atlas Data API: https://www.mongodb.com/docs/atlas/api/data-api/
- Cloudflare Workers KV API: https://developers.cloudflare.com/workers/runtime-apis/kv/
- Cloudflare Workers documentation: https://developers.cloudflare.com/workers/
- Telegram Bot API: https://core.telegram.org/bots/api/