
Introduction
Cloudflare Pages can be used to deploy static websites, much like Github Pages does. From November 2021, Cloudflare Pages started to support dynamic website with full stack capability. With the aid of serverless functions offered in Cloudflare Pages, we may develop our own server-side code to enable dynamic functionality, such as Authenticating, Querying Databases and even simple image processing .
Actually the power of functions in Cloudflare Pages is from Cloudflare Workers, Workers allows us to deploy the serverless functions, just like AWS Lambda. Workers is built on V8 Javascript engine, it supports node.js package that uses webpack or another polyfill bundler. This benefit was somewhat inherited by the functions in Cloudflare Pages, so we can use Cloudflare KV (key-value data store, free 1GB), Durable Objects(low-latency coordination and consistent storage), R2(object storage) and D1(SQLite Database) in the Pages.
Now there are FREE 100,000 functions requests per day for Cloudflare Pages, it’s enough for most personal website and even some small enterprises. Pages also supports native integration with Cloudflare Workers. In this post, I will show you how to deploy a basic dynamic website using Cloudflare Pages with functions. Here is the live demo website.
Get Started
We need to set up the development environment on our PC in order to develop and preview the website locally. Before proceeding, we need to install node.js and npm on PC, you can refer to the official guide.
Let’s start. We first build a static website without serverless function.
-
Create a new project folder, we use
cfdemoas folder name here. -
Open console or terminal, enter
/cfdemodirectory and type the following command to install Wrangler. Wrangler is a command-line tool for building Cloudflare Workers.
$ npm install -g wrangler
The project directory is shown below after installation.
├── cfdemo/
│   ├── package.json
│   └── node_modules/
│       ├── wrangler/
│       └── ......
-
Under
cfdemofolder, create a new folder/publicwhere static webpage files (html, scripts, css, assets) will be placed. -
Create
index.htmlfile under/cfdemo/public/folder. Write a basic “hello world” html in theindex.html. Current project directory is shown below.
├── cfdemo/
│   ├── package.json
│   ├── node_modules/
│   │   ├── wrangler/
│   │   └── ......
│   └── public/
│       └── index.html
- Open console or terminal, enter
/cfdemodirectory and type the following command to preview the “hello world” webpage.
$ wrangler pages dev ./public
Now open http://localhost:8788 in the browser, we can preview the website.
The current website is static without any backend functionality. We will include backend functions in the following part.
Demo Website
We will build a simple survey demo website (click here to try) to demonstrate the serverless functions in Pages. In this webpage, visitors can enter their nickname and choose the fruit they prefer to eat. When they press the submit button, website frontend sends a http post request to the “backend” with nickname and fruit preference. “Backend” functions can help to store the survey result (nickname and fruit preference) to the database, and query the database to determine how many visitors also prefer the same fruit. Finally, functions will return a message to the website frontend, so that visitors can see a message to show how many visitors prefer the same fruit.
Pages with functions (without database query)
Frontend Code
You can get the completed frontend code here. I choose the following important code to explain.
<!--index.html-->
<!DOCTYPE html>
<html>
<head>
......
<link rel="stylesheet" href="css/style.css">
......
</head>
<body>
......
<form>
  ......
  <input type="button" onclick="submitNow()" value="Submit">
</form>
<script>
function submitNow() {
  ......
  const dataToSend = {
    "nickname": document.getElementById("nname").value,
    "fruit": document.getElementById("fruit").value,
  }

  fetch("/api/submit", {
    method: 'POST',
    headers: {
      'Content-Type': 'application/json;charset=utf-8',
    },
    body: JSON.stringify(dataToSend)
  })
    .then(response => response.json())
    .then(dataReceived => {
      if(dataReceived.ok) {
        document.getElementById("message").innerHTML = "<span style='color: blue;'>" + dataReceived.message + "</span>";
      }
    })
    .catch(err => {
      console.log(err);
    })
  }
}
</script>
</body>
</html>
In the above code, we use Fetch API (Axios and JQuery also work) to send http request. The serverless function route address is /api/submit, POST method is used to send the request, which contains the JSON content (nickname and fruit), and it waits for the respond message from the “backend” functions.
Backend serverless functions
In order to use serverless functions in Cloudflare Pages, we need to create a /functions directory at the root of projrct folder /cfdemo. Writing the functions files in this directory will automatically generate a worker with custom functionality at the predesignated routes. We will use havascript to write functions code here.
Using a /functions directory will generate a routing table based on the files present in the directory. For example:
/api/login    =>  ./functions/api/login.js
/api/verify   =>  ./functions/api/verify.js
/api/todos    =>  ./functions/api/todos/index.js
/api/todos/*  =>  ./functions/api/todos/[id].js
Check official doc for more information
So we need to create submit.js file under /cfdemo/functions/api to bind with route /api/submit, current project directory is shown below.
├── cfdemo/
│   ├── package.json
│   ├── node_modules/
│   │   ├── wrangler/
│   │   └── ......
│   ├── public/
│   │   ├── index.html
│   │   └── css/
│   │       └── style.css
│   └── functions/
│       └── api/
│           └── submit.js
Each /functions file must export a function to handle the incoming request. Each function will receive a singular context object, which contains all the information for the request. The following handlers are supported: onRequestGet, onRequestPost, onRequestPatch, onRequestDelete, onRequestHead, onRequestOptions.
The following is the code of submit.js, we don’t handle the database query first, just return a message to frontend webpage for temporary.
/** submit.js
 * POST /api/submit
 */
export async function onRequestPost(context) {
  try {
    let submitInfo = await context.request.json();

    var country = context.request.cf.country; // This is a cf property of request
    // get current date string
    var date = new Date(Date.now());
    date.setHours(date.getHours() + 8); // I am in UTC+8
    var dateStr = date.toISOString();

    var message = submitInfo.nickname +' from ' + country + " prefer " + submitInfo.fruit + " on " + dateStr;
    console.log(message);

    var body = {"message": message, "ok": true};
    var options = { status: 200, headers: { 'Content-Type': 'application/json;charset=utf-8' } }

    return new Response(JSON.stringify(body), options);
} catch (err) {
    return new Response('Bad Request', { status: 400 });
  }
}
Now we can preview the website by executing the following command again in the root directory:
$ wrangler pages dev ./public
Now open http://localhost:8788 in the browser. Enter nickname, choose fruit and press submit, you will see the returned message from Functions.
Note: Worker memory is 128 MB. A worker can consume up to 10 milliseconds CPU runtime for each request on the free plan, 50ms for the paid plan. So don’t use Worker to do heavy computation task, you shoud do it in your compute server and return the result to Worker.
Use Database in Pages functions or Workers
In normal node.js project, we can install PostgreSQL (MySQL) or MongoDB driver easily, but we can not do this in functions or Workers now. There is 5MB size limit for Worker code, the size of normal PostgreSQL, MySQL and MongoDB node.js driver is too big for Workers.
You can check this post for more detail on how to query databse in Pages functions or Workers.
There are still some methods to query database:
-
Use the worker-postgres or worker-mysql template provided by Cloudflare, this is the recommended way if you want to set up your own SQL database (non-cloud). It provides a customized runtime Deno SQL driver. Cloudflare Tunnel (free and easy to use) need to be configured to communicate with the SQL server. worker-postgres is the first choice if you want to use non-cloud SQL database, easier to setup. After the SQL worker is deployed, you can send the http request from your Functions of Pages to the Worker URL, let the Worker do the SQL staff. Click here to see the detail steps to use PostgreSQL.
-
Create a REST API with Cloudflare Workers, MongoDB Atlas, and Realm. MongoDB Atlas is the cloud MongoDB database service, it provides 500Mb free storage. Realm is a SDK to provide access to Atlas App Services. The blog provides very detailed step-by-step guide on how to set up.
-
Use MongoDB Atlas HTTP Data API. The Data API lets us read and write data in MongoDB Atlas with standard HTTPS requests, so we can query the database in MongoDB Atlas by sending a https request, it’s very easy to implement in the Functions or Workers. The biggest disadvantage is the latency, each request may takes about several hundreds milliseconds in my testing. For how to deploy a free 500Mb MongoDB Atlas cluster, you can refer the official guide.
-
Use PlanetScale MySQL-compatible serverless cloud database,
it provides 5GB storage, 1 billion row reads and 10 million row writes per month for free plan.(not free from Apr 2024) PlanetScale introduced serverless driver for javascript in August 2022, so we can easily query PlanetScale MySQL from Functions and Workers using HTTP request with simple setup. The official document provides very good tutorials on how to use it. In my testing, PlanetScale MySQL showed an awesome latency performance (~30ms). You can check this post for detail guide.
In the following post, I will introduce how to use method 3 MongoDB Atlas Data API in the demo zero-cost website. But I have included worker-postgres(method 1), MongoDB Atlas HTTP Data API (method 3) and PlanetScale MySQL (method 4) in the demo website, I suggest you check this repository for detail code.
Pages with Functions (with database query)
In the following, We will query the databse from the functions. Frontend website code is same as above. Backend functions code submit.js will be rewrote.
Before proceeding, make sure you already deployed a MongoDB Atlas cluster according to the guide. You shold have the following information of Atlas cluster:
- Data API App ID (Your Data API App ID, which you can find in the URL Endpoint section of the UI).
- Data API Key (The Data API key you created).
- Cluster name (The name of a cluster with the Data API enabled).
Assume the cluster name is Cluster0. Now create a database with name cfdemo in the Cluster0, then create a collection with name submitInfo in the cfdemo.
New Backend Functions
The new funtion code is shown below. sendToDBMongo() executes a document insert action, countFruitMongo() executes a document find action. You can refer here for more MongoDB Atlas Data API usage.
/**submit.js
 * POST /api/submit
 */
export async function onRequestPost(context) {
  try {
    let submitInfo = await context.request.json();

    var country = context.request.cf.country;

    var date = new Date(Date.now());
    date.setHours(date.getHours() + 8);// I am in UTC+8
    var dateStr = date.toISOString();

    await sendToDB(submitInfo, dateStr, country); // store info to database
    var count = await countFruit(submitInfo.fruit); // get the count number from database

    var message = "You (" + submitInfo.nickname + " from " + country + ") are the " + count.toString() + "th person who prefers " + submitInfo.fruit + " in the database.";

    var body = {"message": message, "ok": true};
    var options = { status: 200, headers: { 'Content-Type': 'application/json;charset=utf-8' } }

    return new Response(JSON.stringify(body), options);
  } catch (err) {
    return new Response('Bad Request', { status: 400 });
  }
}

async function sendToDBMongo(info, time, country) {
  var infoDoc = {
    "nickname": info.nickname,
    "fruit": info.fruit,
    "time": time,
    "country": country
  }

  var data = JSON.stringify({
    "dataSource": "Cluster0",
    "database": "cfdemo",
    "collection": "submitInfo",
    "document": infoDoc,
  });

  var appID = '!!!paste-your-app-id-here!!!';
  var apiKey = '!!!paste-your-api-key-here!!!';

  var endpointURL = 'https://data.mongodb-api.com/app/' + appID + '/endpoint/data/v1';

  var config = {
    method: 'POST',
    headers: {
        'Content-Type': 'application/json',
        'Access-Control-Request-Headers': '*',
        'api-key': apiKey,
    },
    body: data
  };

  await fetch(endpointURL+'/action/insertOne', config)
  .then(response => response.json())
  .then(data => {
    console.log(data);
  })
  .catch(error => console.log(err));
}

async function countFruitMongo(fruitName) {
  var data = JSON.stringify({
    "dataSource": "Cluster0",
    "database": "cfdemo",
    "collection": "submitInfo",
    "filter": {"fruit": fruitName},
  });

  var appID = '!!!paste-your-app-id-here!!!';
  var apiKey = '!!!paste-your-api-key-here!!!';

  var endpointURL = 'https://data.mongodb-api.com/app/' + appID + '/endpoint/data/v1';

  var config = {
    method: 'POST',
    headers: {
        'Content-Type': 'application/json',
        'Access-Control-Request-Headers': '*',
        'api-key': , apiKey,
    },
    body: data
  };

  var result = 0;

  await fetch(endpointURL+'/action/find', config)
  .then(response => response.json())
  .then(data => {
    result = data.documents.length;
  })
  .catch(error => console.log(err));

  return result;
}
Now we can preview the website by executing the following command again in the root directory:
$ wrangler pages dev ./public
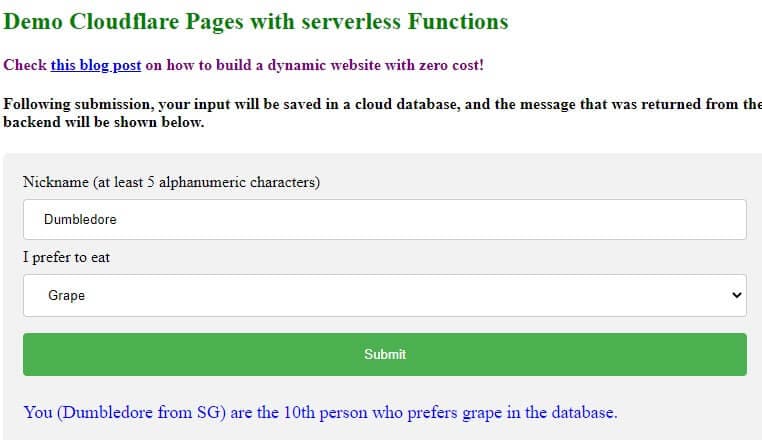
After pressing the submit button in the demo website, the webpage will display a message similar to the one below.
You (Dumbledore from US) are the 38th person who prefers grape in the MongoDB database.
It took 3100 ms to INSERT to free MongoDB Atlas in Singapore AWS.
It took 1882 ms to SELECT from free MongoDB Atlas in Singapore AWS.
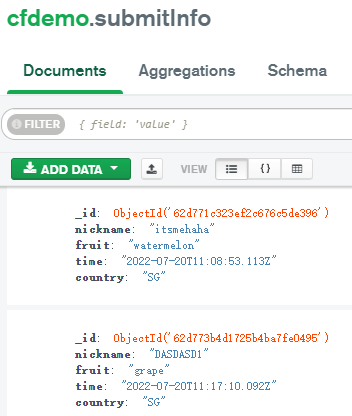
The following image shows that how the information stored in the MongoDB database.
Environment Variables
As you can see from the above functions code, we need to write the App ID and API key of database in the code. It’s a bad practice (unsafe and inconvenient) if we directly exposure them in the code, other people will see the secret if we push the code to GitHub. To solve this problem, we can set environment variables in Pages project. An environment variable is an injected value that can be accessed by your Functions. It is stored as plaintext.
Let’s add the environment variables for local development first. Before doing that, we need to quit the command wrangler pages dev ./public first. Wrangler tool only takes the environment variables once when the command executes.
Add a .dev.vars file to the root directory cfdemo of project. Next, define our environment variables and then access them in your component by using context.env.ENV_NAME.
# cfdemo/.dev.vars
MONGO_APP_ID = "!!!paste-your-app-id-here!!!"
MONGO_API_KEY = "!!!paste-your-api-key-here!!!"
We can use them in the functions code as the following way:
// part of submit.js
var appID = context.env.MONGO_APP_ID;
var apiKey = context.env.MONGO_API_KEY;
You can now preview the website by executing the command, the environment variables should work as expected.
We will set environment variables in Cloudflare dashboard for production in the later part.
Push Code to Github
To publish the website to Cloudflare Pages, an easy way is to connect your GitHub repository to Pages.
- Ceate a
.gitignorefile in the root directorycfdemoof project. There is no need to upload all files to GitHub, such ascfdemo/node_modules/andcfdemo/.dev.vars.
# .gitignore
.DS_Store
*-lock.*
*.lock
*.log
node_modules/*
.dev.vars
Current project directory is shown below.
├── cfdemo/
│   ├── .gitignore
│   ├── .dev.vars
│   ├── package.json
│   ├── node_modules/
│   │   ├── wrangler/
│   │   └── ......
│   ├── public/
│   │   ├── index.html
│   │   └── css/
│   │       └── style.css
│   └── functions/
│       └── api/
│           └── submit.js
- Initialize a git repository in
cfdemo, create a new empty repository in your GitHub, then push the local code repository to the new GitHub repository.
Create Project in Cloudflare Pages
Login to your Cloudflare account → go to Pages Dashboard → Create a project - Connect to Git. Then authorize Cloudflare to connect to your GitHub account, select the repository that we just created in GitHub, then begin setup.
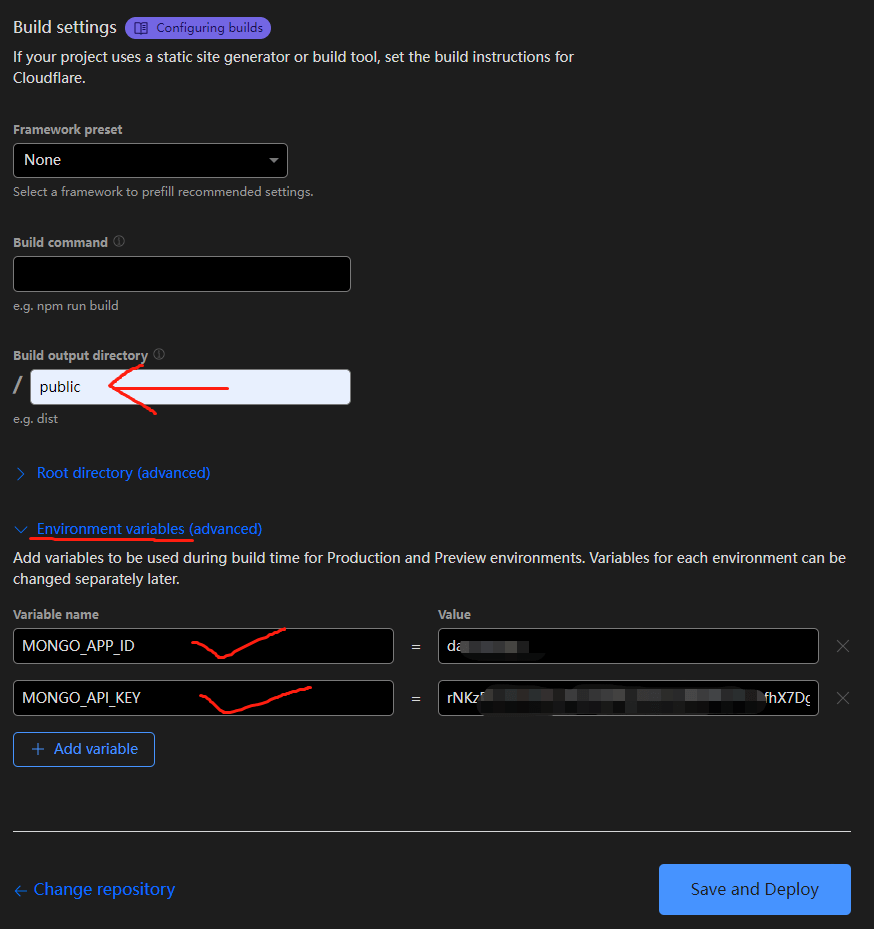
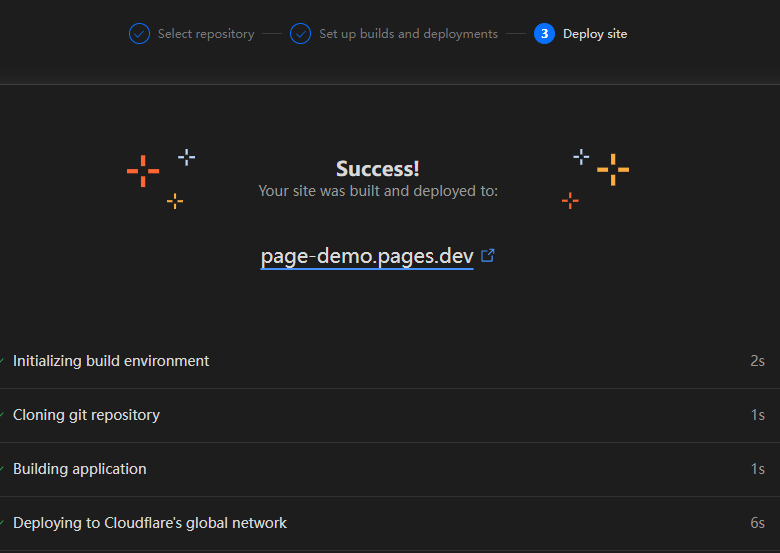
In build setting, we set Build output directory is public, then add environment variables that we set above. Finally, save and deploy, you will see the success page with the website URL. You can click here to try the demo website. You also can set custom domains in Pages dashboard - Custom domains, add or edit environment variables in Pages dashboard - Setting - Environment variables.
For the future website update, you just push the update to Github repository, Cloudflare Pages will automatically update your website from the GitHub repository.
You can check the full code here for the demo website.
Conclusion
Now we have finished all steps to build a zero-cost dynamic website using Cloudflare Pages with serverless Functions, it supports to query database too. For how to select and use database, you can check this post for more detail. The demo website is simple, you can build your website by adding more functions.
Hope this can help you!
Reference
- Cloudflare Pages documentation: https://developers.cloudflare.com/pages/
- Cloudflare Workers documentation: https://developers.cloudflare.com/workers/
- MongoDB Atlas Data API documentation: https://www.mongodb.com/docs/atlas/api/data-api/
- PlanetScale MySQL Serverless documentation: https://planetscale.com/docs/tutorials/planetscale-serverless-driver