Introduction
Ultralytics released the YOLOv8 two months ago (Jan 2023), it contains out-of-the-box support for object detection, classification, and segmentation. As YOLO is popular and well-known, further details are omitted here. YOLO is very easy to use in Python, just a few lines of code, and we can get the detection results.
ONNX is a standard format for machine learning models, which is supported by many ML frameworks. ONNX is also supported by OpenCV, so we can use OpenCV to load the ONNX model and do inference. OpenCV is orginally written in C++ which I am familiar with, but it also provides Rust bindings. In this post, I will use Rust to implement YOLOv8 object detection with OpenCV using ONNX models (no ONNXRuntime), more for my own reference.
You can find the the Python implementation of YOLOv8 on OpenCV using ONNX in the official repository.
Dec 2023 update: You can find the Rust implementation of YOLOv8 using ONNX in the official repository, without OpenCV, but using ONNXRuntime directly.
Prerequisites
Rust
Install Rust by following the official instructions.
OpenCV
If we want to use OpenCV crate in Rust, it requires OpenCV system library to be installed in the system. It’s not complicated, we have no need to build OpenCV from source like in C++. Follow the instructions to set it up in a few minutes.
ONNX
Because we will use OpenCV to load ONNX models, there is no need to install ONNX runtime separately. We only focus on object detection in this post. The default model format in YOLOv8 is .pt, which is PyTorch format. Ultralytics provides nano to xlarge models.
Once we have the .pt model, we can convert it to ONNX format by following commands:
$ pip install ultralytics
$ yolo export model=your_model.pt imgsz=640 format=onnx opset=12
# after a while, we will get an onnx model named `your_model.onnx`
The imgsz is the input image size, opset is the ONNX opset version. The default imgsz is 640, you can change it according to your needs. opset version 12 is important to set, because OpenCV can support opset version 12 well.
Understand the Model
Note: You can visualize the ONNX model by using Netron online to check the model structure and input/output shapes.
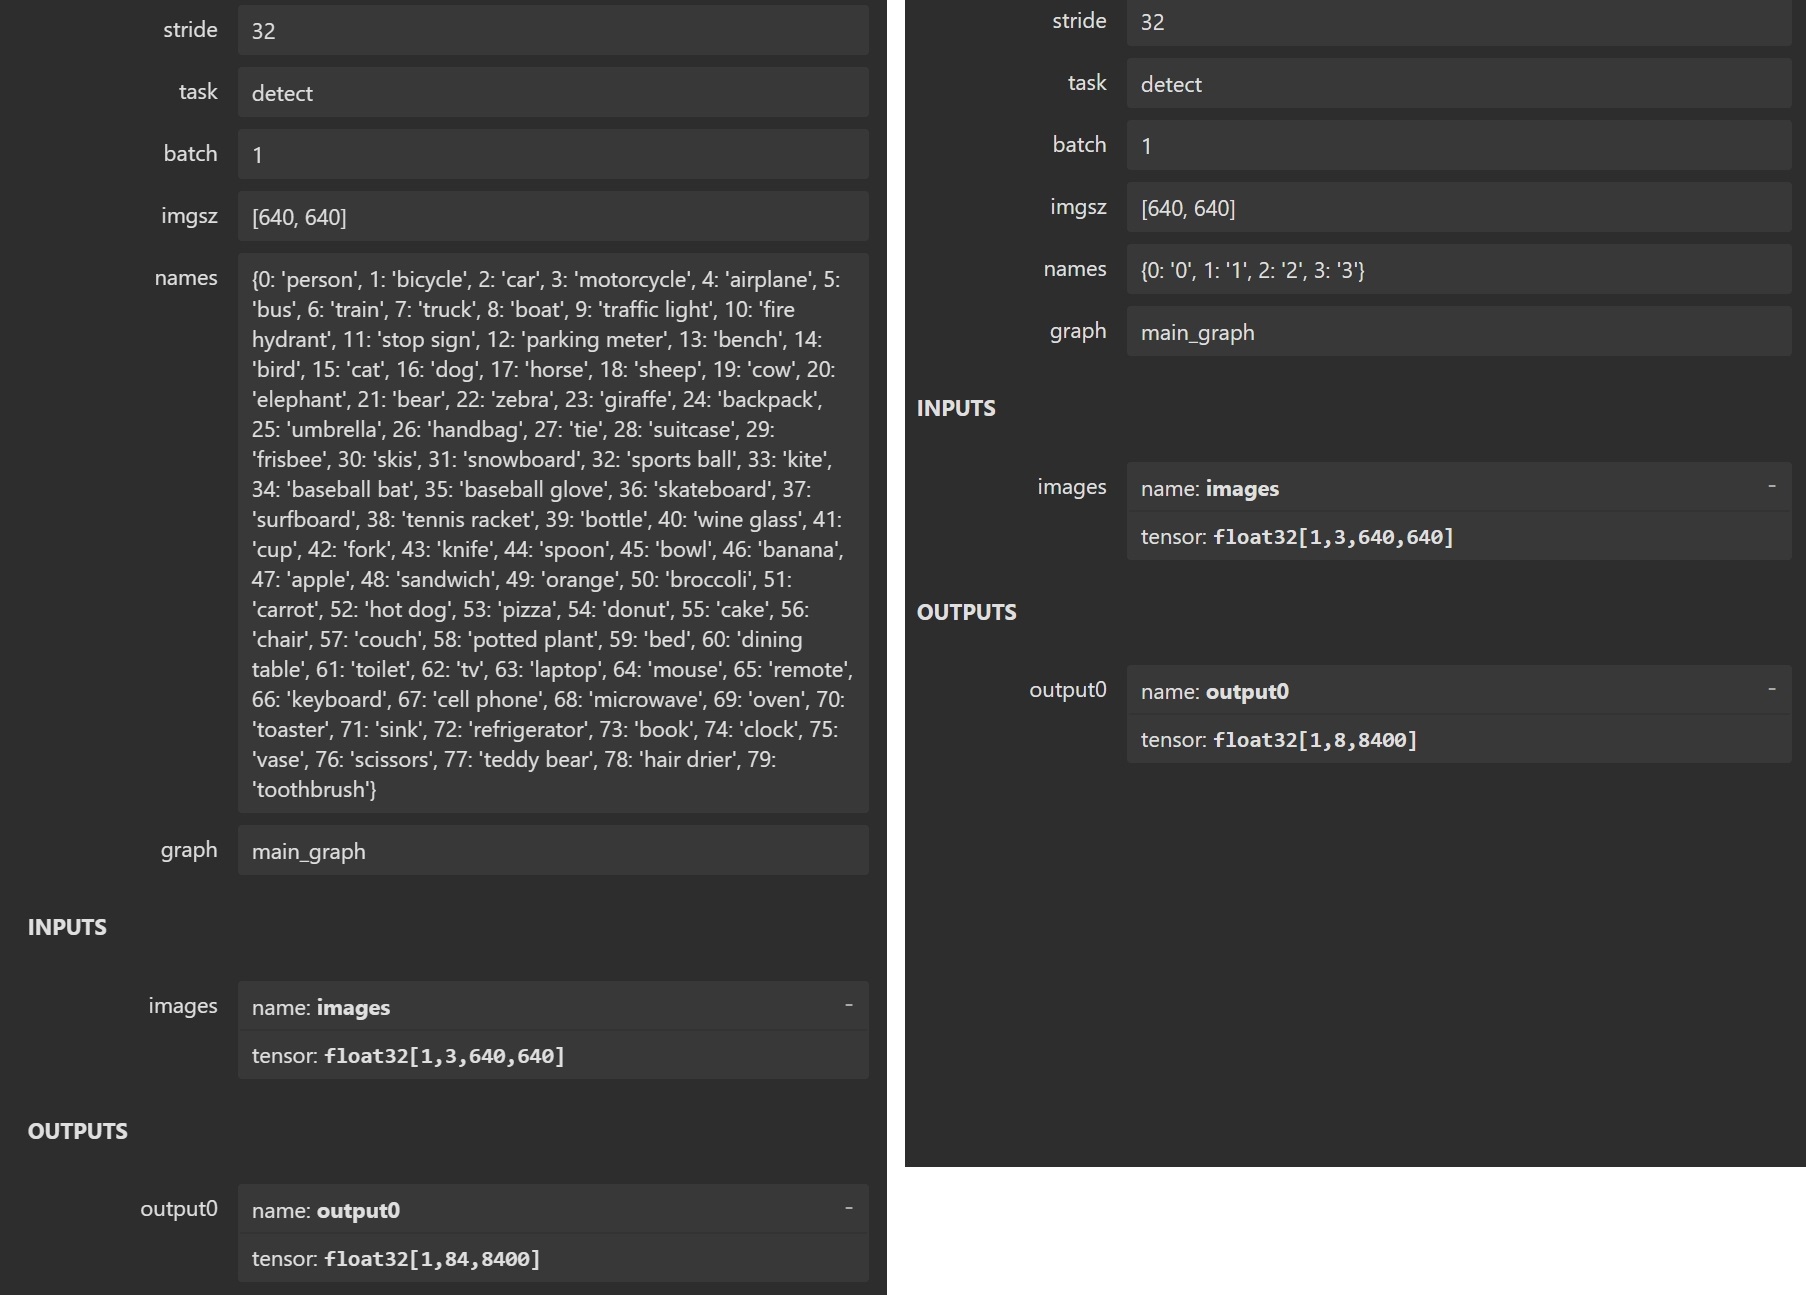
It’s recommended to understand the model structure and input/output shapes before coding. The above image shows the properties of the YOLOv8 model, the left side is model provided by Ultralytics, the right side is the model I trained for demo. The input shape is [1, 3, 640, 640], the output shape is [1, X, 8400]. In the output shape, 1 is batch size, X is number of classes plus 4 (box center-x, center-y, width, height), and 8400 is the fixed number of anchor boxes in YOLO detection model. So you can see the left side model has 80 classes, X of output shape is 84 and the right side model has 4 classes, X of output shape is 8.
How to understand the output shape? The output shape is [1, X, 8400], it means for each image, we have 8400 anchor boxes, and for each anchor box, we have X-4 classes prediction confidence score. For example, if X is 8, it means for each anchor box, we have prediction confidence scores for 4 classes, and the others are 4 bounding box coordinates. In short, there are 8400 arrays of length X in the output, each array looks like [box_center_x, box_center_y, box_width, box_height, class1_confidence, class2_confidence, class3_confidence, class4_confidence, ...].
Implementation
Setup new Rust Project
Start a new Rust project by running cargo new yolov8_opencv_onnx --bin, then add the following dependencies to Cargo.toml:
[dependencies]
opencv = "0.80" # you may adjust the version according to system library
serde_json = "1.0"
serde = { version = "1.0", features = ["derive"] }
There is a main.rs file in the src directory, we create a new file named yolo.rs in the src directory to implement the YOLOv8 processing. Create a new folder named data in the root directory, and put the your_model.onnx and test_image.jpg file in the data folder, lastly, create a new file named config.json in the data folder. Here is the project structure:
yolov8_opencv_onnx
├── Cargo.toml
├── data
│   ├── your_model.onnx
│   ├── config.json
│   └── test_image.jpg
└── src
    ├── main.rs
    └── yolo.rs
The config.json file is used to store model path, image size and class names, the content is like this:
{
    "model_path": "data/your_model.onnx",
    "img_size": 640,
    "names": ["person", "bicycle", "car", "motorbike"]
}
YOLOv8 Processing
The normal process of YOLOv8 object detection is as follows:
- Load the ONNX model and configuration.
- Read the input image and pre-process it.
- Inference/Detect and get the output.
- Post-process the output and get the final detection results.
- Draw the bounding boxes if needed.
We will implement the above process in the yolo.rs file. Before coding, prepare the necessary imports and structs:
// yolo.rs
use opencv::{
    core::{self, MatTraitConst, MatExprTraitConst},
    core::{Mat, Vector, Rect},
    dnn::{self, NetTraitConst, NetTrait}
};
use std::{fs::File, io::BufReader, error::Error};
use serde::{Deserialize, Serialize};

#[derive(Debug, Serialize, Deserialize)]
pub struct BoxDetection {
    pub xmin: i32, // bounding box left-top x
    pub ymin: i32, // bounding box left-top y
    pub xmax: i32, // bounding box right-bottom x
    pub ymax: i32, // bounding box right-bottom y
    pub class: i32, // class index
    pub conf: f32  // confidence score
}

#[derive(Debug, Serialize, Deserialize)]
pub struct Detections {
    pub detections: Vec<BoxDetection>
}

#[derive(Debug, Deserialize)]
pub struct ModelConfig {    // refer to the `data/config.json`
    pub model_path : String, // ONNX model absolute path
    pub class_names : Vec<String>, // array of class names
    pub input_size: i32 // model input image size
}

pub struct Model {
    pub model: dnn::Net, // we will use OpenCV dnn module to load the ONNX model
    pub model_config: ModelConfig
}

#[derive(Debug)]
pub struct MatInfo {
    width: f32, // original image width
    height: f32, // original image height
    scaled_size: f32 // effective size fed into the model
}
Load ONNX and Configuration
The loading part is simple, just read the model path and configuration from the config.json file, then load the model using OpenCV dnn module. Here is the code:
// yolo.rs
pub fn load_model() -> Result<Model, Box<dyn Error>> {
    let model_config = load_model_from_config().unwrap();
    let model = dnn::read_net_from_onnx(&model_config.model_path);

    let mut model = match model {
        Ok(model) => model,
        Err(_) => {println!("Invalid ONNX model."); std::process::exit(0)}
    };
    model.set_preferable_backend(dnn::DNN_BACKEND_OPENCV)?;

    println!("Yolo ONNX model loaded.");

    Ok(Model{model, model_config})
}

fn load_model_from_config() -> Result<ModelConfig, Box<dyn Error>>{
    let file = File::open("data/config.json"); // change the path if needed
    let file = match file {
        Ok(file) => file,
        Err(_) => {println!("data/config.json does NOT exist."); std::process::exit(0)}
    };

    let reader = BufReader::new(file);
    let model_config : std::result::Result<ModelConfig, serde_json::Error> = serde_json::from_reader(reader);
    let model_config = match model_config {
        Ok(model_config) => model_config,
        Err(_) => {println!("Invalid config json."); std::process::exit(0)}
    };

    if !std::path::Path::new(&model_config.model_path).exists() {
        println!("ONNX model in {model_path} does NOT exist.", model_path=model_config.model_path);
        std::process::exit(0)
    }

    Ok(model_config)
}
Pre-process the Image
The pre-processing part is used to convert the image to a squared image (the model input is squared), but haven’t resize it to the model input size (640x640) yet (resize process is in the pub fn detect()). Here is the code:
// yolo.rs
fn pre_process(img: &Mat) -> opencv::Result<Mat> {
    let width = img.cols();
    let height = img.rows();

    let _max = std::cmp::max(width, height);
    // keep the original aspect ratio by adding black padding
    let mut result = Mat::zeros(_max, _max, core::CV_8UC3).unwrap().to_mat().unwrap();
    img.copy_to(&mut result)?;

    Ok(result)
}
Inference/Detect
The inference is standard OpenCV DNN process, just feed the pre-processed image to the model and get the output. Here is the code:
// yolo.rs
pub fn detect(model_data: &mut Model, img: &Mat, conf_thresh: f32, nms_thresh: f32) -> opencv::Result<Detections> {
    let model = &mut model_data.model;
    let model_config = &mut model_data.model_config;

    let mat_info = MatInfo{
        width: img.cols() as f32,
        height: img.rows() as f32,
        scaled_size: model_config.input_size as f32
    };

    let padded_mat = pre_process(&img).unwrap();
    // convert the image to blob input with resizing
    let blob = dnn::blob_from_image(&padded_mat, 1.0 / 255.0, core::Size_{width: model_config.input_size, height: model_config.input_size}, core::Scalar::new(0f64,0f64,0f64,0f64), true, false, core::CV_32F)?;
    let out_layer_names = model.get_unconnected_out_layers_names()?;

    let mut outs : Vector<Mat> = Vector::default();
    model.set_input(&blob, "", 1.0, core::Scalar::default())?;
    model.forward(&mut outs, &out_layer_names)?;

    let detections = post_process(&outs, &mat_info, conf_thresh, nms_thresh)?;

    Ok(detections)
}
Post-process the Output
Post-processing is the most important part, it’s used to convert the model output to the final detection results. To handle the output, we need to understand the output shape and the meaning of each value in the output, that’s why I explained the model structure at the beginning. I have added important comments in the code to help understand the process.
The overall post-process is to iterate over all detections/anchors, get the maximum class confidence score and its index, thresholding by score, then do NMS (Non-Maximum Suppression) to remove the redundant bounding boxes, and finally get the final detection results.
The following code works with YOLOv8 Detect model well. You need to adjust the below code if you use YOLOv5, because the output shape is different, and the meaning of each value in the output is different. But the overall process is the same. Here is the code:
fn post_process(outs: &Vector<Mat>, mat_info: &MatInfo, conf_thresh: f32, nms_thresh: f32 ) -> opencv::Result<Detections>{
    // outs: tensor float32[1, M, 8400]  M = 4 + the number of classes, 8400 anchors
    let dets = outs.get(0).unwrap(); // remove the outermost dimension
    // dets: 1xMx8400   1 x [x_center, y_center, width, height, class_0_conf, class_1_conf, ...] x 8400
    let rows = *dets.mat_size().get(2).unwrap(); // 8400
    let cols = *dets.mat_size().get(1).unwrap(); // M

    let mut boxes: Vector<Rect> = Vector::default();
    let mut scores: Vector<f32> = Vector::default();
    let mut indices: Vector<i32> = Vector::default();
    let mut class_index_list: Vector<i32> = Vector::default();
    let x_scale = mat_info.width / mat_info.scaled_size;
    let y_scale = mat_info.height / mat_info.scaled_size;

    // Iterate over all detections/anchors and get the maximum class confidence score and its index
    // To understand it better, I iterate over all anchors using the for loop.
    // In practice, it's recommended to use the function `opencv::core::min_max_loc()` to get the maximum score and its index. easy to use.
    for row in 0..rows { // 8400 anchors
        let mut vec = Vec::new();
        let mut max_score = 0f32;
        let mut max_index = 0;
        for col in 0..cols { // [x_center, y_center, width, height, class_0_conf, class_1_conf, ...]
            // first 4 values are x_center, y_center, width, height
            let value: f32 = *dets.at_3d::<f32>(0, col , row)?; // (1 x M x 8400)
            if col > 3 {
                // the rest (after 4th) values are class scores
                if value > max_score {
                    max_score = value;
                    max_index = col - 4;
                }
            }
            vec.push(value);
        }
        // thresholding by score
        if max_score > 0.25 {
            scores.push(max_score);
            class_index_list.push(max_index as i32);
            let cx = vec[0];
            let cy = vec[1];
            let w = vec[2];
            let h = vec[3];
            boxes.push( Rect{
                x: (((cx) - (w) / 2.0) * x_scale).round() as i32,
                y: (((cy) - (h) / 2.0) * y_scale).round() as i32,
                width: (w * x_scale).round() as i32,
                height: (h * y_scale).round() as i32
            } );
            indices.push(row as i32);
        }
    }
    // do NMS
    dnn::nms_boxes(&boxes, &scores, conf_thresh, nms_thresh, &mut indices, 1.0, 0)?;

    let mut final_boxes : Vec<BoxDetection> = Vec::default();

    for i in &indices {
        let class = class_index_list.get(i as usize)?;
        let rect = boxes.get(i as usize)?;

        let bbox = BoxDetection{
            xmin: rect.x,
            ymin: rect.y,
            xmax: rect.x + rect.width,
            ymax: rect.y + rect.height,
            conf: scores.get(i as usize)?,
            class: class
        };

        final_boxes.push(bbox);
    }

    Ok(Detections{detections: final_boxes})
}
Draw the Bounding Boxes
The last part is to draw the bounding boxes on the image, nothing to explain. Here is the code:
pub fn draw_predictions(img: &mut Mat, detections: &Detections, model_config: &ModelConfig) {
    let boxes = &detections.detections;

    for i in 0..boxes.len() {
        let bbox = &boxes[i];
        let rect = Rect::new(bbox.xmin, bbox.ymin, bbox.xmax - bbox.xmin, bbox.ymax - bbox.ymin);
        let label = model_config.class_names.get(bbox.class as usize).unwrap();

        // change according to your needs
        if label == "person" {
            let box_color = core::Scalar::new(0.0, 255.0, 0.0, 0.0); // green color
            opencv::imgproc::rectangle(img, rect, box_color, 2, opencv::imgproc::LINE_8, 0).unwrap();
        } else if label == "bicycle" {
            let box_color = core::Scalar::new(0.0, 165.0, 255.0, 0.0); // orange color
            opencv::imgproc::rectangle(img, rect, box_color, 2, opencv::imgproc::LINE_8, 0).unwrap();
        }
        // ... other classes
    }
}
Combine all the Parts
Now we have implemented the YOLOv8 processing, let’s combine all the parts in the yolo.rs file:
// yolo.rs

// ...... imports and structs

pub fn load_model() -> Result<Model, Box<dyn Error>> { ...... }

fn load_model_from_config() -> Result<ModelConfig, Box<dyn Error>>{ ...... }

fn pre_process(img: &Mat) -> opencv::Result<Mat> { ...... }

pub fn detect(model_data: &mut Model, img: &Mat, conf_thresh: f32, nms_thresh: f32) -> opencv::Result<Detections> { ...... }

fn post_process(outs: &Vector<Mat>, mat_info: &MatInfo, conf_thresh: f32, nms_thresh: f32 ) -> opencv::Result<Detections>{ ...... }

pub fn draw_predictions(img: &mut Mat, detections: &Detections, model_config: &ModelConfig) { ...... }
You can find the complete yolo.rs file here.
Next, let’s implement the main.rs file to use the yolo.rs file:
// main.rs
use opencv::prelude::*;
mod yolo;
fn main() -> Result<()> {
// load the model
let mut model = match yolo::load_model() {
Ok(model) => model,
Err(e) => {
println!("Error: {}", e);
std::process::exit(0);
}
};
// read the input test image
let img_path = "data/test_image.jpg"; // change the path if needed
let img = imgcodecs::imread(img_path, imgcodecs::IMREAD_COLOR)?;
if img.size()?.width > 0 {
println!("Image loaded successfully.");
} else {
println!("Failed to load image.");
std::process::exit(0);
}
// change the threshold if needed
// first threshold is for class confidence score, the second threshold is for NMS boxes
let detections = yolo::detect(&mut model, &img, 0.5, 0.5);
if detections.is_err() {
println!("Failed to detect, {:?}", detections.err().unwrap());
std::process::exit(0);
}
let detections = detections.unwrap();
println!("{:?}", detections);
yolo::draw_predictions(&mut img, &detections, &model.model_config);
let params: opencv::core::Vector<i32> = opencv::core::Vector::default();
opencv::imgcodecs::imwrite("res.jpg", &img, ¶ms).unwrap(); // save the result image
Ok(())
}
Run the Project
Run the project by running cargo run, if everything is correct, you will get the res.jpg file in the root directory, which draw the detection boxes.
If you want to build the project in release mode, run cargo build --release, then you will get the target/release/yolov8_opencv_onnx binary file, which can be run directly. But remember to copy the data folder to the target/release directory. Because OpenCV is used, you need to copy the opencv_world library to the target/release directory as well. In Windows, the library is opencv_world4xx.dll, in Linux, the library is libopencv_world.so.4.x.x, 4xx is the version number of OpenCV.
Time Consumption
Here, I only compare the time consumption of YOLOv8 object detection with Rust OpenCV using ONNX models (NO ONNXRuntime) and YOLOv8 object detection with Python using .pt model. Only detection time is compared, the time to load the model and pre-process is not included. The test image is 1280x960 pixels, CPU is used, YOLOv8 Detect nano model is used.
-
Rust + OpenCV + ONNX model: ~50ms
-
Python + .pt model: ~100ms
It seems that Rust OpenCV with ONNX model is faster than Python with .pt model. Normally, it’s recommended to use ONNXRuntime to run .onnx models for optimal performance instead of using OpenCV. You should select the proper tool according to your project requirements.