
前言
我已经使用了两年的RSS服务来获取阅读新闻/博客/文章,感觉良好。具体来说,我使用FreshRSS作为RSS阅读器,使用RSSHub作为RSS源生成器,FreshRSS和RSSHub都被我部署在云服务器上。具体的部署过程(依然有效)以及RSS相关的介绍,请见我之前的文章:Docker部署宝塔面板搭建FreshRSS自建RSS。经过两年的使用和检验,我认为FreshRSS和RSSHub都非常棒,在云服务器上运行稳定并且维护简单。
最近一年,我不再续订已有的云服务器,逐渐把服务转移到Serverless平台上面,比如Cloudflare Workers, Fly.io, Railway, Zeabur。数据库也转移到了Serverless DB上面,比如Planetscale MySQL, NEON Postgres, MongoDB Atlas。它们使用起来实在是太方便了,而且都有免费额度,可以满足我大部分的私人需求。
弃用云服务器后,这次我选择了Fly.io作为FreshRSS和RSSHub的部署平台,首先是因为它支持Docker部署,其次是因为它支持部署的国家/区域选择多和免费额度足够,可以满足我的需求,而且部署过程十分快捷简单,也几乎不需要维护。Fly.io的hobby plan免费额度是3个容器(3 shared-cpu-1x 256mb VMs),3GB的总存储空间,每月160GB的出站流量。根据最新的计划(2024年4月),Fly.io已经不提供免费的hobby plan了,很可惜,只在注册时提供一次性的$5的credit,这已经满足不了我们白嫖的需求了。所以如果想免费使用fly.io的话,到目前已经不现实了。最新的Hobby plan的价格是$5/month,足够RSS使用,大家可以根据自己的需求选择用或者不用。下面的教程本来是为白嫖fly.io写的,但是现在依然试用于付费的fly.io。
数据库上,我选择了NEON Postgres,它是一个Serverless Postgresql数据库,正好也支持部署在我所在的区域,连接快速延迟很低。经过测试,它也可以正常地与FreshRSS兼容工作,而且免费额度差不多够用。它的免费额度是1个1GB RAM shared vCPU, 3GB的存储空间。现在它的最新(2024年3月更新,又缩水了)的免费额度是500MB存储(够用,如果不够可以每几个月清理或者重置一下),0.25 vCPU,1GB RAM。其实Fly.io也支持一键部署Postgresql数据库,但是它的性能不如NEON Postgres的,再加上NEON Postgres的管理界面清晰易于使用,所以我选择了NEON Postgres。
话不多说,下面开始部署过程。
部署FreshRSS
注册登录Fly.io
首先,注册一个Fly.io账号。要注意的是你需要添加信用卡才可以开始使用。
然后,根据官方教程安装Fly.io的CLI命令行工具。
最后,打开终端,输入fly auth login,按照提示登录Fly.io账号。
$ fly auth login
Opening https://fly.io/app/auth/cli/15f170c006bfc53329bfe ...

Waiting for session... Done
successfully logged in as *******@**mail.com
创建FreshRSS Docker服务(方法一,官方镜像)
创建一个新文件夹freshrss(任意名字均可),在里面创建一个fly.toml文件,用于配置Fly.io的Docker服务。在这个方法里,我们是直接拉取FreshRSS的官方Docker镜像稳定版本freshrss/freshrss:latest.
# fly.toml
app = "freshrssflyio" # 你的应用名字
kill_signal = "SIGINT"
kill_timeout = "5s"

[experimental]
  auto_rollback = true

[build]
  image = "freshrss/freshrss:latest" # FreshRSS的官方Docker镜像

[env]
  CRON_MIN = "1,31" # 每小时的1分和31分更新拉取RSS源

[[mounts]]
  source = "freshrss_data" # 把freshrss_data文件夹挂载到容器的/var/www/FreshRSS/data目录下
  destination = "/var/www/FreshRSS/data"
  initial_size = '1gb' # 1GB的存储空间,免费额度是3GB

[[services]]
  protocol = "tcp"
  internal_port = 80
  processes = ["app"]

  [[services.ports]]
    port = 80
    handlers = ["http"]
    force_https = true

  [[services.ports]]
    port = 443
    handlers = ["tls", "http"]
  [services.concurrency]
    type = "connections"
    hard_limit = 25
    soft_limit = 20

  [[services.tcp_checks]]
    interval = "15s"
    timeout = "2s"
    grace_period = "1s"
    restart_limit = 0

[[vm]]
  cpu_kind = 'shared'
  cpus = 1
  memory_mb = 256 # 3 free shared-cpu-1x 256mb VMs, we use 1 of them
注意:2024年2月测试发现,当使用免费的256MB的shared-cpu-1x VM时,部署可能提示成功也可能提示失败(内存大小原因,官方可能做了什么改动),但是即使提示失败,但是实际上也不太影响使用(你要登录你部署的网址进去看看)。
然后在终端里进入freshrss文件夹,输入fly launch,按照提示进行配置。配置过程中尽量选择部署离你最近的区域,也不需要根据提示配置Postgresql数据库和Upstash Redis,因为我们后面会使用NEON Postgres。
$ cd freshrss
$ fly launch
Creating app in F:\Workspace\flyio\freshrss
An existing fly.toml file was found for app freshrssflyio
? Would you like to copy its configuration to the new app? Yes
Using build strategies '[the "freshrss/freshrss:latest" docker image]'. Remove [build] from fly.toml to force a rescan
We're about to launch your app on Fly.io. Here's what you're getting:

Organization: myorg                  (fly launch defaults to the personal org)
Name:         freshrssflyio         (from your fly.toml)
Region:       Singapore, Singapore   (from your fly.toml)
App Machines: shared-cpu-1x, 256MB RAM (specified on the command line)
Postgres:     <none>                 (not requested)
Redis:        <none>                 (not requested)
? Do you want to tweak these settings before proceeding? Yes
Opening https://fly.io/cli/launch/97e8d6fbxx94b9fddef6da4242e5xx84 ...

Waiting for launch data... Done
Created app 'freshrssflyio ' in organization 'myorg'
Admin URL: https://fly.io/apps/freshrssflyio
Hostname: freshrssflyio.fly.dev
Wrote config file fly.toml
Validating F:\Workspace\flyio\freshrss\fly.toml
✓ Configuration is valid
==> Building image
Searching for image 'freshrss/freshrss:latest' remotely...
image found: img_2wokpywjnrdv3g1m

Watch your app at https://fly.io/apps/freshrssflyio/monitoring

Provisioning ips for freshrssflyio
Dedicated ipv6: 2a09:8280:xx::24:2213
Shared ipv4: 66.241.xxx.59
Add a dedicated ipv4 with: fly ips allocate-v4
Creating 1GB volume 'freshrss_data' for process group 'app'. Use 'fly vol extend' to increase its size
This deployment will:
* create 1 "app" machine

No machines in group app, launching a new machine
Machine 3287xx9c069d8 [app] update finished: success
Finished launching new machines
Updating existing machines in 'freshrssflyio' with rolling strategy
Finished deploying

Visit your newly deployed app at https://freshrssflyio.fly.dev/
完成后,打开浏览器,访问https://freshrssflyio.fly.dev/(这个只是举例用,根据提示访问你自己的链接),如果出现FreshRSS的安装界面,说明部署成功了。
如果你想进入这个应用Docker容器的终端,可以在终端里输入fly ssh console,就可以进入这个容器了。
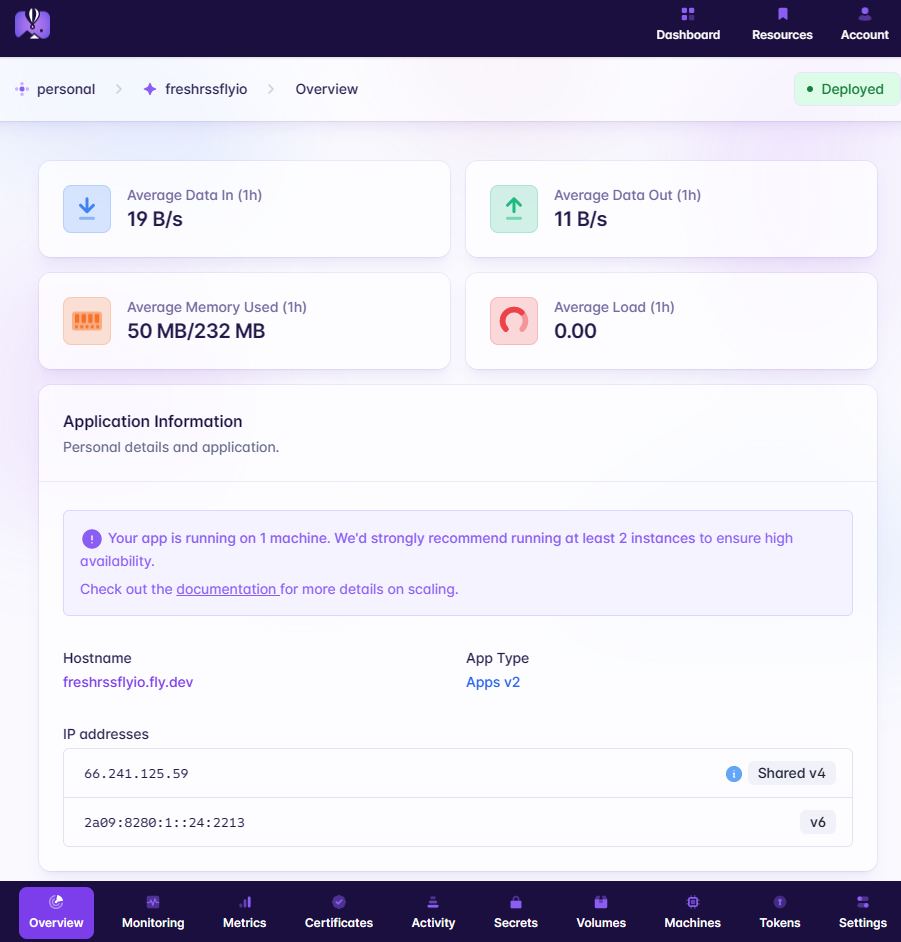
这时候,我们进入Fly.io的网页控制台,也可以看到我们部署的应用的具体情况。
创建FreshRSS Docker服务(方法二,定制源码)
上面的部署方法一快速简单直接,但是缺点是我们无法修改FreshRSS的源代码。如果你有自己的需求想要修改FreshRSS的源代码,那么你可以使用这个方法二来部署。
首先,我们需要从GitHub上拉取FreshRSS的源代码到本地。在终端里输入以下命令:
# 从GitHub上拉取FreshRSS最新稳定版的源代码到freshrss文件夹
$ git clone --branch latest https://github.com/FreshRSS/FreshRSS.git freshrss
现在源代码都在freshrss文件夹里,我们可以根据自己的需求在本地修改源代码。官方已经为我们提供了一个Dockerfile文件,它位于freshrss/Docker/Dockerfile,用于构建FreshRSS的Docker镜像。你可以不修改或者根据自己的需求来修改这个Dockerfile文件。
然后,我们需要在freshrss文件夹里创建一个fly.toml文件,用于配置Fly.io的Docker服务。在这个方法里,我们是拉取本地的FreshRSS的源代码进行镜像构建,然后在Fly.io上编译部署。
# fly.toml
app = "freshrssflyio"
kill_signal = "SIGINT"
kill_timeout = "5s"

[experimental]
  auto_rollback = true

[env]
  CRON_MIN = "1,31"

[[mounts]]
  source = "freshrss_data"
  destination = "/var/www/FreshRSS/data"
  initial_size = '1gb' # free for 3GB

[[services]]
  protocol = "tcp"
  internal_port = 80
  processes = ["app"]

  [[services.ports]]
    port = 80
    handlers = ["http"]
    force_https = true

  [[services.ports]]
    port = 443
    handlers = ["tls", "http"]
  [services.concurrency]
    type = "connections"
    hard_limit = 25
    soft_limit = 20

  [[services.tcp_checks]]
    interval = "15s"
    timeout = "2s"
    grace_period = "1s"
    restart_limit = 0
[[vm]]
  cpu_kind = 'shared'
  cpus = 1
  memory_mb = 256 # 3 free shared-cpu-1x 256mb VMs
上面的fly.toml文件和方法一的是一样的,唯一不同的是build部分。
现在我们可以在终端里进入freshrss文件夹,输入fly launch --dockerfile .\Docker\Dockerfile执行,和方法一一样按照提示进行配置。
$ cd freshrss
$ fly launch --dockerfile .\Docker\Dockerfile
Creating app in F:\Workspace\flyio\freshrss
An existing fly.toml file was found for app freshrssflyio1
? Would you like to copy its configuration to the new app? Yes
Using dockerfile .\Docker\Dockerfile
We're about to launch your app on Fly.io. Here's what you're getting:

Organization: myorg                  (fly launch defaults to the personal org)
Name:         freshrssflyio1         (from your fly.toml)
Region:       Singapore, Singapore   (from your fly.toml)
App Machines: shared-cpu-1x, 256MB RAM (specified on the command line)
Postgres:     <none>                 (not requested)
Redis:        <none>                 (not requested)
? Do you want to tweak these settings before proceeding? Yes
Opening https://fly.io/cli/launch/97e8d6fbxx94b9fddef6da4242e5xx84 ...

Waiting for launch data... Done
Created app 'freshrssflyio1' in organization 'myorg'
Admin URL: https://fly.io/apps/freshrssflyio1
Hostname: freshrssflyio1.fly.dev
Wrote config file fly.toml
Validating F:\Workspace\flyio\freshrss\fly.toml
✓ Configuration is valid
==> Building image
Remote builder fly-builder-dark-xxxx-827 ready
==> Creating build context
--> Creating build context done
==> Building image with Docker
--> docker host: 20.10.12 linux x86_64
[+] Building 0.6s (0/1)
[+] Building 3.5s (13/13) FINISHED
 => [internal] load remote build context                                                                           0.0s
 => copy /context /                                                                                                0.2s
 => [internal] load metadata for docker.io/library/debian:11-slim                                                  2.1s
 => [1/9] FROM docker.io/library/debian:11-slim@sha256:7606bef5684b393434f06a50a3d1a09808fee5a0240d37da5d181b1b12  0.0s
 => CACHED [2/9] RUN ln -snf /usr/share/zoneinfo/UTC /etc/localtime && echo UTC > /etc/timezone                    0.0s
 => CACHED [3/9] RUN apt-get update &&  apt-get install --no-install-recommends -y  ca-certificates cron  apache2  0.0s
 => CACHED [4/9] RUN mkdir -p /var/www/FreshRSS/ /run/apache2/                                                     0.0s
 => CACHED [5/9] WORKDIR /var/www/FreshRSS                                                                         0.0s
 => [6/9] COPY . /var/www/FreshRSS                                                                                 0.1s
 => [7/9] COPY ./Docker/*.Apache.conf /etc/apache2/sites-available/                                                0.0s
 => [8/9] RUN a2dismod -f alias autoindex negotiation status &&  a2enmod deflate expires headers mime remoteip se  0.6s
 => [9/9] RUN sed -r -i "/^\s*(CustomLog|ErrorLog|Listen) /s/^/#/" /etc/apache2/apache2.conf &&  sed -r -i "/^\s*  0.3s
 => exporting to image                                                                                             0.1s
 => => exporting layers                                                                                            0.1s
 => => writing image sha256:f90952cfef37f36d427528c344457d8c8c1ae9539f0ffe1a437efbcc092082f6                       0.0s
 => => naming to registry.fly.io/freshrssflyio1:deployment-01H1NQxxxxRTHJBZ9PCN32A9PCH                              0.0s
--> Building image done
==> Pushing image to fly
The push refers to repository [registry.fly.io/freshrssflyio1]
847826aa2724: Pushed
d07b6ced0dd8: Pushed
338bd7c84f0e: Pushed
5a6e669991a0: Pushed
5f70bf18a086: Pushed
c5ae01a1b02f: Pushed
1425f5a29774: Pushed
38fc7ec69b43: Pushed
8cbe4b54fa88: Pushed
deployment-01H1NQ3S9RTHxxxxCN32A9PCH: digest: sha256:7412839568xxxx87134abcf13e2d589adc92932237e60af9d76b57dfd3da8c7 size: 2195
--> Pushing image done
image: registry.fly.io/freshrssflyio1:deployment-01H1NQ3S9RTHJBZ9PCN32A9PCH
image size: 216 MB

Watch your app at https://fly.io/apps/freshrssflyio1/monitoring

Provisioning ips for freshrssflyio1
  Dedicated ipv6: 2a09:8280:xxx::4e:2255
  Shared ipv4: 66.241.xxxx.108
  Add a dedicated ipv4 with: fly ips allocate-v4
Creating 1GB volume 'freshrss_data' for process group 'app'. Use 'fly vol extend' to increase its size
This deployment will:
 * create 1 "app" machine

No machines in group app, launching a new machine
  Machine 568344xxdee68e [app] update finished: success
Finished launching new machines
Updating existing machines in 'freshrssflyio1' with rolling strategy
  Finished deploying

Visit your newly deployed app at https://freshrssflyio1.fly.dev/
配置NEON Postgres数据库
创建数据库
首先去NEON Postgres注册一个账号,根据提示在离你最近的区域创建一个项目,然后在此项目下新建一个数据库,这里我创建的数据库名为freshrssdb,然后记录保存好你设定的用户名freshrss_username和密码freshrss_password,也要给这个用户分配该数据库的所有权限。
注意:如果你使用NEON Postgres的免费版,那么你一定要在Primary main Branch下创建数据库,
因为non-primary branch的有每月100小时的Active time的限制,而Primary main Branch没有这个限制。当月的active hours即将超过或者超过100小时的时候,你可能会收到。最新的(2024年3月)的Neon price更新了,虽然容量和性能降低了,但是支持24/7 main compute了。Free Tier usage limit alert的邮件,但是你不需要担心,超过100小时也没问题,因为它只会冻结non primary branches,不会冻结Primary main Branch
你可以从NEON Postgres的Dashboard获取到数据库的连接信息,如下图所示:

这个连接字符串信息类似如下:
postgres://[email protected]/main
从上面的连接字符串中,我们可以提取出数据库的主机地址Host是xx-aaa-bb-123456.ap-southeast-1.aws.neon.tech,数据库用户名freshrss_username。
数据库名是我们之前创建的freshrssdb,密码是freshrss_password。NEON Postgres的默认端口号是5432,不过我们暂且不会用到这个端口号。
数据库的创建就完成了。接下来开始配置FreshRSS的数据库连接。
进入FreshRSS安装界面
在浏览器中访问你的FreshRSS应用地址,这里比如是https://freshrssflyio.fly.dev/,按照提示进行安装配置,直到进入数据库配置(Database Configuration)界面。
按照如下选项进行配置数据库连接:
Type of Database: PostgreSQL
Host: xx-aaa-bb-123456.ap-southeast-1.aws.neon.tech
Database username: freshrss_username
Database password: endpoint=xx-aaa-bb-123456;freshrss_password
Database: freshrssdb
在上面的配置中,需要特别注意的是,数据库密码Database password的值是endpoint=xx-aaa-bb-123456;freshrss_password,这里的xx-aaa-bb-123456是数据库的主机地址Host的前半部分,freshrss_password是我们之前创建数据库时设置的密码。之所以这样写是因为FreshRSS Docker里的PostgreSQL的客户端库比较老,不支持直接使用连接字符串的方式连接数据库,所以需要这样的方式来连接。相关的情况可以参考这里。
然后继续根据提示进行后续安装配置,直到完成安装。具体的使用过程这里就不再赘述了,如果有需要可以参考之前的博客。
部署RSSHub
注意,部署RSSHub不是必须的,它相当于是一个RSS源生成器,然后让FreshRSS来订阅这些RSS源。公开的优质的RSS源已经不少了,所以如果你不需要RSSHub来生成自己的源,可以跳过这一部分。
创建RSSHub Docker服务
创建一个新文件夹rsshub(任意名字均可),在里面创建一个fly.toml文件,我们直接拉取RSSHub的官方Docker镜像稳定版本diygod/rsshub:latest.
# fly.toml
app = "rsshubflyio"
kill_timeout = "5s"

[experimental]
  auto_rollback = true

[build]
  image = "diygod/rsshub:latest"

[[services]]
  protocol = "tcp"
  internal_port = 1200
  processes = ["app"]

  [[services.ports]]
    port = 80
    handlers = ["http"]
    force_https = true

  [[services.ports]]
    port = 443
    handlers = ["tls", "http"]
  [services.concurrency]
    type = "connections"
    hard_limit = 25
    soft_limit = 20

  [[services.tcp_checks]]
    interval = "15s"
    timeout = "2s"
    grace_period = "1s"
    restart_limit = 0
然后在终端里进入rsshub文件夹,输入fly launch,按照提示进行配置。还是不需要根据提示配置Postgresql数据库和Upstash Redis,我们后面会手动配置Redis。
$ cd rsshub
$ fly launch
Creating app in F:\Workspace\flyio\rsshub
An existing fly.toml file was found for app rsshubflyio
? Would you like to copy its configuration to the new app? Yes
Using build strategies '[the "diygod/rsshub:latest" docker image]'. Remove [build] from fly.toml to force a rescan
? Choose an app name (leaving blank will default to 'rsshubflyio')

? Choose an app name (leaving blank will default to 'rsshubflyio')
automatically selected personal organization: xxx
App will use 'sin' region as primary

Created app 'rsshubflyio' in organization 'personal'
Admin URL: https://fly.io/apps/rsshubflyio
Hostname: rsshubflyio.fly.dev
? Would you like to set up a Postgresql database now? No
? Would you like to set up an Upstash Redis database now? No
Wrote config file fly.toml
? Would you like to deploy now? Yes
Validating F:\Workspace\flyio\rsshub\fly.toml
Platform: machines
✓ Configuration is valid
==> Building image
Searching for image 'diygod/rsshub:latest' remotely...
image found: img_rlw04nz8xw84z2yq

Watch your app at https://fly.io/apps/rsshubflyio/monitoring

Provisioning ips for rsshubflyio
Dedicated ipv6: 2a09:8280:xxx::24:2229
Shared ipv4: 66.241.xxx.40
Add a dedicated ipv4 with: fly ips allocate-v4
This deployment will:
* create 2 "app" machines

No machines in group app, launching a new machine
Machine 3287405c690585 [app] update finished: success
Creating a second machine to increase service availability
Machine e784902f235e83 [app] update finished: success
Finished launching new machines
Updating existing machines in 'rsshubflyio' with rolling strategy
Finished deploying

Visit your newly deployed app at https://rsshubflyio.fly.dev/
从上面的日志中可以看到,RSSHub被部署到了两台“机器”上,这样可以提高服务的可用性。之前的FreshRSS应用占用了一台“机器”,所以免费的3台“机器”刚好全部用完了。
部署完成后,我们在浏览器中访问https://rsshubflyio.fly.dev/,安装成功的话可以看到RSSHub的默认界面。
配置Redis缓存
为了提高RSSHub的性能,我们可以为它配置Redis缓存。这里我们使用Fly.io提供的的Upstash Redis服务,每个账号有一个免费的Upstash Redis实例,支持100MB的存储空间。
在终端里进入rsshub文件夹,输入fly redis create来创建Upstash Redis实例,区域选择与你上面创建RSSHub时相同的地域,建议选择开启eviction选项。创建完成后会输出类似于 redis://default:
因为有一个bug的存在,我们暂时需要在Redis的连接URL后追加family=6的参数,即使用redis://default:<password>@<domain>.upstash.io/?family=6作为连接 URL。
最后使用fly secrets set命令设置缓存类型和Redis的连接URL, RSSHub会自动重新部署启动并使用Redis缓存。
$ cd rsshub
$ fly redis create
  ......省略部分日志
  ......创建完成
$ fly secrets set CACHE_TYPE=redis REDIS_URL='redis://default:<password>@<domain>.upstash.io/?family=6'
至此,RSSHub的部署也完成了。
自定义域名
部署完FreshRSS和RSSHub后,我们分别会得到一个xxxxxx.fly.dev的二级域名,通过这个二级域名就可以访问我们的应用。
Fly.io也提供了自定义域名服务,我们可以将自己的域名绑定到Fly.io的这个二级域名上。
现在我用FreshRSS这个应用来举例,这里我使用的是Cloudflare的域名服务,其他域名服务商的操作也类似。
假设FreshRSS应用的Fly.io二级域名是freshrssflyio.fly.dev,假设已有的一个挂靠在Cloudflare的顶级域名是myfreshrss.com,我们要将freshrssflyio.fly.dev绑定到myfreshrss.com上。
首先去Fly.io的应用管理页面,找到FreshRSS应用,点击Certificates选项,进入后点击Add Certificate按钮,输入myfreshrss.com作为Hostname,点击Create按钮进行确认,然后会提示你添加DNS记录。
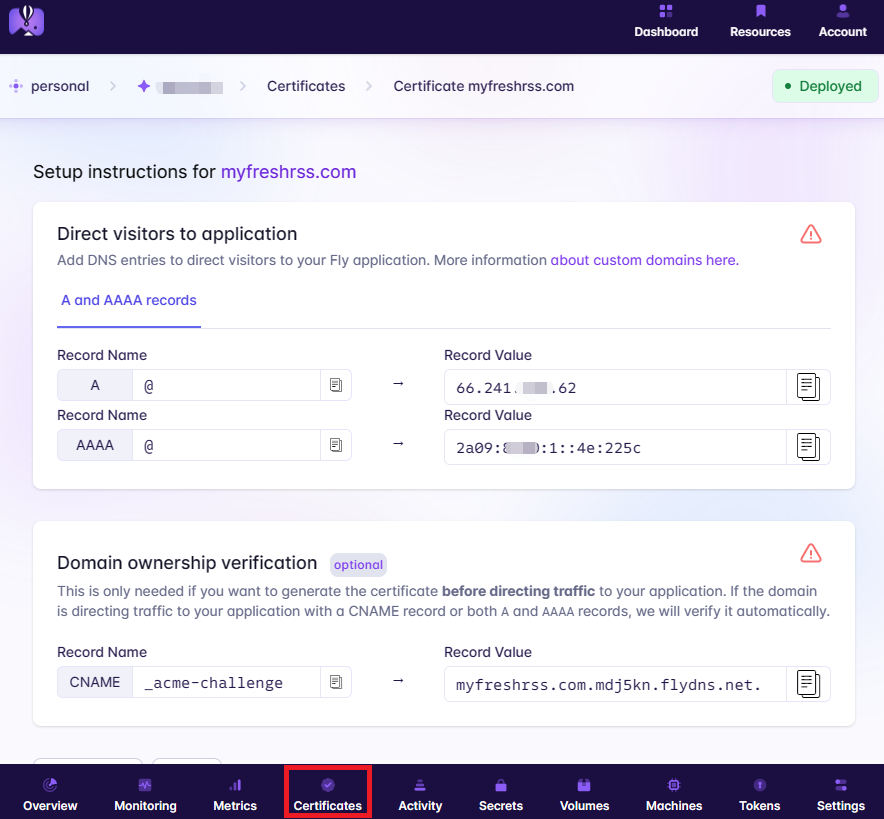
然后我们打开Cloudflare的网站控制面板,点击进入myfreshrss.com管理界面,点击SSL/TLS选项, 把SSL/TLS encryption mode选项设置为Full,这个设置非常重要,否则我们打不开网站。因为Fly.io端提供了SSL证书(免费额度10张SSL证书)。
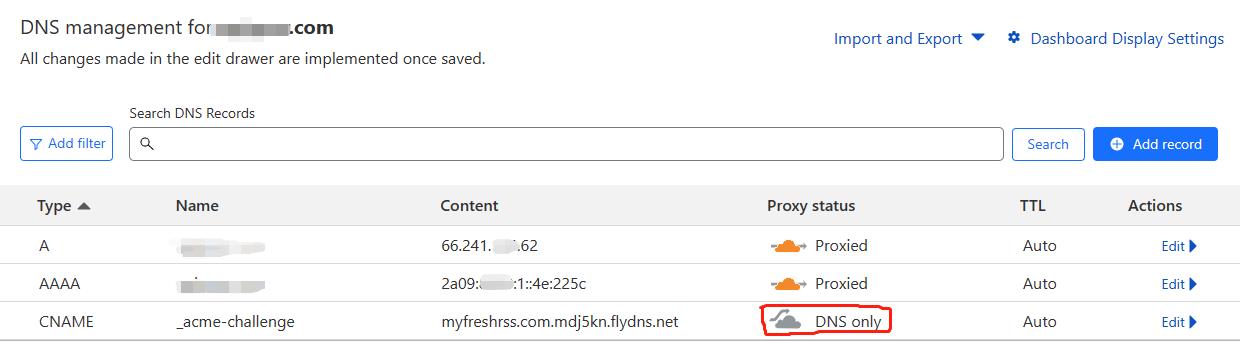
在myfreshrss.com管理界面,点击进入DNS选项,根据Fly.io提供的提示,添加三条DNS记录,分别是A记录、AAAA记录和CNAME记录。需要注意的是,CNAME记录的Proxy status需要设置为DNS only。如下图所示:
至此,我们就完成了自定义域名的绑定。现在去Fly.io的应用管理页面,找到FreshRSS应用,进入后点击Certificates选项,可以看到myfreshrss.com的证书已经验证添加成功。我们现在可以在浏览器中访问https://myfreshrss.com来访问你的FreshRSS应用了。
RSSHub的自定义域名绑定操作与上面类似,这里就不再重复了。
总结
本文介绍了如何使用Fly.io部署FreshRSS和RSSHub,相比较于在云服务器上部署,Fly.io的部署方式简单的太多了,在条件允许的情况下,推荐大家优先使用Fly.io来部署RSS服务。RSS的介绍以及一些推荐的RSS订阅源,依然可以参考我之前的文章。
祝您食用愉快~