Introduction
ANN (Approximate Nearest Neighbor) Vector Search is a technique that has become increasingly popular in recent years for finding the nearest neighbors of a given vector in a high-dimensional space. It is commonly used in applications such as image and text search, recommendation systems, and anomaly detection. Rather than exhaustively searching through all vectors in the space, which can be computationally expensive in high dimensions, ANN vector search algorithms use approximations to identify the nearest neighbors. These algorithms aim to strike a balance between search accuracy and computational efficiency.
Vector indexing refers to the construction of a data index structure that is both time and space efficient, using a mathematical quantization model to index vectors. This allows us to quickly retrieve K vectors that are as close as possible to a given query vector in real-time. By building vector indexes, searching can be done more efficiently. Popular vector indexing algorithms for ANN include KD-tree, PQ/OPQ Vector Quantization, LSH (Locality-Sensitive Hashing), and HNSW (Hierarchical Navigable Small World).
There are several popular vector search libraries available for use in building ANN search systems. The most famous one is FAISS, FAISS (Facebook AI Similarity Search) is a widely-used open-source library. It supports a variety of distance metrics, including cosine and L2 distance, and has a range of index types for different use cases, but its ease of use is not very good. There are many out-of-the-box vector search libraries available, such as Milvus, Weaviate, Jina, and others. We will not go into too much detail about them, as they have similar functionality.
How does it look like?
In this blog, I will create a reverse image search system using Milvus vector database. Milvus provides an easy-to-use and highly scalable platform. It offers both CPU and GPU acceleration, and a range of index types, including IVFADC, IVFPQ, and HNSW, among others. Additionally, Milvus provides a RESTful API, SDKs for multiple programming languages, and integrates with popular tools such as PyTorch. With its ease of use and flexibility, so I choose it as the vector search engine for the system.

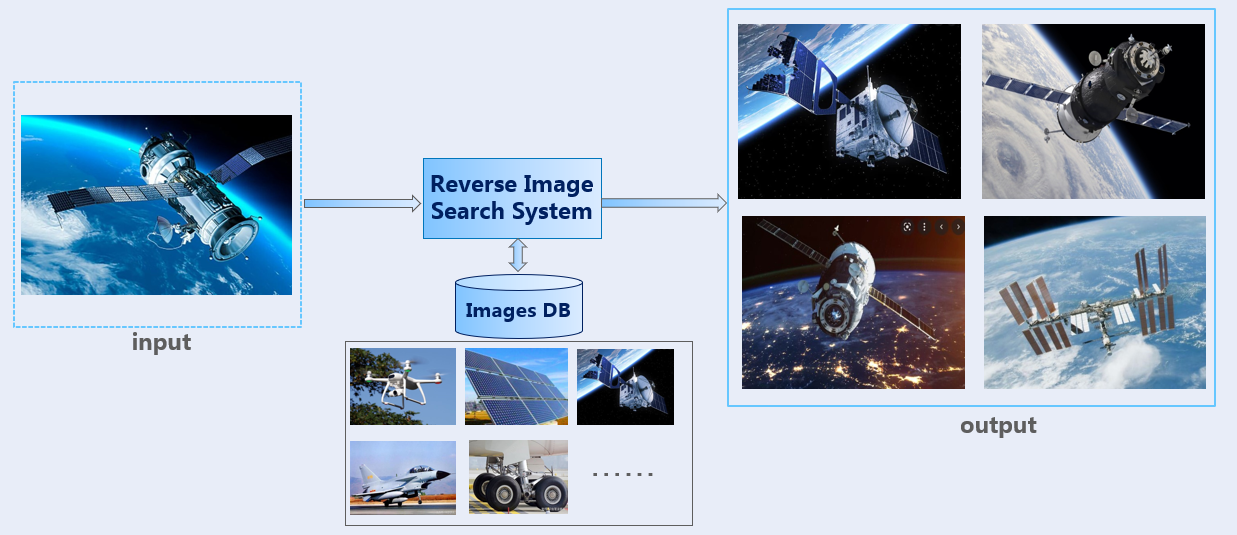
In the above animation, you can see a demonstration of how the reverse image search system can be used. To perform the search, you simply upload an input image to a web user interface. The system then uses this image to search a database of images and returns the most similar matches. You will see the detailed guide on how to build the backend and frontend of the system in the following section.
Training
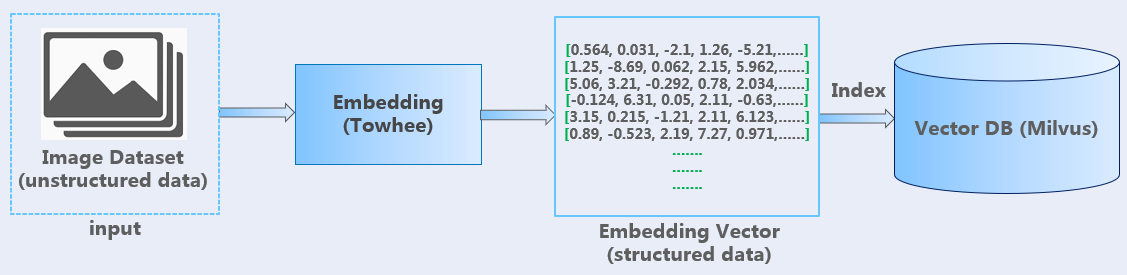
In the training process shown in the above figure, the Towhee framework is used to create an embedding pipeline, and a variety of machine learning models can be utilized to generate embedding vectors. These vectors are then stored in the Milvus vector database after being indexed.
Searching
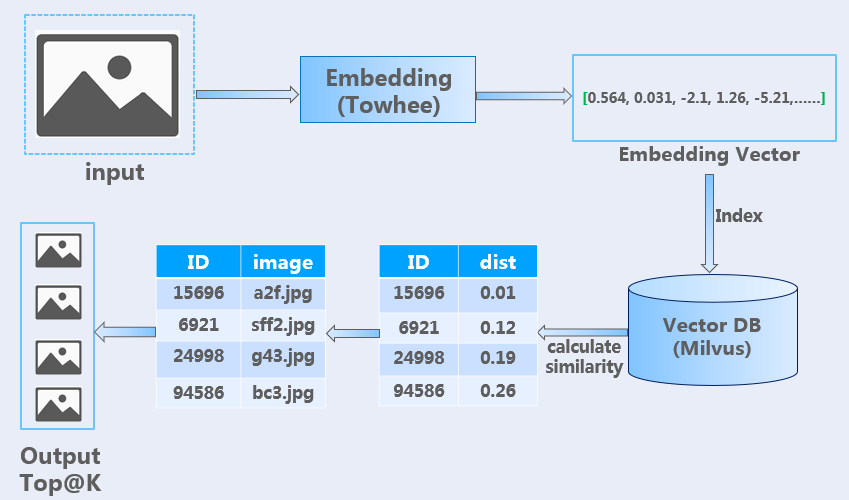
As illustrated in the above figure, the same embedding pipeline is utilized in the searching process. When using Milvus vector search engine, the system calculates the similarity between two vectors using the L2 distance metric, and returns the top K most similar images based on that similarity calculation.
Architecture
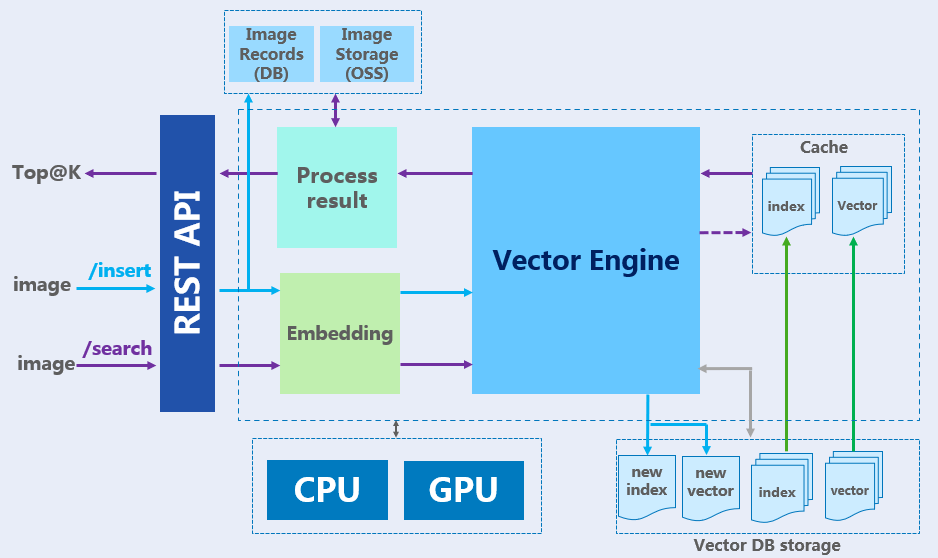
The above image shows the basic architecture of the system. Milvus is a powerful vector engine that is capable of handling large-scale data sets. Towhee is used to perform the vector embedding, and self-hosted MinIO serves as the storage system for images. In addition, the system provides REST APIs that can be called from the frontend to perform similarity search operations.
Steps
All code is available here.
1. Install Vector Database
Before installation, make sure you have installed Docker (version>=20.0) and Docker Compose.
# 1. Prepare the source code
$ git clone https://github.com/zcsd/Reverse_Image_Search
$ cd Reverse_Image_Search/doc

# 2. Prepare the docker-compose file
$ cp vector-engine-docker-compose.yml docker-compose.yml

# 3. Executing docker-compose and install the services
$ docker-compose up -d
Milvus v2.1.1, etcd, minio will be installed. Mivlus vector server exposes port 19530 for gRPC communication with clients.
2. Prepare the Image Dataset
For demo purpose, ImageNet-1K dataset (1,281,167 training images) is used to build images library to search. You can download ImageNet-1K dataset here, I recommend you select a mini-set from ImageNet-1K or prepare your own images, because full ImageNet-1K is a little big. Copy training images folder to folder /Reverse_Image_Search/image_search/data/imagenet/.
# structure your dataset folder like this
├── Reverse_Image_Search/
│   ├── image_search/
│   │   ├── data/
│   │   │   ├── upload/
│   │   │   └── imagenet/
│   │   │       └── train/
│   │   │           ├── n01440764/
│   │   │           │   ├── n01440764_18.JPEG
│   │   │           │   ├── n01440764_36.JPEG
│   │   │           │   └── ......
│   │   │           └── ......
│   │   └── ......
│   └── ......
│
3. Upload Images to MinIO Object Storage
I recommend you upload all training images to MinIO Object Storage, so that we can view real-time images results easily (access the image from an URL). You can skip this part if you don’t want to view images in search results.
# 1. prepare minio docker-compose file
$ cd Reverse_Image_Search/doc
$ cp minio-docker-compose.yml docker-compose.yml

# 2. Executing docker-compose and install MinIO
$ docker-compose up -d
Now you can access MinIO control panel from http://127.0.0.1:8001 (default username: user1, password: user1password).
Login to the MinIO control panel website, create a new Bucket with name “images”. After creating the new Bucket, change the Access Policy of the Bucket to “public”, so that we can access any file or image in this bucket from http://127.0.0.1:8000/images/XXXXXX.
Now we can upload images to MinIO, there are two ways: Manaully upload images from MinIO control panel (http://127.0.0.1:8001), we can select whole dataset folder to upload; Or you can use /Reverse_Image_Search/image_search/preprocess.py to upload images using MinIO API.
After uploading, you can view the image by accessing the URL: http://127.0.0.1:8000/images/n01440764/n01440764_18.JPEG (example only).
4. Run the Reverse Image Search Server
For easy setup and better performance, the application is suggested to run in Linux. The web server is built with Flask.
In Windows, Windows 10 SDK for Desktop C++ and Visual C++ Build tools are required to be installed before the following steps.
# 1. go to work folder
$ cd Reverse_Image_Search

# Python version >= 3.8
# 2. Install Python packages
$ pip3 install -r requirements.txt

# !!! change configuration in /Reverse_Image_Search/image_search/conf/config.ini

# 3. Preprocess the images
# this step will save all images to HDF5 file and upload images to MinIO bucket
$ python3 image_search/preprocess.py

# 4. Embedding images and insert vectors to database
# it may take half day if you use full imagenet-1K dataset.
$ python3 image_search/trainer.py

# Now the vector database should have the vectors collection and index.
# It's ready to start image search.

# 5. Start reverse image search web server
$ python3 image_search/app.py
Now port 5000 serves as the http request port for reverse image search. You can access http://127.0.0.1:5000/status/ to check the vector database status. Check app.py for more API Endpoint and how to use.
Here are API endports fot the web server:
# Vector server status:
http://127.0.0.1:5000/status/

# Reverse Image search:
http://127.0.0.1:5000/search/

# Insert new image to vector database:
http://127.0.0.1:5000/insert/

# Create new index for collection
http://127.0.0.1:5000/indexing/
5. Run the Frontend Website
You can run a demo webpage to test the reverse image search system. Click here to check out the code for frontend demo webpage.
Download the Reverse_Image_Search_Web code, dist folder will work as your webpage source folder, you can ignore functions/api and package.json in the main directory (I use them for Cloudflare Pages deployment, you have no need to do that).
For testing purpose, you also need to change the baseURL to http://127.0.0.1:5000/ in /dist/assets/js/helper.js line 223.
Now you can open the webpage (just double click index.html) to try the reverse image search!
Performance
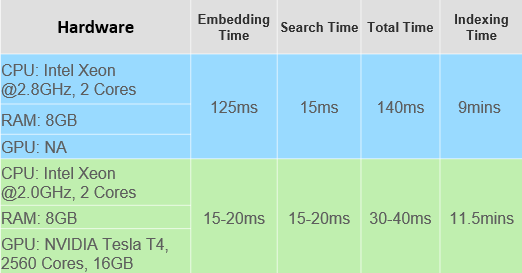
The dataset used in the performance testing consists of 210,000 images across 1000 different classes. The total cost time for a single search process is made up of two parts: the embedding time and the search time. The embedding time refers to the time required to encode the images as vectors that can be used for similarity search, while the search time is the time required to perform the vector similarity search.
Looking at the above table, search time is approximately 15ms for both hardware condition, which suggests that CPU is a more relevant factor for search performance. However, when it comes to embedding time (ResNet-50 Model is used in the testing), a better GPU can lead to much shorter times, although it does require setting up a CUDA environment to take advantage of this.
One thing to keep in mind is that creating a new index can be time-consuming, especially if you’re dealing with a large number of images. This means that the initial setup of your search system may take longer, but once the index is created, search times should be relatively fast.
Surely, a big RAM is necessary, all vectors need to be loaded into memory for fast access. If you have a dataset of one million images and you want to use the ResNet-50 model to extract features, each output vector will have 2048 dimensions, and will require 8192 bytes (8.192 KB) of memory. Therefore, to process the entire dataset, the machine will need to allocate a total of approximately 7.6 GB of memory.
Overall, it’s important to consider both CPU and GPU performance when building a similarity search system. While a good GPU can greatly improve embedding time, CPU performance is likely to have a greater impact on overall search performance. Additionally, it’s important to be prepared for the time required to create your index, or you can let system do it at late night when it’s not busy.