Introduction
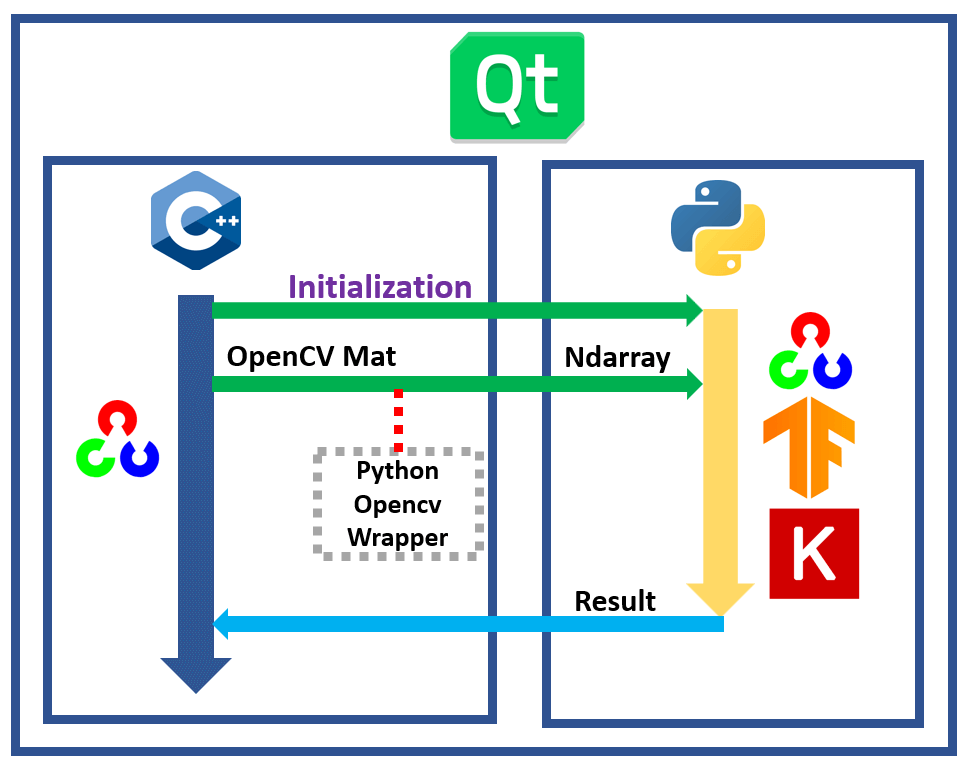
The above image shows the process flow that call a Python funtion from Qt C++ and pass OpenCV Mat image in C++ as python input, finally return a result.
As we all know, it’s very easy to use many machine learning related library in Python program. Although some machine learning librarys also provide C/C++ API, it’s not convenient enough in fast development. In this article, I will show you how to call a Python Function from Qt C++ code to do a image pridication task.
Environment
- Ubuntu 18.04
- Qt 5.12.0 LTS
- OpenCV-4.0.0 C/C++ or newer (Please refer to this post for installation)
- Python 3.6 in root environment
Preparation
For the OpenCV installation from native building, MUST set python related flag off when compiling, because we don’t want to use this vesion Python OpenCV (NOT compatible), we will install other version later.
-D BUILD_opencv_python2=OFF -D BUILD_opencv_python3=OFF
Installation
Now, install python3-numpy C/C++ library (not install Numpy for Python), so we can include their header file in code:
# it's different from "pip3 install numpy".  DON'T MIX
sudo apt-get install python3-numpy
Next, we will install Python OpenCV. For our case, we MUST use Python in root environment, do NOT use Python with virtual environment, such as Anaconda, virtualenv etc.
sudo apt install python3-pip
# Not all version works. this version is ok. You also can try other version
pip3 install opencv-python==3.1.0.4
# For usage on Python code
pip3 install imutils numpy tensorflow keras
Configuration
Add the following code into *.pro file in the Qt project:
# Python 3.6 native library in ubuntu 18.04
INCLUDEPATH += /usr/include/python3.6m
LIBS += -L/usr/local/lib/python3.6 -lpython3.6m

# OpenCV 4.x.x
INCLUDEPATH += /usr/local/include/opencv4
LIBS += -L/usr/local/lib -lopencv_core -lopencv_imgproc -lopencv_imgcodecs -lopencv_videoio -lopencv_highgui

# this line is to add python script to Qt project. "python/predication.py" is the script file relative path.
DISTFILES += \
    python/predication.py
Code Usage
Python-OpenCV-Wrapper
This wrapper is a converter between OpenCV C/C++ Mat data and Python-acceptable numpy array data, so we can easily pass OpenCV image argument from C++ to Python.
I apapted this wrapper code from OpenCV source code file opencv/modules/python/src2/cv2.cpp.
You can click here to check the wrapper class file and you can directly copy these two files into your project without modification.
For example, if you want to convert OpenCV Mat to Numpy Array data in C++, you just call:
#include "py_cv_wrapper/pycvconverter.h"
#include "numpy/ndarrayobject.h"

PyObject* pNDArray = nullptr;
pNDArray = pycvt::fromMatToNDArray(imgMat);
Call Python from Qt C++
Include the following header to the header file:
#include "py_cv_wrapper/pycvconverter.h"

// To handle SLOTs error
#pragma push_macro("slots")
#undef slots
#include "Python.h"
#pragma pop_macro("slots")

#include "numpy/ndarrayobject.h"

// declare the python objects
PyObject* pModule = nullptr;
PyObject* pFunc = nullptr;
PyObject* pParam = nullptr;
PyObject* pNDArray = nullptr;
PyObject* pResult = nullptr;
1. Initialize your Python function
You can initialize the Ptyhon script anytime before the code call the function.
void initPy{
    // Initilaize Python
    Py_Initialize();
    // set system path to find correct python script
    string chdir_cmd = string("sys.path.append(\'../python\')");
    const char* cstr_cmd = chdir_cmd.c_str();

    // use sys to locate the script
    PyRun_SimpleString("import sys");
    PyRun_SimpleString(cstr_cmd);

    // import module(predication.py), it's a python script file name
    pModule = PyImport_ImportModule("predication");

    if (!pModule){
        qDebug() << "get module failed!";
    }

    // get "main" function from the module, should match the function name in the Python script
    pFunc = PyObject_GetAttrString(pModule, "main");

    if (!pFunc){
        qDebug() << "get func failed!";
    }
}
2. Call the Python function
Now you can call the Python function anytime after initialization:
void callPyFunction(cv::Mat imageMat){
    pNDArray = pycvt::fromMatToNDArray(imageMat);
    // counld add more PyObj arguments before "NULL" indicator
    pResult = PyObject_CallFunctionObjArgs(pFunc, pNDArray, NULL);

    /* This method is to pass non-object para
    pParam = Py_BuildValue("(s)", "MSG from Qt");
    pResult = PyEval_CallObject(pFunc, pParam);
    */

    if(pResult){
        if(PyArg_Parse(pResult, "(sf)", &resLabel, &resConfidence))
        {
            // resLabel: the class predicated, resConfidence: confidence level of the predication
            qDebug() << resLabel << ":" << resConfidence;
        }
    }
}
3. Decrement your Python Object
When the program finish calling the Python function, you need to finalize them:
void closePy(){
    // Decrement the reference count for python object, prevent memory leak

    // PyObject must NOT be NULL. you may add if check.
    Py_DECREF(pModule);
    //Py_DECREF(pParam);
    Py_DECREF(pFunc);
    Py_DECREF(pNDArray);
    Py_DECREF(pResult);

    Py_Finalize();
}
You can click here to see how do I used them in my project.
Python Code
import cv2 # version = 3.1.0.4
import numpy as np
import tensorflow as tf
import keras
from keras import backend as K

# yes, this one is the "main" function called in above cpp file.
def main(nd_data):
    (label, confidence) = predication(nd_data)
    return (label, confidence)

def predication(nd_data):
    # process the nd_data
    # ML predication task using tf and keras
    # ......

    return (label, confidence)
You can click here to check the Python part.
Now, all the steps are done, you should be more clear. If you want to acclerate the machine learning predication speed using a NVIDIA graphics card, you can refer to this post on how to set up.