Introduction
This project’s objective was to create an office/home/lab surveillance system; IP cameras (accessible through RTSP) and USB webcams may be utilized as video stream sources; if motion is detected, a video clip will be stored to storage. Once a new video clip has been saved, the video analytics module will begin to read the video, perform face detection and identification, determine who is in the video, and send the information (name, timestamp, video path) to the SQL Database server. The system has been operational 24x7 at my lab (consisting of about 20 workers) for a few months, and its accuracy is truly remarkable.
Function of face detection and recognition depend on Dlib library, HoG (Histogram of Oriented Gradients) feature descriptor is used in face detection because it’s fast and accurate; Dlib returns a 128-dimension face encoding for each face detected, on top of this 128D feature vector, I trained a KNN/SVM classifier to recognize the person from my face database, the accuracy is very nice if the face quality is good. For the detailed theory, you can check the original FaceNet paper. The face recognition model in DLib is a ResNet network with 27 Conv layers, was trained from scratch on a dataset of about 3 million faces, achive 99.38% accuracy in LFW.
Basic Function
- Live video streaming (read from RTSP or usb webcam)
- Motion detection and save the corresponding video clip
- Face detection based on HoG and CNN provided by Dlib or Face Recognition
- Face Recognition based on ResNet provided by DLib
- Automatic face images collection for training
- KNN/SVM face classifier training on top of 128D face embedding
- Update the MySQL Server with event (NAME, TIMESTAMP, VIDEO_PATH)
Installation
Requirements
- RTSP stream or USB Webcam
- Python 3.5+
- Ubuntu 16.04/18.04
Steps
1. Install Dlib with Python3 bindings
Install library dependancy (Passed in Ubuntu 16.04/18.04):
$ sudo apt update

$ sudo apt install python3-pip build-essential cmake gfortran git wget curl graphicsmagick libgraphicsmagick1-dev libavcodec-dev libavformat-dev libgtk2.0-dev libjpeg-dev liblapack-dev libswscale-dev pkg-config python3-dev python3-numpy software-properties-common zip

# change to libatlas-base-dev for Ubuntu 18.04
$ sudo apt install libatlas-dev

$ sudo apt clean && rm -rf /tmp/* /var/tmp/*

$ pip3 install setuptools
Download the code from github:
$ mkdir dlib
$ cd dlib
$ git clone https://github.com/davisking/dlib.git
$ cd dlib
Build the main Dlib library:
$ mkdir build
$ cd build
$ cmake .. -DDLIB_USE_CUDA=0 -DUSE_AVX_INSTRUCTIONS=1; cmake --build .
Build and install the Python3 extensions (NOT use CUDA):
$ cd ..
$ python3 setup.py install --yes USE_AVX_INSTRUCTIONS --no DLIB_USE_CUDA
At this point, you should be able to run python3 and type import dlib successfully.
2. Install face_recognition library
The face_recognition is a simple facial recognition api for Python, it depends on Dlib.
$ pip3 install face_recognition
3. Install necessary Python libary to import
$ pip3 install opencv-python==3.4.2.17 #3.4.1 has bugs
$ pip3 install pymysql
$ pip3 install scipy
$ pip3 install imutils
$ pip3 install scikit-learn==0.19.2
$ pip3 install numpy
$ sudo apt install python3-tk
$ sudo apt install ffmpeg
$ pip3 install matplotlib
$ pip3 install mlxtend
$ pip3 install pyinotify
How to use?
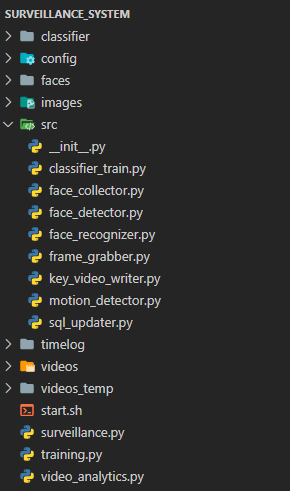
Project Code Structure
You can click here to get the full code, it has detailed explanation.
Directory structure for face database
Firstly, we need to put face images into SurveillanceSystem/faces/train folder for next setp training, each person has one folder, name the folder name as the person name. For the number of images for each person, I recommend at least 15 images for each person. You also can put test face images in SurveillanceSystem/faces/test if you want to get the training accuracy.
    <SurveillanceSystem/faces/train>/
    ├── <person1>/
    │   ├── <somename1>.jpg
    │   ├── <somename2>.jpg
    │   ├── ...
    ├── <person2>/
    │   ├── <somename1>.jpg
    │   └── <somename2>.jpg
    └── ...
Train face classifier
Train a new classifier when face images databse changed:
$ python3 training.py
After training, remember to copy the trained classifer (in SurveillanceSystem/classifier) to production server folder.
Normal Usage (surveillance and face recognition)
# you need to "chmod +x start.sh" for first time using
$ ./start.sh
If you want to only use basic surveillance without face recognition:
$ python3 surveillance.py
There are GUI mode and NO-GUI mode, you can check the code for setting. Press q for quit program in GUI mode.
Note:
- You need to change some path variable and image ROI area for new setup PC and environemnt before using, check the detail in code comment.
- You need to turn
GUI_SHOWflag to False if you want to run in server OS (NO-GUI).- Processed videos are saved in
SurveillanceSystem/videosfolder,SurveillanceSystem/videos_tempis just for temporarily using.
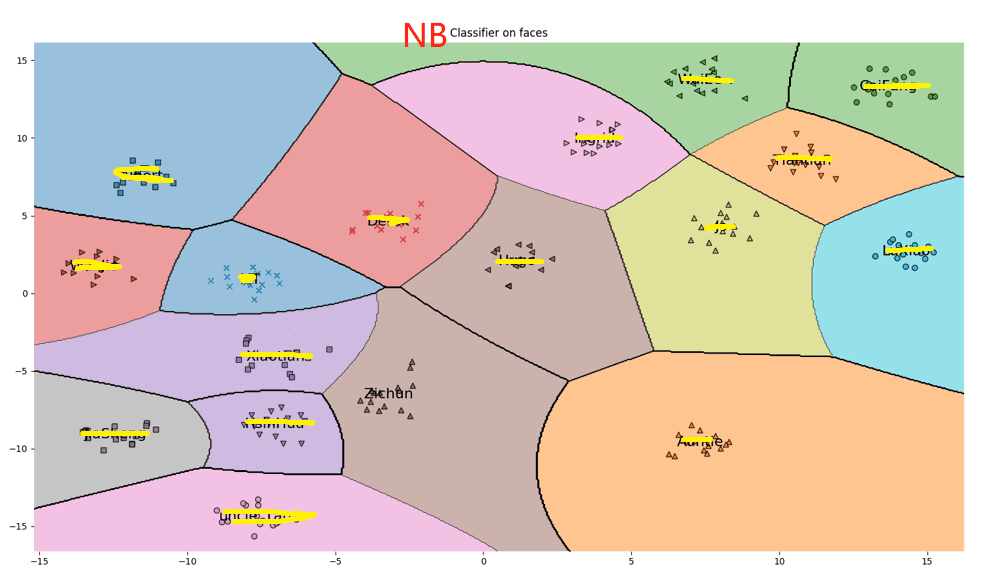
About the classifer
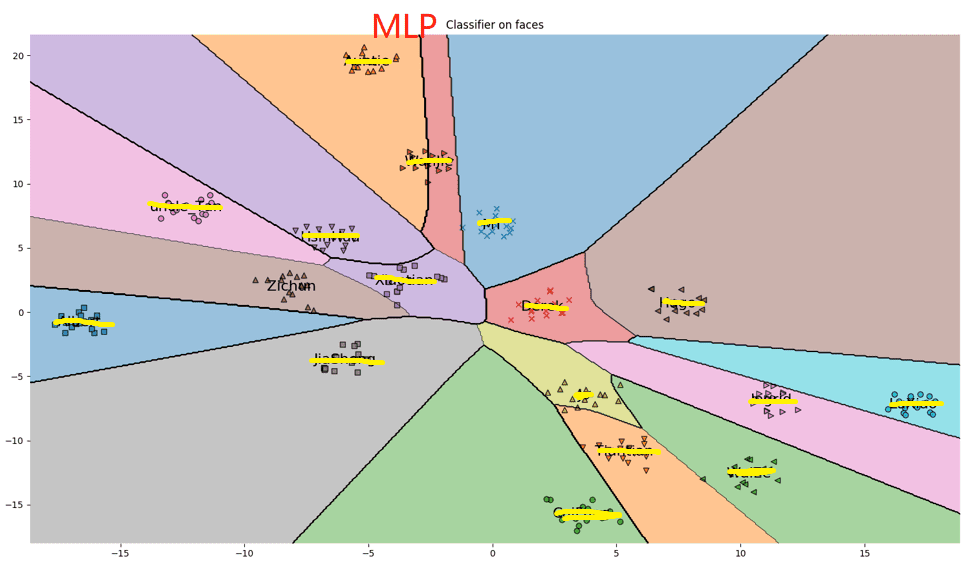
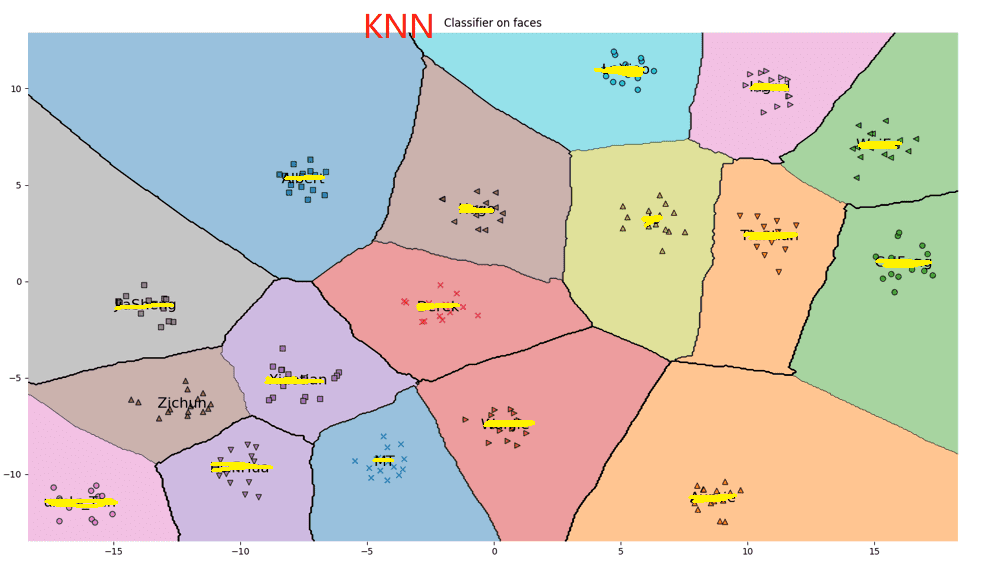
I trained the face classifier using a few algorithms. According to the observation in practice, the KNN classifier works very well. The following images shows the trained classifier, you also can see that KNN look better than others.
- KNN (k-nearest neighbors)
- Linear SVM (support vector machines)
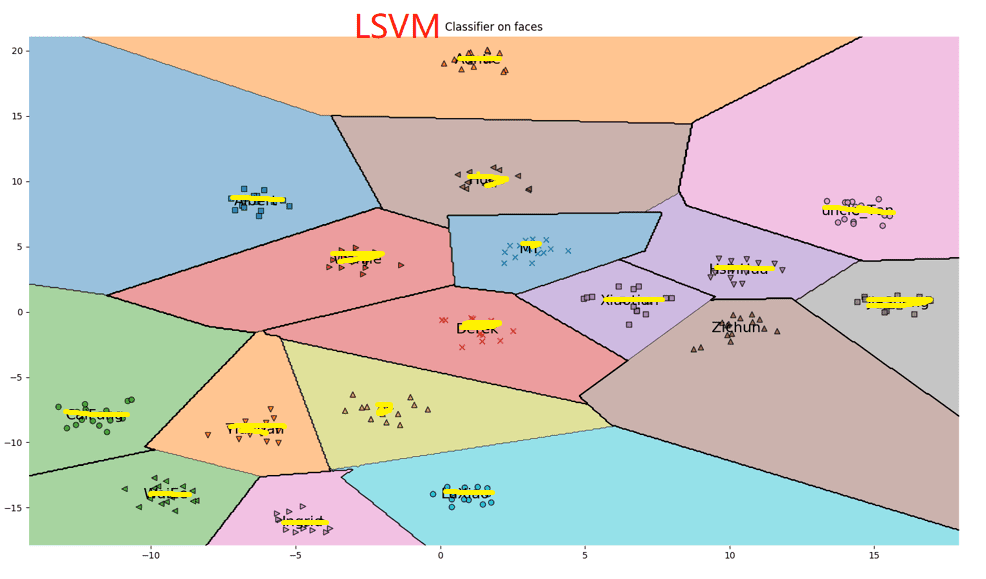
- Poly SVM
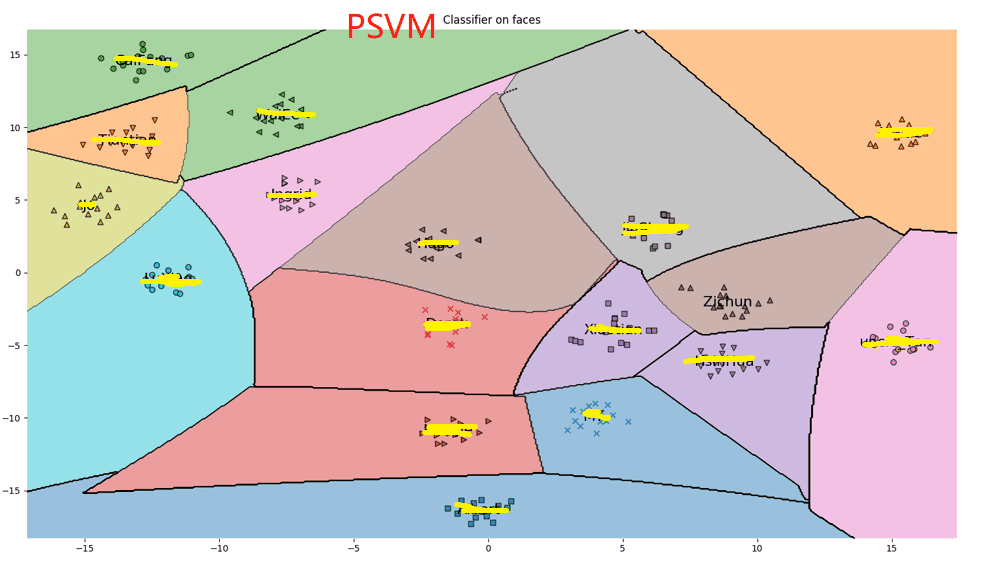
- Naive Bayes
- Multi-layer Perceptron